
Bolded Summary: Discover 15 Christmas nail ideas you can DIY in minutes! This curated roundup from top nail experts and beauty artists shows easy, festive designs perfect for beginners or last-minute holiday fun. Quick, stylish, and budget-friendly, these nails make your holidays sparkle effortlessly.
The holiday season is the perfect time to get creative with your nails. If you love festive fun but don’t have hours to spend at a salon, you’re in the right place. We’ve gathered 15 Christmas nail ideas you can DIY in minutes, curated from top nail artists and beauty websites. From glittery snowflakes to classic red-and-green designs, these looks are easy, stylish, and perfect for beginners.
Whether you want something simple or a little more dazzling, this guide makes it easy to achieve holiday-ready nails at home. Get ready to impress friends and family with gorgeous nails, all without breaking the bank or spending hours on each hand
Why This Style/Trend/Design?
Christmas nail art is one of the most exciting trends each holiday season. These designs let you show off your creativity while keeping your look festive and fun. This year, nail trends 2025 focus on easy DIY styles, glitter accents, and playful patterns that anyone can recreate at home. DIY holiday nails save time and money, and they allow you to experiment with colors, textures, and designs that match your personal style. Whether you love minimalist looks or bold, sparkly nails, these ideas make it simple to celebrate the season in style. Quick, cute, and Instagram-worthy, these Christmas nail ideas are perfect for beginners and nail enthusiasts alike.
Christmas Nail Ideas You Can DIY in Minutes
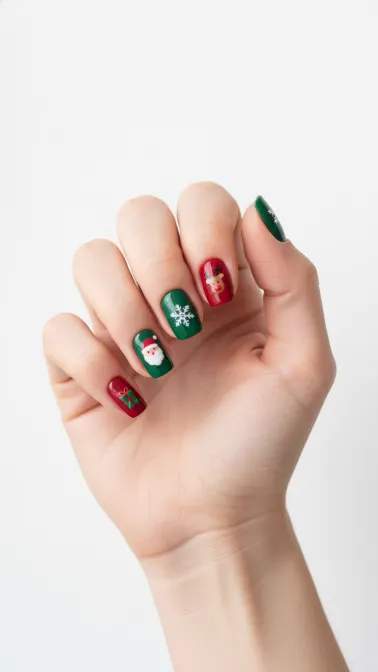
💅 1. Classic Red & Green Christmas Nails
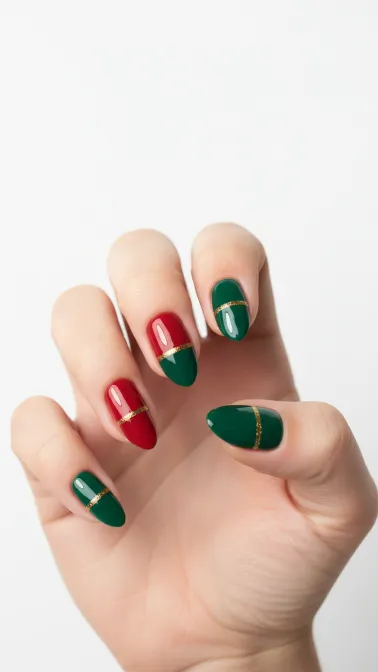
Bring holiday cheer to your fingertips with this timeless red and green design. Perfect for beginners, these festive colors capture the essence of Christmas and look stunning on any occasion. Quick to do, stylish, and cheerful, this look is ideal for last-minute holiday fun.
Why You’ll Love This Look:
- Timeless Christmas color combo everyone loves
- Easy and beginner-friendly
- Works for parties, family gatherings, or casual wear
- Pairs well with any outfit
How to Get This Look:
- Prep nails by cleaning, shaping, and applying a base coat
- Paint alternating nails red and green
- Add a thin gold stripe or dot accents for extra sparkle
- Let nails dry completely
- Apply a glossy top coat to seal and protect the design
- Optional: Use a quick-dry spray for faster results
Best Nail Shape: Almond, Square
Products You May Need:
- Red nail polish
- Green nail polish
- Gold striping tape or dotting tool
- Base and top coat
💅 2. Glitter Snowflake Nails
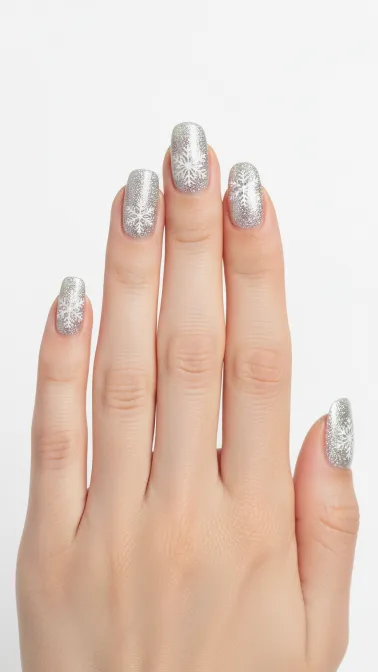
Sparkle all season with delicate snowflakes over a glittery base. This festive look adds a winter wonderland touch to your nails and is perfect for holiday parties. Easy to customize with your favorite glitter shades.
Why You’ll Love This Look:
- Shimmery and festive for winter
- Great for holiday parties and events
- Looks intricate but easy to DIY
- Pairs with cozy winter outfits
How to Get This Look:
- Prep nails with base coat
- Apply a glitter polish of your choice
- Use a white nail art pen or brush to draw small snowflakes
- Let design dry completely
- Seal with a top coat for shine and durability
- Optional: Add tiny rhinestones at the center of snowflakes
Best Nail Shape: Coffin, Round
Products You May Need:
- Glitter nail polish
- White nail art pen or thin brush
- Rhinestones (optional)
- Base and top coat
💅 3. Candy Cane Stripes
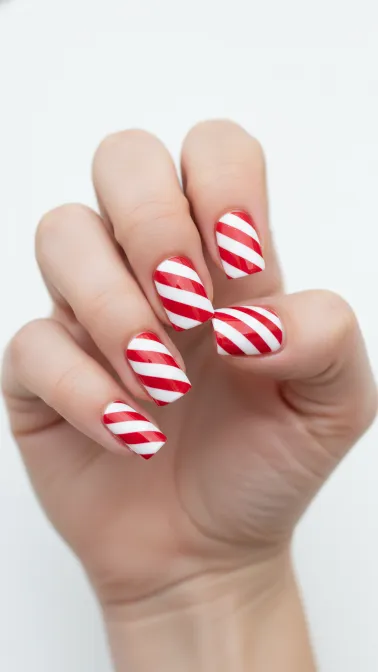
Sweeten your nails with playful red-and-white stripes inspired by candy canes. Fun, festive, and super easy to recreate in minutes. Perfect for beginners looking for a classic holiday vibe.
Why You’ll Love This Look:
- Festive and playful for Christmas
- Quick to achieve at home
- Great for beginners
- Pairs well with red or white outfits
How to Get This Look:
- Prep nails and apply a base coat
- Paint nails white as the base
- Use a thin brush or striping tape to add red diagonal stripes
- Allow stripes to dry fully
- Apply a top coat for a polished finish
- Optional: Add glitter to stripes for extra sparkle
Best Nail Shape: Square, Almond
Products You May Need:
- White nail polish
- Red nail polish
- Striping brush or tape
- Base and top coat
💅 4. Minimalist Christmas Tree Tips
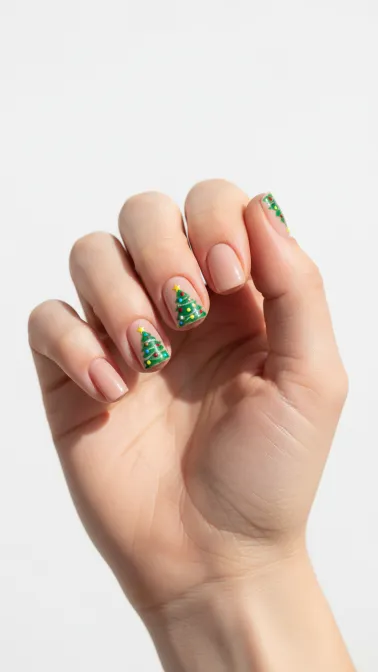
Subtle yet stylish, this design features small Christmas trees at the tips of your nails. Perfect for office-friendly holiday nails or a chic minimalist look.
Why You’ll Love This Look:
- Minimalist and trendy
- Works for professional or casual settings
- Quick and easy for beginners
- Stylish seasonal accent
How to Get This Look:
- Prep nails and apply a nude or light base coat
- Use a green polish to paint small triangle trees at the tips
- Add tiny dots for ornaments using a contrasting color
- Let dry completely
- Seal with a top coat
- Optional: Add a gold star at the top of each tree
Best Nail Shape: Oval, Almond
Products You May Need:
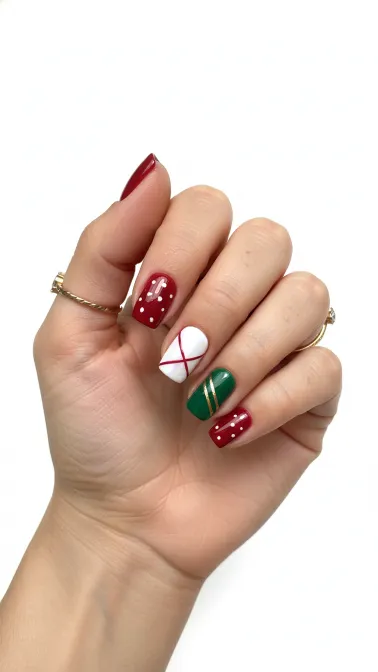
💅 5. Festive Polka Dot Nails
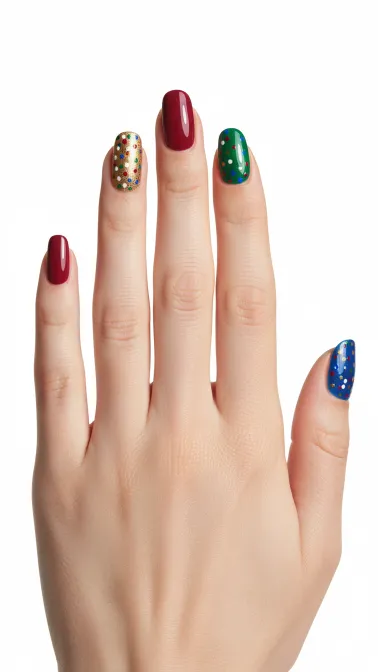
Cheerful and fun, this design uses colorful polka dots to spread holiday joy. Easy, beginner-friendly, and perfect for quick DIY sessions.
Why You’ll Love This Look:
- Fun and playful for all ages
- Quick to do in minutes
- Customizable with favorite holiday colors
- Perfect for casual holiday gatherings
How to Get This Look:
- Prep nails and apply a base coat
- Paint nails a solid holiday color
- Use a dotting tool to create polka dots with contrasting colors
- Let nails dry completely
- Apply a glossy top coat
- Optional: Add a few glitter dots for sparkle
Best Nail Shape: Round, Square
Products You May Need:
- Base color nail polish
- Contrasting polish for dots
- Dotting tool
- Base and top coat
💅 6. Santa Hat Accent Nail
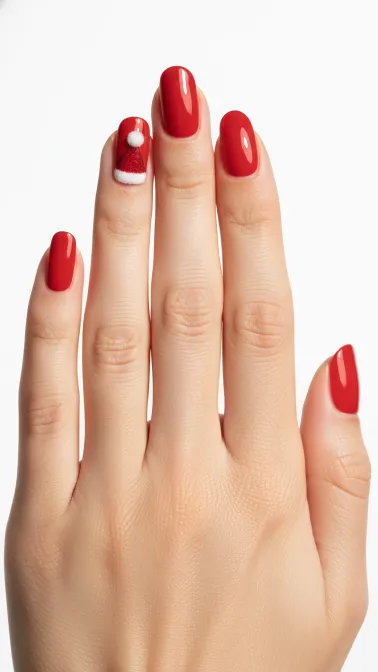
Celebrate Christmas with a cute Santa hat on an accent nail while keeping other nails simple. Fun, festive, and beginner-friendly.
Why You’ll Love This Look:
- Adds a playful festive touch
- Works as a subtle accent or full manicure
- Quick DIY design
- Great for holiday photos
How to Get This Look:
- Prep nails and apply a base coat
- Paint all nails a neutral or red color
- On one nail, paint a small red triangle for the Santa hat
- Add a white tip and dot for the hat’s pom-pom
- Let dry completely
- Seal with top coat
Best Nail Shape: Almond, Round
Products You May Need:
- Red and white nail polish
- Thin nail brush
- Dotting tool
- Base and top coat
💅 7. Snowman Nail Art
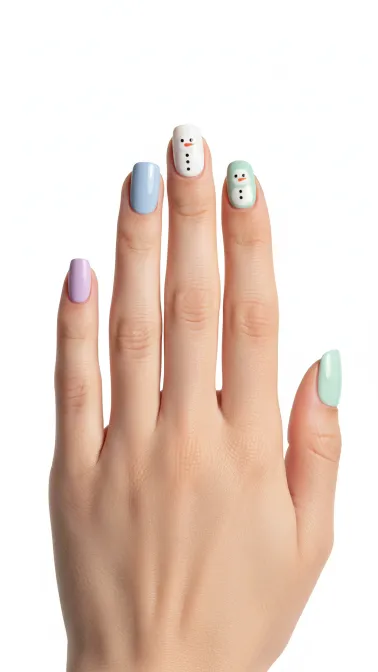
Bring winter cheer with tiny snowmen on your nails. Cute, festive, and ideal for holiday lovers of all skill levels.
Why You’ll Love This Look:
- Adorable winter-themed design
- Perfect for kids or beginners
- Fun conversation starter
- Easy to customize with colors and accessories
How to Get This Look:
- Prep nails and apply a base coat
- Paint nails a light or pastel color
- Use a dotting tool to create three stacked white circles for snowmen
- Add black dots for eyes and buttons, orange for the nose
- Let dry completely
- Seal with a top coat
Best Nail Shape: Round, Oval
Products You May Need:
- White, black, and orange polish
- Dotting tool
- Thin brush
- Base and top coat
💅 8. Gold & Silver Sparkle Nails
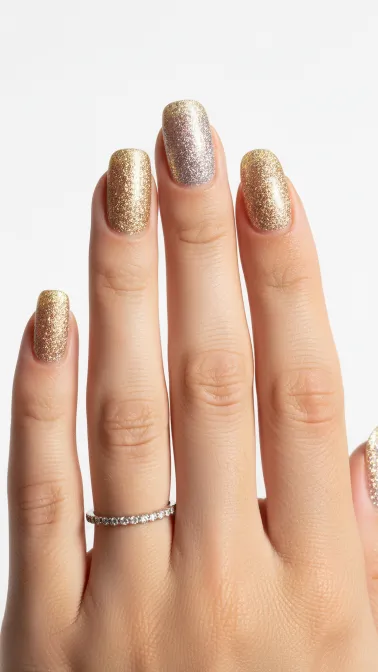
Shimmer and shine with a glittery metallic manicure. Perfect for glamorous holiday parties or New Year’s Eve celebrations.
Why You’ll Love This Look:
- Elegant and festive sparkle
- Quick and easy to apply
- Works for formal or casual events
- Instant glam without complicated steps
How to Get This Look:
- Prep nails and apply a base coat
- Apply gold or silver glitter polish
- Use a sponge to dab on extra glitter for intensity
- Let nails dry
- Seal with a glossy top coat
- Optional: Add tiny star or dot accents
Best Nail Shape: Coffin, Square
Products You May Need:
- Gold and silver glitter polish
- Sponge (for glitter application)
- Base and top coat
💅 9. Reindeer Nail Design
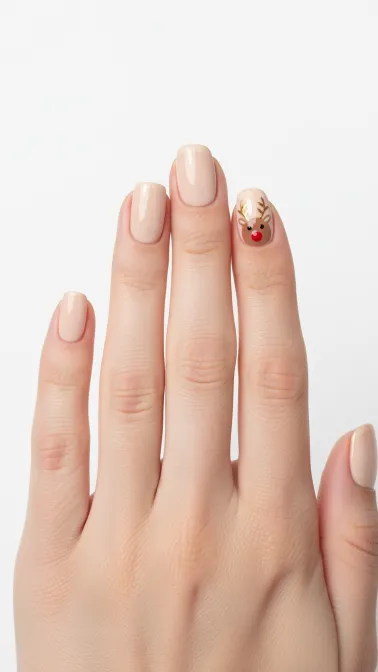
Bring holiday fun to your nails with a cute reindeer accent. Adorable, festive, and perfect for beginners who love themed nail art.
Why You’ll Love This Look:
- Cute and playful holiday design
- Great for kids or themed parties
- Easy to recreate with simple tools
- Adds festive charm to your look
How to Get This Look:
- Prep nails and apply a neutral base coat
- Paint accent nails with brown polish for the reindeer
- Use a dotting tool for eyes and a red dot for the nose
- Add small antlers with a thin brush
- Let dry completely
- Seal with top coat
Best Nail Shape: Round, Almond
Products You May Need:
- Brown, black, red polish
- Dotting tool and thin brush
- Base and top coat
💅 10. Plaid Christmas Nails
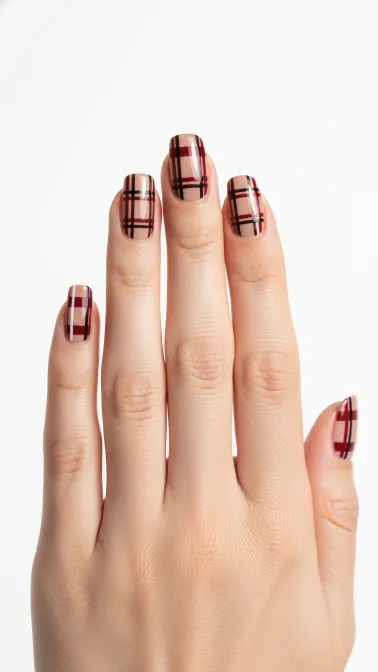
Stylish and trendy, plaid nails give a cozy holiday vibe. Great for those who love patterns but want a quick DIY look.
Why You’ll Love This Look:
- Chic and festive winter design
- Perfect for casual or cozy outfits
- Beginner-friendly with striping tools
- Works well for parties or family photos
How to Get This Look:
- Prep nails and apply a neutral or red base coat
- Use thin striping brushes to draw vertical and horizontal lines
- Alternate colors for a classic plaid effect
- Let nails dry
- Seal with a top coat
- Optional: Add a hint of glitter along some lines
Best Nail Shape: Square, Almond
Products You May Need:
- Base nail polish (neutral or red)
- Striping brushes or nail tape
- Contrasting polish colors
- Base and top coat
💅 11. Cozy Sweater Pattern Nails
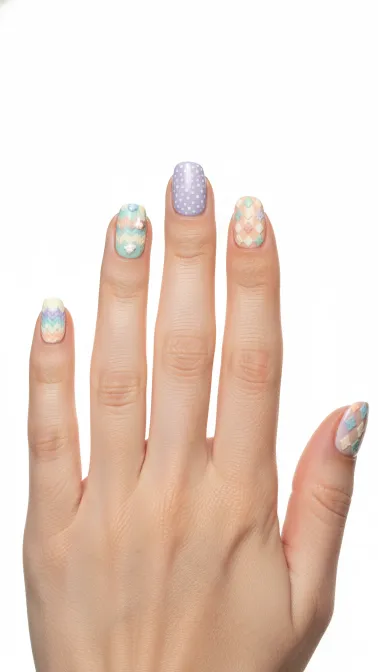
Bring the warmth of winter to your nails with cozy sweater-inspired patterns. This cute design is perfect for casual holiday days and adds a fun, textured look to your manicure.
Why You’ll Love This Look:
- Trendy winter nail design
- Cozy and festive vibe
- Perfect for casual or holiday gatherings
- Great for beginners with simple patterns
How to Get This Look:
- Prep nails and apply a base coat
- Paint nails a neutral or soft color
- Use a thin brush to draw horizontal or zigzag lines for the sweater effect
- Add small dots or patterns to mimic knit details
- Let nails dry completely
- Seal with a top coat
Best Nail Shape: Round, Oval
Products You May Need:
- Neutral base polish
- Thin nail art brush
- White or contrasting polish
- Base and top coat
💅 12. Holly & Berry Nail Art
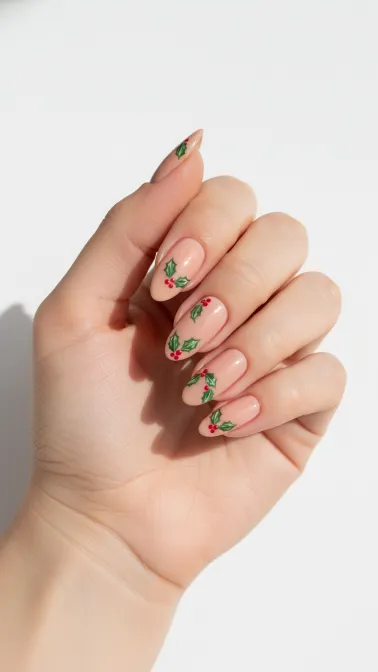
Festive and bright, this design features green holly leaves with red berries. Perfect for holiday parties or adding a seasonal touch to any outfit.
Why You’ll Love This Look:
- Classic Christmas motif
- Quick DIY-friendly design
- Great for accent nails or full manicure
- Perfect for festive gatherings
How to Get This Look:
- Prep nails and apply a base coat
- Paint nails a soft green or nude base
- Use a thin brush to paint small green holly leaves
- Add red dots for berries
- Let nails dry completely
- Apply top coat to seal and shine
Best Nail Shape: Almond, Oval
Products You May Need:
- Green and red nail polish
- Thin nail art brush
- Base and top coat
💅 13. Glitter Ombre Winter Nails
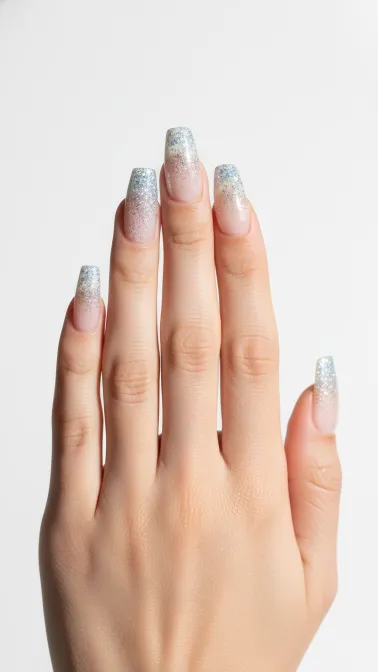
Add sparkle to your nails with a glitter ombre effect. This dreamy, festive design is perfect for holiday parties and New Year’s celebrations.
Why You’ll Love This Look:
- Glamorous and eye-catching
- Perfect for parties and special occasions
- Easy to customize with favorite glitter colors
- Works for both short and long nails
How to Get This Look:
- Prep nails and apply a base coat
- Paint nails a solid winter color (white, silver, or blue)
- Use a sponge to dab glitter polish from the tip downward for an ombre effect
- Blend until smooth and let dry
- Apply a top coat for shine and longevity
- Optional: Add small snowflake decals for extra charm
Best Nail Shape: Coffin, Almond
Products You May Need:
- Winter-colored nail polish
- Glitter polish
- Makeup sponge for ombre
- Base and top coat
💅 14. DIY Christmas Nail Stickers
Fast and fun, nail stickers make holiday designs easy for beginners. Perfect for last-minute manicures with stunning results.
Why You’ll Love This Look:
- Quick and beginner-friendly
- Minimal effort, maximum style
- Works for all nail lengths
- Fun for holiday parties or casual wear
How to Get This Look:
- Prep nails and apply a base coat
- Paint nails a solid holiday color
- Apply Christmas-themed nail stickers carefully
- Press gently to secure and smooth out bubbles
- Seal with a top coat
- Optional: Add glitter or accent nail polish for extra sparkle
Best Nail Shape: Round, Square
Products You May Need:
- Base nail polish
- Nail stickers (Christmas themed)
- Tweezers for application
- Base and top coat
💅 15. Last-Minute Holiday Nail Ideas
Perfect for when you’re short on time, these simple designs use basic colors, dots, and stripes to create festive nails in minutes.
Why You’ll Love This Look:
- Quick and easy for beginners
- Perfect for last-minute holiday prep
- Uses minimal tools and products
- Fun and festive without stress
How to Get This Look:
- Prep nails and apply a base coat
- Paint nails a solid festive color (red, green, or white)
- Add simple dots, stripes, or glitter as accents
- Let nails dry completely
- Seal with a top coat
- Optional: Mix and match patterns for variety
Best Nail Shape: Square, Almond
Products You May Need:
- Base color nail polish
- Dotting tool or thin brush
- Glitter polish (optional)
- Base and top coat
More Nail Tips & Details
Creating festive nails at home doesn’t have to be stressful. With a few simple tips, your Christmas nail designs can look professional and last longer. Always start with clean, dry nails and apply a base coat to protect them. Use thin layers of polish to avoid smudges and allow each layer to dry completely. For a professional touch, experiment with dotting tools, striping brushes, or nail stickers. Quick-dry sprays or fast-dry top coats can save time, especially if you’re doing multiple designs. Mix and match colors, patterns, and textures to make your nails unique. Whether you choose glitter, minimalist designs, or playful accents, these tips will help you create festive nails you’ll love showing off.
Tools & Products Needed
Having the right tools makes DIY Christmas nails easier and more enjoyable. Here’s a handy list of essentials:
- Base coat and top coat for nail protection and shine
- Red, green, white, and nude nail polish for holiday colors
- Glitter polish for sparkle and festive flair
- Thin nail brushes and dotting tools for detailed designs
- Nail stickers, striping tape, or decals for easy patterns
- Optional: rhinestones, sponges for ombre, and quick-dry spray
FAQ
Q1: How do I make Christmas nails last longer?
A: Always use a base coat, apply thin layers, let each layer dry, and finish with a top coat. Avoid hot water for a few hours after painting.
Q2: Can beginners do these designs at home?
A: Absolutely! Many of these designs use simple patterns, stickers, or dotting techniques that are beginner-friendly.
Q3: What are the best colors for Christmas nail designs?
A: Traditional red and green, metallic gold and silver, white, nude, or pastel winter shades work beautifully.
Q4: Are nail stickers worth using?
A: Yes! They save time, are easy to apply, and give professional-looking results with minimal effort.
Q5: How do I clean up mistakes easily?
A: Use a thin brush dipped in nail polish remover to correct smudges or edges without affecting the main design.
Conclusion
This holiday season, you don’t need a salon appointment to get stunning nails. With these 15 Christmas nail ideas, you can DIY stylish, festive looks in minutes. From glittery snowflakes to playful reindeer accents, there’s a design for every mood and skill level. Remember to prep your nails, use the right tools, and have fun experimenting with colors and patterns. Try a few designs, mix and match, and enjoy the festive sparkle right at your fingertips. Share your creations with friends, family, or on social media—it’s the perfect way to celebrate the holidays in style.