
Discover 15 Valentine Nails That Make DIY Feel Effortless! This curated roundup from top nail artists shows easy, trendy designs anyone can recreate at home. Perfect for beginners or nail lovers wanting fun, romantic looks this Valentine’s.
Valentine’s Day is the perfect excuse to get creative with your nails, and you don’t need to be a pro to pull off stunning designs. In this post, we’ve gathered 15 Valentine Nails That Make DIY Feel Effortless, curated from top nail experts, artists, and popular beauty sites. From soft pink shades to bold heart patterns, each idea is easy to follow at home. Whether you love glitter, 3D accents, or minimalist looks, these designs are perfect for beginners and nail enthusiasts alike. Get ready to impress with nails that feel polished, professional, and totally fun—all without leaving your house!
Why This Style/Trend/Design?
Valentine-themed nails are more popular than ever, and for good reason. They’re fun, romantic, and allow you to show your personal style with just a few tools. This year, DIY nail art is trending, making it easy for anyone to create beautiful designs at home. From playful hearts to soft pastel tones, these styles work for every mood and outfit. Using simple techniques, you can achieve looks that feel professional without spending hours in a salon. Whether you want a subtle, minimalist design or a bold, eye-catching manicure, these Valentine nails combine creativity and ease, making DIY effortless and enjoyable.
15 Valentine Nails That Make DIY Feel Effortless
💅 3D Pink Nails
Add depth and charm to your nails with soft 3D pink accents. This trendy design is perfect for anyone who loves romantic, standout nails without overcomplicating their DIY routine. Soft textures and playful shapes make these nails eye-catching for Valentine’s Day or date nights.
Why You’ll Love This Look
- Adds dimension and unique flair to simple pink nails
- Perfect for romantic occasions or a fun night out
- Stays on trend with 3D nail art popular in 2026
- Works for beginners willing to try small accents
How to Get This Look
- Prep nails by filing and buffing them smooth.
- Apply a base coat and let it dry.
- Paint nails with a soft pink polish and wait until fully dry.
- Use 3D nail gel to create small hearts, flowers, or dots on accent nails.
- Cure under a UV/LED lamp if using gel, or let air dry if using acrylic.
- Finish with a top coat to seal and protect the 3D accents.
Best Nail Shape
- Square
- Oval
Products You May Need
- Soft pink nail polish
- 3D gel or acrylic
- Dotting tool or small brush
- Base coat and top coat
💅 Pink And Red Heart Nails
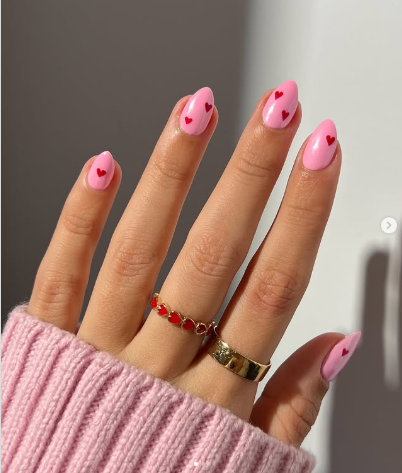
Classic Valentine’s colors meet easy DIY techniques in this sweet heart design. Pink and red hearts are playful, flirty, and perfect for beginners who want a festive look without complicated patterns.
Why You’ll Love This Look
- Combines two classic Valentine colors
- Fun and romantic for dates or parties
- Simple enough for beginners to DIY
- Can be adapted with glitter or matte finishes
How to Get This Look
- Prep nails and apply a base coat.
- Paint nails a soft pink or nude shade.
- Use a small brush or dotting tool to draw red hearts on each nail.
- Let the polish dry completely.
- Add glitter or tiny rhinestones if desired.
- Seal with a top coat for shine and durability.
Best Nail Shape
- Almond
- Oval
Products You May Need
- Pink and red nail polish
- Dotting tool or fine brush
- Glitter (optional)
- Base coat and top coat
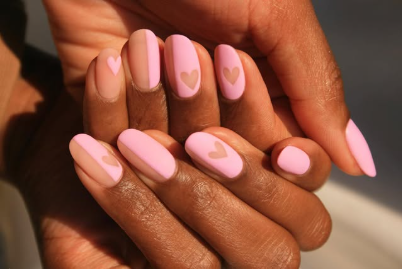
💅 Baby Pink Nails
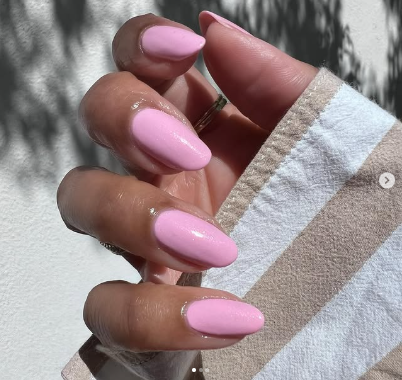
Soft, delicate, and timeless, baby pink nails are perfect for those who love understated elegance. This gentle color works well with minimalist designs or subtle accents for a fresh, DIY-friendly Valentine’s look.
Why You’ll Love This Look
- Minimalist yet chic for any outfit
- Easy to achieve at home
- Works for short or long nails
- Pairs well with subtle hearts or tiny glitter
How to Get This Look
- File and buff nails to your desired shape.
- Apply a base coat to protect natural nails.
- Paint nails with baby pink polish in two thin coats.
- Add a small heart or glitter accent if desired.
- Let nails dry completely.
- Finish with a glossy top coat.
Best Nail Shape
- Round
- Square
Products You May Need
- Baby pink nail polish
- Fine brush for accents
- Base coat and top coat
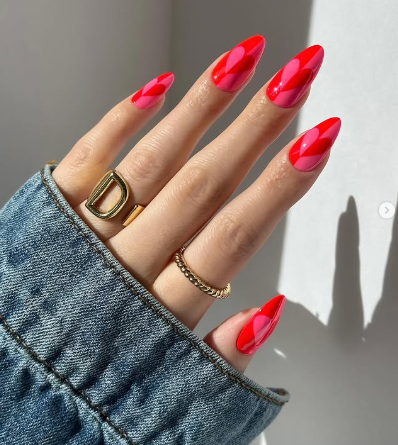
💅 Inverted Heart Nails
This modern twist on classic hearts flips the design upside down for a chic, trendy look. Perfect for those who want a playful yet stylish Valentine manicure that stands out.
Why You’ll Love This Look
- Unique spin on a traditional heart design
- Fun conversation starter
- Beginner-friendly with simple dotting tools
- Works well with bold or neutral colors
How to Get This Look
- Prep nails and apply a base coat.
- Paint nails a light or neutral shade.
- Use a dotting tool to draw inverted hearts in red or pink.
- Let the polish dry completely.
- Add a top coat to protect the design.
- Optional: add glitter inside the hearts for extra flair.
Best Nail Shape
- Almond
- Square
Products You May Need
- Red and pink nail polish
- Dotting tool
- Base coat and top coat
💅 Two-Toned Heart Nails
Mix two complementary shades for a cute, eye-catching heart manicure. This style adds creativity without complexity, making it perfect for DIY nail lovers.
Why You’ll Love This Look
- Combines two colors for a fun, dynamic effect
- Easy to adjust for your favorite shades
- Trendy and playful for Valentine’s Day
- Beginner-friendly with basic tools
How to Get This Look
- Prep nails with a base coat.
- Paint nails a light pink base.
- Use a small brush to add red accents or half-hearts.
- Allow polish to dry.
- Apply a top coat to seal the design.
- Optional: add tiny dots or glitter for extra charm.
Best Nail Shape
- Oval
- Square
Products You May Need
- Light pink and red polish
- Small detail brush
- Base coat and top coat
💅 Metallic French Nails

Give classic French tips a modern twist with metallic polish. Sleek and trendy, these nails are perfect for DIY mani lovers who want shine and sophistication.
Why You’ll Love This Look
- Chic and modern take on French manicure
- Adds glamour without being over the top
- Easy to do with striping tape or steady hand
- Works for both short and long nails
How to Get This Look
- Prep nails with base coat.
- Paint the entire nail a soft nude or pink.
- Use metallic polish for the tips.
- Optional: apply striping tape for crisp lines.
- Let dry completely.
- Finish with top coat for shine and durability.
Best Nail Shape
- Coffin
- Almond
Products You May Need
- Nude or soft pink polish
- Metallic polish
- Striping tape or fine brush
- Base coat and top coat
💅 Red Velvet Heart Nails
Luxurious and cozy, these nails mimic the soft texture of velvet. Perfect for romantic events or a standout DIY Valentine’s manicure.
Why You’ll Love This Look
- Soft, luxe texture adds dimension
- Bold and romantic style
- Fun for special occasions
- Easy to DIY with matte or flocking powder
How to Get This Look
- Prep nails and apply base coat.
- Paint nails with a deep red polish.
- Apply red velvet powder or matte top coat.
- Use a small brush to add heart shapes.
- Seal lightly with a top coat on non-velvet areas.
- Let nails dry completely before touching.
Best Nail Shape
- Oval
- Almond
Products You May Need
- Deep red polish
- Velvet powder or matte top coat
- Small brush for hearts
- Base coat and standard top coat
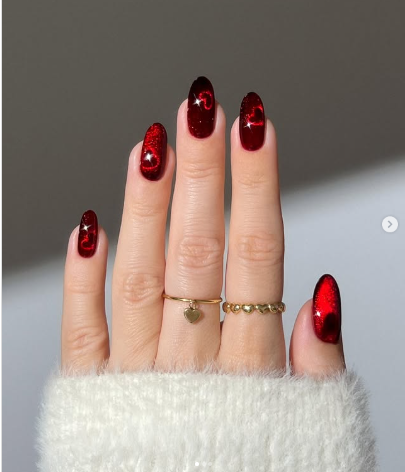
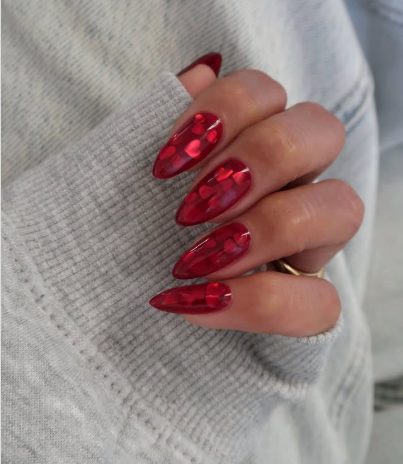
💅 Red Tortoise Nails

Chic and trendy, red tortoise nails offer a stylish alternative to plain Valentine shades. This design works for those who want bold DIY nails that feel polished.
Why You’ll Love This Look
- Unique pattern for standout nails
- Works with both short and long nails
- Perfect for trendy DIY mani lovers
- Easy to achieve with layering techniques
How to Get This Look
- Prep nails and apply base coat.
- Paint a light red or pink base.
- Add darker red and brown spots with a small brush.
- Blend slightly for a natural tortoise effect.
- Let dry completely.
- Apply top coat to seal the design.
Best Nail Shape
- Square
- Coffin
Products You May Need
- Red, brown, and pink polish
- Small detail brush
- Base coat and top coat
💅 Cloudy Heart Nails
Soft gradients and floating hearts make this dreamy design perfect for DIY Valentine nails. Light, airy, and beginner-friendly, it’s ideal for subtle romance.
Why You’ll Love This Look
- Soft and romantic gradient effect
- Perfect for Valentine’s Day or casual looks
- Easy for beginners with sponges or brushes
- Adds a whimsical touch to any outfit
How to Get This Look
- Prep nails and apply base coat.
- Use a makeup sponge to blend soft pink and white polish.
- Draw small heart shapes with a dotting tool.
- Let polish dry completely.
- Add glitter or tiny accents if desired.
- Seal with top coat for smooth finish.
Best Nail Shape
- Oval
- Round
Products You May Need
- Light pink and white polish
- Makeup sponge
- Dotting tool
- Base coat and top coat
💅 Heart Confetti Nails
Playful and festive, heart confetti nails are perfect for anyone who loves fun, easy-to-do Valentine designs. Sprinkle hearts for a cheerful, DIY-friendly look.
Why You’ll Love This Look
- Bright, playful, and romantic
- Quick and easy for beginners
- Works with glitter, stickers, or confetti
- Great for parties or casual dates
How to Get This Look
- Prep nails and apply base coat.
- Paint nails with a soft pink or nude polish.
- Apply heart confetti or stickers while polish is tacky.
- Press gently to secure confetti.
- Let dry completely.
- Seal with a generous layer of top coat.
Best Nail Shape
- Round
- Almond
Products You May Need
- Pink or nude polish
- Heart confetti or stickers
- Base coat and top coat
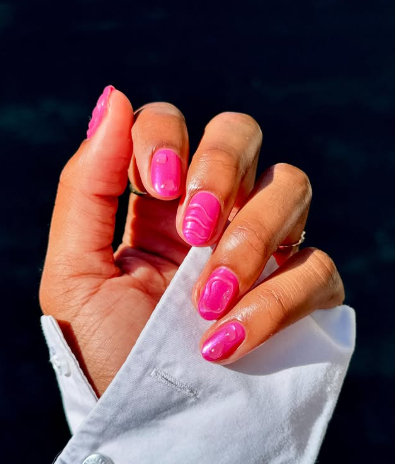
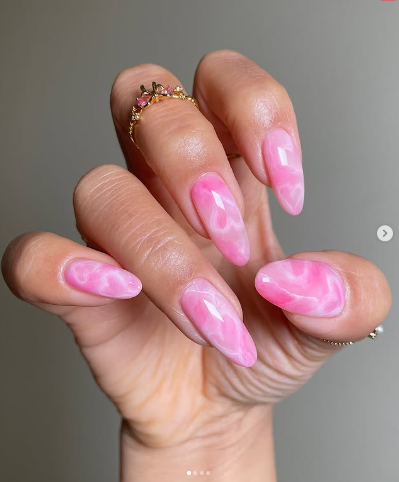
💅 Valentine’s Marble Nails
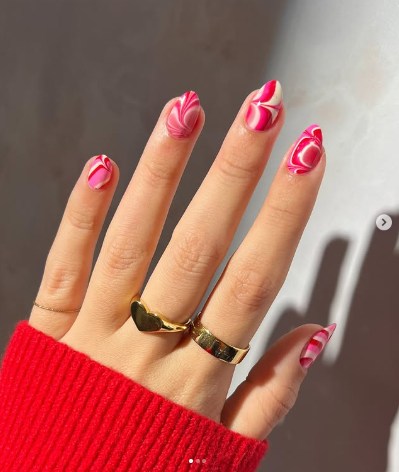
Elegant and eye-catching, Valentine’s marble nails mix soft pinks, reds, and whites for a chic DIY look. This design is perfect for anyone who loves trendy, artistic nails without complicated steps.
Why You’ll Love This Look
- Sophisticated, salon-worthy style
- Unique patterns on every nail
- Fun DIY project for beginners
- Perfect for Valentine’s Day or special occasions
How to Get This Look
- Prep nails and apply a base coat.
- Paint a white or light pink base on each nail.
- Drop small amounts of red and pink polish on the nail.
- Use a thin brush or toothpick to swirl colors for a marble effect.
- Let nails dry completely.
- Seal with top coat for shine and durability.
Best Nail Shape
- Almond
- Coffin
Products You May Need
- White, pink, and red polish
- Thin brush or toothpick
- Base coat and top coat
💅 Stained Glass Rose Nails
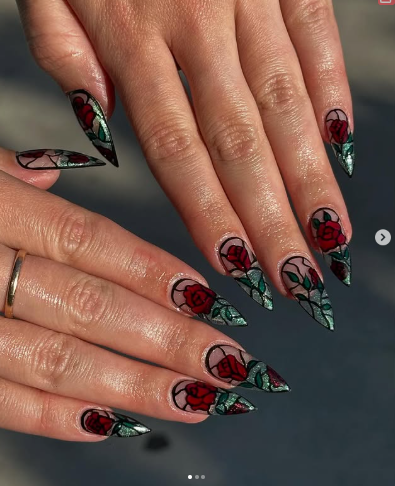
Artistic and romantic, stained glass rose nails give a hand-painted look without needing advanced skills. Perfect for DIY enthusiasts who want a floral statement manicure.
Why You’ll Love This Look
- Unique, artsy floral design
- Perfect for romantic or creative occasions
- Beginner-friendly with simple outlining
- Looks polished without a salon visit
How to Get This Look
- Prep nails and apply a base coat.
- Paint nails a neutral or light pink shade.
- Use a thin brush to draw rose petals in red or pink.
- Add black or gold lines to mimic stained glass.
- Let polish dry completely.
- Finish with a top coat for shine and protection.
Best Nail Shape
- Oval
- Almond
Products You May Need
- Neutral base polish
- Red/pink polish for petals
- Thin detailing brush
- Top coat
💅 Mismatched 3D Nails
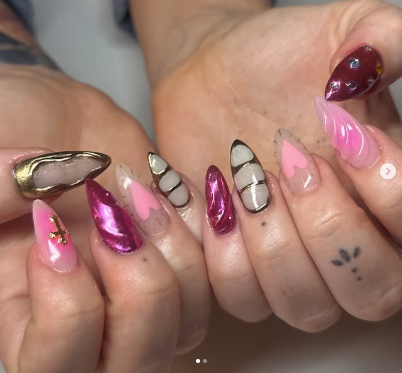
Bold, creative, and playful, mismatched 3D nails mix textures, colors, and designs on each finger. Perfect for DIY lovers who enjoy experimenting with fun, trendy nail art.
Why You’ll Love This Look
- Allows creative freedom with multiple designs
- Stands out with texture and 3D elements
- Fun and playful for parties or dates
- Beginner-friendly with small accents
How to Get This Look
- Prep nails and apply a base coat.
- Paint each nail a different base color or pattern.
- Add small 3D accents like hearts, rhinestones, or pearls.
- Use a UV/LED lamp to cure gel accents if needed.
- Seal with top coat around 3D elements.
- Let nails dry completely before touching.
Best Nail Shape
- Square
- Almond
Products You May Need
- Variety of polishes
- 3D gel or acrylic accents
- Dotting tools or small brushes
- Base coat and top coat
💅 Abstract Rhinestone Nails
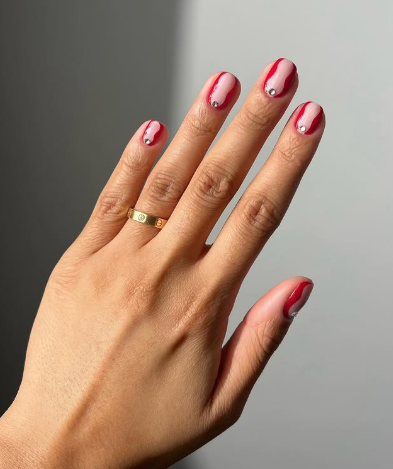
Glamorous and trendy, abstract rhinestone nails combine minimalistic designs with sparkling accents. Perfect for DIY enthusiasts who love Instagram-worthy manicures.
Why You’ll Love This Look
- Adds sparkle without overwhelming the design
- Works well with neutral or bold colors
- Easy for beginners using stickers or gel adhesive
- Perfect for parties, dates, or special events
How to Get This Look
- Prep nails and apply a base coat.
- Paint nails a soft neutral or pastel shade.
- Place rhinestones or gems in abstract patterns using tweezers or a dotting tool.
- Secure rhinestones with nail glue or gel.
- Seal with top coat, avoiding direct coverage on stones if needed.
- Let dry completely before handling.
Best Nail Shape
- Coffin
- Almond
Products You May Need
- Neutral or pastel polish
- Rhinestones or gems
- Nail glue or gel
- Tweezers or dotting tool
- Base coat and top coat
💅 Dripped-Out Cherry Nails
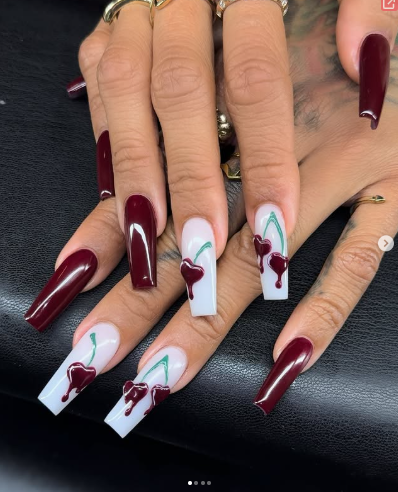
Fun, bold, and playful, dripped-out cherry nails give a fresh twist on classic Valentine motifs. Perfect for those who love quirky, colorful DIY designs.
Why You’ll Love This Look
- Eye-catching cherry-inspired design
- Fun for casual or festive occasions
- Beginner-friendly with simple dripping techniques
- Pairs well with pinks, reds, and nude bases
How to Get This Look
- Prep nails and apply a base coat.
- Paint nails a soft nude or pink shade.
- Use a small brush to paint cherries on accent nails.
- Add dripping effect with red polish for a playful look.
- Let polish dry completely.
- Seal with top coat to protect the design.
Best Nail Shape
- Round
- Almond
Products You May Need
- Pink or nude polish
- Red polish
- Small detail brush
- Base coat and top coat
More Nail Tips & Details
Creating DIY Valentine nails can be fun and stress-free with a few simple tips. First, always start with clean, dry nails to help polish stick better. Keep a small brush or cotton swab nearby for quick cleanups. Layer thin coats instead of thick ones to avoid smudges. Don’t rush drying time—patience makes your nails last longer. Mix and match designs for a playful look, and remember, imperfections can add charm to your DIY manicure.
Tools & Products Needed
- Base coat and top coat for protection and shine
- Variety of nail polishes: pinks, reds, neutrals, metallics
- 3D gels, acrylics, or rhinestones for accent nails
- Small brushes, dotting tools, and makeup sponges for precision
- Nail glue or gel adhesive for decorations
FAQ
1. How long does it take to do DIY Valentine nails?
Most designs can be completed in 30–60 minutes, depending on complexity and drying time.
2. Can beginners recreate these designs at home?
Yes! Many designs are beginner-friendly and require only basic tools and polish.
3. Which nail types are best for 3D designs?
Acrylic, gel, or longer natural nails hold 3D accents best.
4. How do I make my nails last longer?
Always use a base coat, apply thin polish layers, and finish with a durable top coat.
5. Can I mix multiple designs on one hand?
Absolutely! Mixing textures, colors, and patterns adds creativity and uniqueness.
6. What are the easiest designs for beginners?
Baby pink nails, heart confetti nails, and soft gradients are the easiest DIY options.
7. Are these nails suitable for gel or regular polish?
Yes! Most designs can be adapted for gel, acrylic, or standard polish.
8. How do I remove glitter and rhinestones safely?
Use an acetone soak for glitter and gently lift rhinestones with a wooden stick to avoid nail damage.
Conclusion
With these 15 Valentine Nails That Make DIY Feel Effortless, you can create beautiful, trendy designs right at home. From soft pastels to bold 3D accents, there’s something for every style and skill level. Grab your favorite polishes, experiment with hearts, glitter, and textures, and enjoy a fun, creative manicure that’s perfect for Valentine’s Day or any romantic occasion. Show off your DIY nails with confidence and have fun with every design!