You can remove fake nails at home safely without ruining your natural nails by using the right method for your nail type and taking your time. Soak-off methods with acetone, warm soapy water for glue-ons, or gentle lifting with dental floss can remove acrylics, gels, and press-ons without damage when done carefully.
Start by checking what type of fake nails you have and gather simple tools like acetone, foil, a nail file, and a bowl of warm water. Follow step-by-step removal for your nail type, protect the skin around your nails, and give your natural nails a short care routine afterward to help them recover.
Key Takeaways
- Use the correct removal method for the nail type to avoid damage.
- Take time and protect the skin and nail bed during removal.
- Treat natural nails after removal to restore strength and hydration.
Safe Methods to Remove Fake Nails
You can remove fake nails safely at home with tools you likely have. Pick a method that suits your nail type and how stubborn the glue or product is.
Using Acetone for Nail Removal
Acetone dissolves acrylic, gel adhesive, and many press-on glues quickly. Work in a well-ventilated room and protect skin with petroleum jelly applied around the cuticles to reduce drying.
Steps:
- Clip nails short and file the top layer to break the shine.
- Soak cotton pads in pure acetone, place on nails, and wrap each finger in aluminum foil.
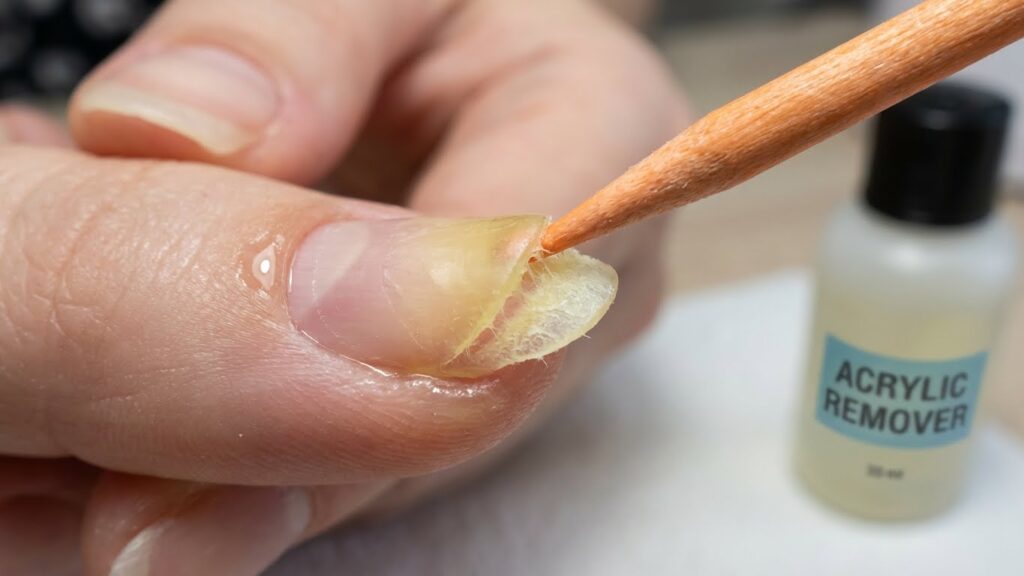
- Wait 10–20 minutes, then check one nail. Use a wooden cuticle stick to gently push off softened material.
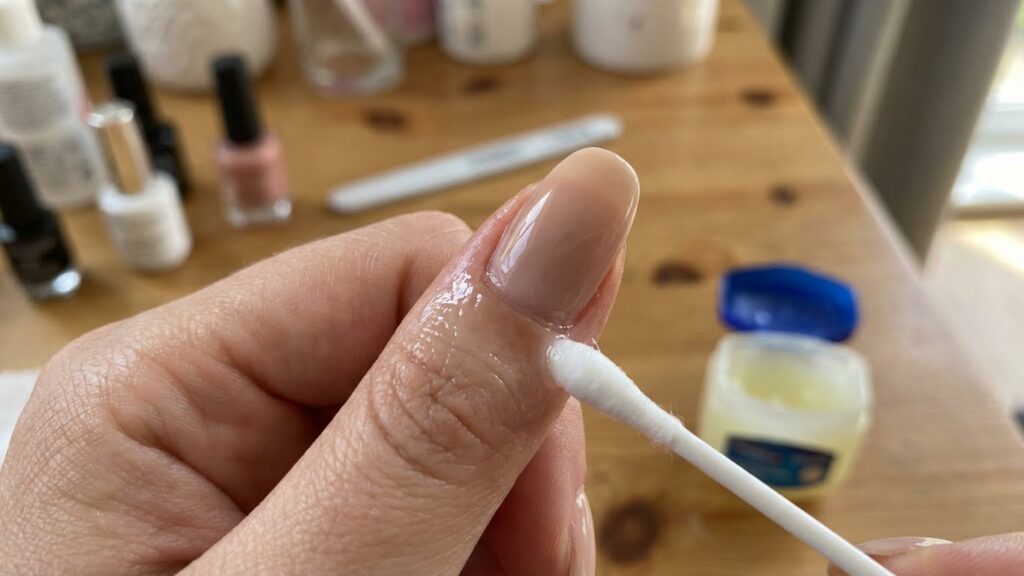
If the product resists, rewrap and soak another 5–10 minutes. Don’t force removal; forcing can peel or thin your natural nail. Finish by rinsing hands, applying cuticle oil, and using a moisturizer to restore hydration.
Non-Acetone Alternatives
Non-acetone removers work for glue-on tips and light gel polish but are slower. They’re safer for very dry or sensitive skin and for occasional use. Look for removers with ethyl acetate or specialized formulas labeled “gentle” or “for press-ons.”
Method:
- Clip and file the nail surface to remove the glossy seal.
- Soak a cotton pad with remover and hold it on the nail for 10–15 minutes, reapplying as needed.
- Use a soft orangewood stick to ease the fake nail away once the glue softens.
If removal is hard, switch to a longer soak in warm, soapy water or see a nail tech. Always hydrate nails and skin after using solvents to prevent brittleness.
Soaking and Wrapping Techniques
Soaking and wrapping works for acrylics, dip powder, and press-ons when you don’t want strong solvents. It combines warmth, moisture, and time to loosen glue or product.
Foil wrap technique:
- File the top layer, soak cotton in acetone or remover, place on nail, and wrap in foil for 10–30 minutes.
- Check and gently push off softened material with a cuticle pusher.
Warm soapy water:
- Fill a bowl with hot water and mild dish soap. Soak 20–30 minutes, then lift edges with dental floss or an orangewood stick.
Use gentle pressure and patience. If nails don’t release, re-soak instead of prying. Finish with cuticle oil and a hand cream to rebuild moisture.
Removing Different Types of Fake Nails
Choose the right method for the nail type and work slowly. Use acetone for acrylic and gel when needed, but avoid forcing any lifting or peeling to protect your natural nail.
Acrylic Nail Removal Steps
Soak and file first to break the acrylic bond. Trim the free edge, then use a coarse nail file to thin the top layer of the acrylic until you see a thinner shell. This helps acetone penetrate faster and reduces soak time.
Place cotton balls soaked in 100% acetone on each nail and wrap with foil, or use an acetone bowl to soak for 15–30 minutes. Check one nail after 15 minutes; if the acrylic lifts, gently push it off with an orangewood stick. If it resists, rewrap and soak longer.
After removal, buff lightly to smooth any residue. Wash your hands, apply cuticle oil, and give your nails a break for a few days to recover.
Gel Nail Removal Process
Start by filing the shiny top coat to break the seal. Use a fine-to-medium file to remove only the gel’s glossy layer; this speeds acetone action and prevents uneven soaking.
Soak cotton in pure acetone and wrap each nail with foil, or use an acetone bowl, for about 10–20 minutes. Gels often lift in softened sheets; use a cuticle pusher to slide the gel off gently. For builder gel or thick layers, you may need longer soaks and repeated checks.
Finish by buffing residual gel lightly. Rehydrate nails and cuticles with oil and lotion because acetone dries skin and nail plates.
Press-On Nail Removal
Press-ons often come off with warm water or oil. Start by soaking your nails in warm, soapy water for 10–15 minutes to loosen the adhesive. If they still stick, use a nail file to lift an edge gently.
Apply cuticle oil, petroleum jelly, or adhesive remover around the base and under the lifted edge to dissolve glue. Work slowly and peel the press-on off parallel to the nail surface to avoid ripping natural nail layers.
Clean any glue residue with an acetone-free remover or an orangewood stick, then moisturize the nail and skin. Save reusable press-ons by removing glue residue from the underside before storing.
Preparing Your Nails for Removal
Gather and protect what you need so removal goes smoothly and your natural nails stay healthy. Focus on the right tools, and shield the skin around each nail before you start soaking or filing.
Gathering the Right Tools
Get these items before you begin: pure acetone or an acetone-based nail polish remover, a coarse nail file (100/180 grit works), a metal cuticle pusher or orangewood stick, cotton balls or pads, aluminum foil strips, a small bowl, and cuticle oil or hand cream. If you prefer a non-acetone method, add a bowl of warm soapy water and a soft pumice buffer.
Lay tools out on a towel near a well-ventilated window. Trim any long free edge from the fake nails with clippers so acetone soaks under the nail more easily. File the shiny top layer lightly—this speeds up acetone action. Keep a timer or phone handy to track soak times.
Protecting the Skin Around Nails
Apply petroleum jelly or a thick hand cream to the skin and cuticles around each nail to stop acetone from drying or irritating your skin. Do not put the product on the nail itself; keep it only on skin to prevent blocking acetone contact with the fake nail edge.
Wrap small cotton pieces soaked in acetone around each nail and secure with aluminum foil, or use plastic clips made for nail removal. Check every 10 minutes; if the skin feels too dry or red, remove the wraps and rinse hands. After removal, wash your hands with mild soap and apply cuticle oil to restore moisture.
Aftercare for Natural Nails
Your nails will need moisture, gentle care, and targeted products after removing fake nails. Focus on rehydrating cuticles, treating any thinning or peeling, and using a strengthening product for several weeks.
Moisturizing and Rehydration
Start daily with a cuticle oil containing jojoba, almond, or vitamin E oil. Apply 2–3 times a day: after washing hands, before bed, and when nails feel dry. Massage oil into the nail plate and the skin around the nail for 20–30 seconds to boost absorption.
Use a rich hand cream after each wash to replace lost natural oils. If nails feel very brittle, soak them once a week for 5–10 minutes in a bowl of warm water mixed with a little olive or coconut oil. Avoid harsh soaps and long, hot soaks that strip oil. Wear gloves when cleaning or using detergents to keep moisture levels stable.
Dealing with Damage or Sensitivity
If nails are thin, peeling, or sensitive, stop filing aggressively. Trim gently and use a fine-grit file (240 grit) to smooth only the rough edges. Do not peel or force off any remaining product; that can tear nail layers and cause pain.
If you notice redness, swelling, or intense pain, seek medical advice; you might have an infection or allergic reaction. For common sensitivity or white spots, keep nails short and protected while they grow out. Limit polish and acrylics for at least 4–6 weeks to let the nail layers rebuild.
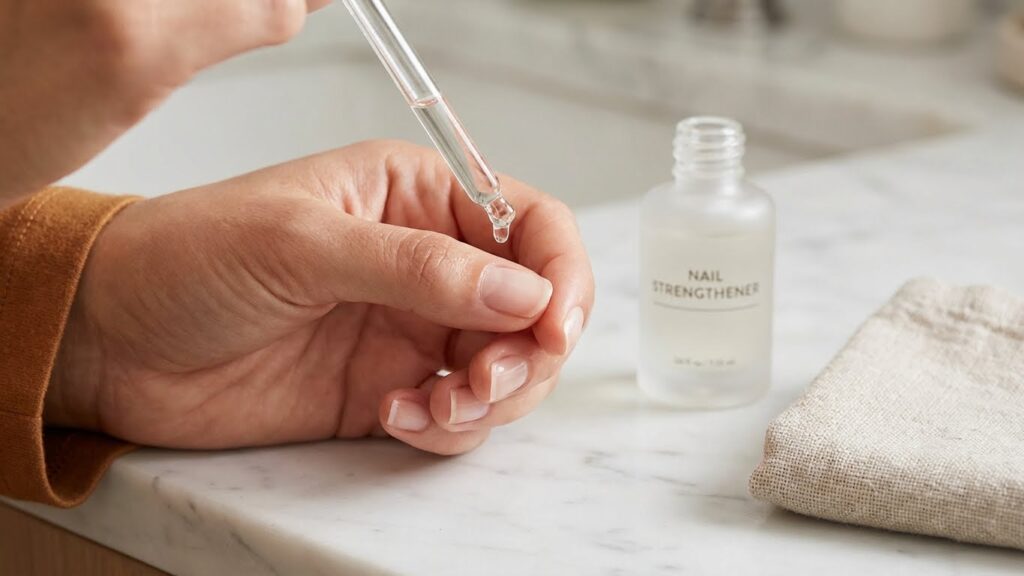
Recommended Nail Strengthening Products
Look for nail treatments with biotin (2.5–5 mg daily supplement or topical forms), keratin, calcium, or protein-based formulas. Topical strengtheners with formaldehyde alternatives (like hydrolyzed wheat protein) help without harsh chemicals.
Choose a clear nail hardener or a protein base coat to use every other day for 2–4 weeks, then reduce to maintenance twice a week. Avoid products that claim instant “miracle” fixes; consistent, gentle use gives the best results. Patch-test new products on one nail first to check for irritation.
Avoiding Common Mistakes
Prevent damage by using proper tools, being patient, and watching for signs of problems. Small choices—like pulling at a tip or skipping moisturizers—make the biggest difference to your nail health.
What Not to Do When Removing Fake Nails
Do not force or pry fake nails off. Pulling or ripping acrylics and gels can strip layers of your natural nail and cause pain or bleeding. Use acetone or soak-off methods and gently file or lift the edges first.
Avoid using household tools like scissors, pliers, or metal files. These can gouge the nail plate and cut skin. Instead, use a soft buffer, a proper nail file, cuticle stick, and acetone-soaked cotton.
Don’t skip moisturizing after removal. Your nails absorb a lot of solvent and can become brittle. Apply cuticle oil and a rich hand cream within an hour of finishing the removal.
Don’t file too aggressively. Over-buffing weakens nails. File only the fake surface to thin it, then follow with a soak. Keep nails short for a few days while they recover.
Recognizing Signs of Nail Infection
Watch for redness, intense pain, swelling, or spreading warmth around the nail. These signs suggest an infection that needs attention from a doctor or dermatologist.
Look for pus, a bad smell, or discolored nail bed (green, yellow, or brown). If you notice any of these, stop home treatments and seek medical care promptly.
Mild tenderness and peeling are normal after removal. But if tenderness persists beyond a week or worsens, book a medical visit. Early treatment prevents bigger problems.
If you have diabetes or poor circulation, treat any unusual nail change as urgent. You may need professional cleaning and antibiotics to avoid complications.
When to Visit a Professional
If your fake nails are lifting, cracking, or causing pain, see a pro. Pain or swelling can signal infection or damage that needs immediate care.
You should visit a salon if the removal method you need involves heavy filing or acetone soaks. Professionals have tools and experience to protect your natural nails and cuticles.
Choose a technician when your nails are acrylic or sculpted gel that are firmly bonded. These types often require soaking, clipping, and careful buffing to avoid thinning your natural nail.
If you notice discoloration, persistent soreness, or liquid under the nail, get professional help. These signs can mean trapped moisture or infection that home methods might worsen.
Cost is usually modest — expect roughly $10–$30 depending on type and location. Ask about the removal steps they’ll use and whether they’ll treat or recommend follow-up care.
If you’ve tried gentle home removal and it isn’t working, stop and book an appointment. For best results, choose a licensed nail technician who follows hygiene and safety practices.
FAQs
Q: Will acetone ruin my natural nails?
A: Pure acetone can dry your skin and nails if you use it often. Soak for short periods and follow with moisturizer or cuticle oil. For safety tips, check a trusted source like the American Academy of Dermatology.
Q: How long does removal take at home?
A: Most soak-off methods take 15–30 minutes per hand. Filing first and being patient will speed things without harming your nail plates.
Q: Can you peel off fake nails?
A: You should avoid peeling. That can strip layers of your natural nail and cause pain or damage. Use soaking or gentle lifting instead.
Q: What if a nail won’t come off after soaking?
A: Re-soak and try gentle pushing with an orange stick or cuticle pusher. If it still sticks, stop and see a salon or a pro to avoid injury.
Q: Are non-acetone methods effective?
A: Non-acetone options like warm soapy water, oil, or gentle filing can work for lighter glue-on nails. They may take longer than acetone for acrylics or gel.
Q: How do I care for nails after removal?
A: Trim and file any rough edges, buff lightly, and apply a nourishing oil or hand cream. Give your nails a break from acrylics for a few weeks to recover.
Q: When should you see a pro?
A: See a professional if you have pain, swelling, persistent discoloration, or if at-home removal fails. A technician or dermatologist can help safely.
Conclusion
You can remove fake nails at home safely if you use the right method and take your time. Choose acetone soak for acrylics and gels, or gentler options like warm soapy water and oil for press-ons and lightly bonded nails.
Work slowly and avoid prying or force. File down thick layers first, then soak or lift gently to protect your natural nail bed.
Pay attention to pain, redness, or swelling. Stop and seek help from a professional if you see signs of damage or infection.
After removal, care for your nails with gentle filing, cuticle oil, and a moisturizing hand cream. Let your nails rest before applying new enhancements.
Quick checklist:
- Tools: file, acetone, bowl, cotton, foil, cuticle pusher
- Remove slowly, don’t force
- Treat any irritation promptly
Follow these steps and your nails will recover faster. You’ll reduce damage and keep your natural nails healthy for future manicures.