
How to Apply Nail Polish at Home: A Beginner-Friendly Step-by-Step Guide

If you’re learning how to apply nail polish for the first time, the good news is this: neat, even nails are mostly about prep and patience, not special talent. A simple manicure becomes much easier when you work in thin layers, keep the nail surface clean, and give each coat time to settle before the next one.
This guide walks you through the whole process from start to finish: what to gather, how to prep, how to paint without flooding the skin, how to dry your nails, and how to remove polish gently later. I’ll keep it practical and beginner-friendly, like I would for a first-time client in the chair.
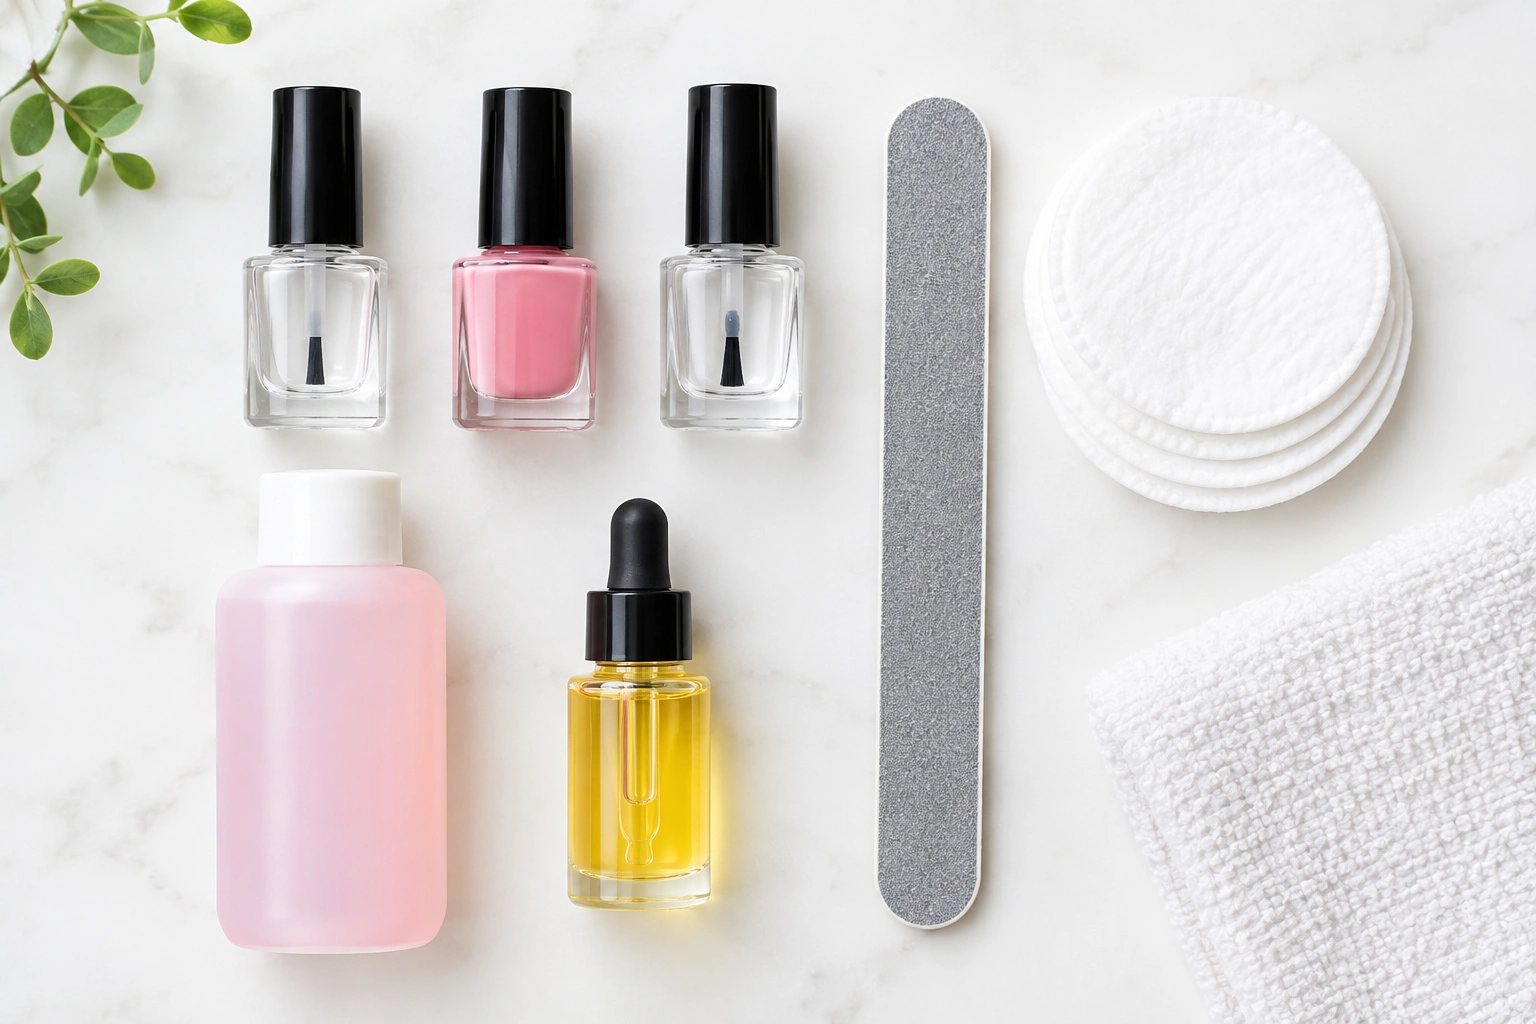
What You Need Before You Start
Gather everything first so you’re not hunting for tools with wet nails.
For a basic at-home manicure, you only need a few essentials:
- Nail polish remover
- Cotton pads or lint-free wipes
- A nail file
- Base coat
- Nail polish color
- Top coat
These are the true essentials for a beginner’s first manicure. Everything else is optional or helpful, but not required.
Optional tools that can make cleanup or prep easier:
- A buffer, if you want to smooth the surface lightly
- A cuticle pusher or orange stick
- Cuticle oil or hand moisturizer for after
- A small cleanup brush
A small cleanup brush can help, but a cotton swab dipped in remover also works for beginners. If you like a very simple routine, you can keep the tool list short and still get a clean result.
If you want a quick comparison before you buy products, this helps:
| Choice | Best for | Trade-off |
|---|---|---|
| Base coat | Better adhesion and a smoother first layer | Adds one extra step |
| Top coat | Shine and protection over color | Needs to be reapplied eventually for best wear |
| Acetone remover | Faster polish removal | Can feel more drying |
| Non-acetone remover | Gentler feel for some users | Usually slower to remove polish |
| Regular polish | More working time while painting | Takes longer to dry |
| Quick-dry polish | Faster finish | Less time to correct mistakes |
| Cream finish | Easiest for beginners | May show brush marks if applied too thick |
| Shimmer/glitter | Can hide small streaks | Can be less even and harder to remove |
| Sheer finish | Soft, natural look | Usually needs more coats and more care to stay even |
For a first manicure, cream finishes are usually the easiest to control. Shimmer can also be forgiving because it hides small streaks, while sheer polish tends to be trickier because it often needs extra coats.
Choose a Beginner-Friendly Nail Polish
For a first manicure, a cream polish in a medium or opaque shade is usually the easiest choice. Cream finishes tend to level out more smoothly than very sheer polishes, so you can get decent coverage in fewer coats.
Shimmer and glitter can be forgiving because they hide small streaks, but they often need more patience to apply evenly. Very sheer colors look pretty, but they usually need extra coats, which makes them harder for beginners to keep smooth.
Quick-dry polish is tempting if you want speed, and it can be a smart choice when you’re short on time. The trade-off is that it often gives you less time to adjust the brush strokes before the polish starts setting.
A simple beginner rule:
– Pick a cream polish if you want the easiest application.
– Pick a quick-dry formula if speed matters more than perfect correction time.
– Skip very sheer shades until you’re comfortable with the basics.
Prep Your Nails for Better Adhesion
Clean nails hold polish better than oily or damp ones. That’s why prep matters so much.
Here’s the simple prep routine I recommend:
- Remove any old polish completely.
- Wash and dry your hands.
- Shape the free edge with a nail file.
- Gently push back the cuticles if needed.
- Lightly buff only if the nail surface is uneven or shiny from old residue.
- Wipe each nail with remover to remove oil and dust.
Keep filing and buffing gentle. You’re just creating a tidy surface, not thinning the nail.
A clean nail plate helps the base coat grip better, and that usually means a neater finish and better wear.
Apply Base Coat, Color, and Top Coat in the Right Order
The correct order is simple:
base coat → color polish → top coat
Each layer has a job.
- Base coat helps the color go on more smoothly and creates a better surface for adhesion.
- Color polish gives the look you want.
- Top coat helps seal the color and adds shine or a finished surface.
If you skip the base coat, color can cling unevenly to the nail and may stain more easily, especially with darker shades. If you skip the top coat, the manicure usually looks less polished and may wear down faster at the tips.
Think of it like building a neat sandwich: each layer supports the one above it.
Base Coat vs. Top Coat
Beginners sometimes mix these up, so here’s the short version:
- Base coat goes on first and prepares the nail.
- Top coat goes on last and protects the finished color.
They are not interchangeable. A base coat is not meant to finish the manicure, and a top coat is not meant to replace the base layer.
How to Apply Polish Neatly and Evenly
This is the part most beginners worry about, but the technique is straightforward.
Load a small amount of polish onto the brush. A good rule is to wipe off the excess so the brush is coated but not dripping. If the brush looks heavy, it’s too much. Then use these steps:
- Place the brush a little above the cuticle, not right against it.
- Push the polish gently toward the cuticle without touching skin.
- Pull the brush straight down the center of the nail.
- Paint one side, then the other.
- Finish by lightly brushing across the free edge to “cap” it.
The goal is a thin, even coat. Thick coats are the main reason beginners get streaks, bubbles, and long drying times.
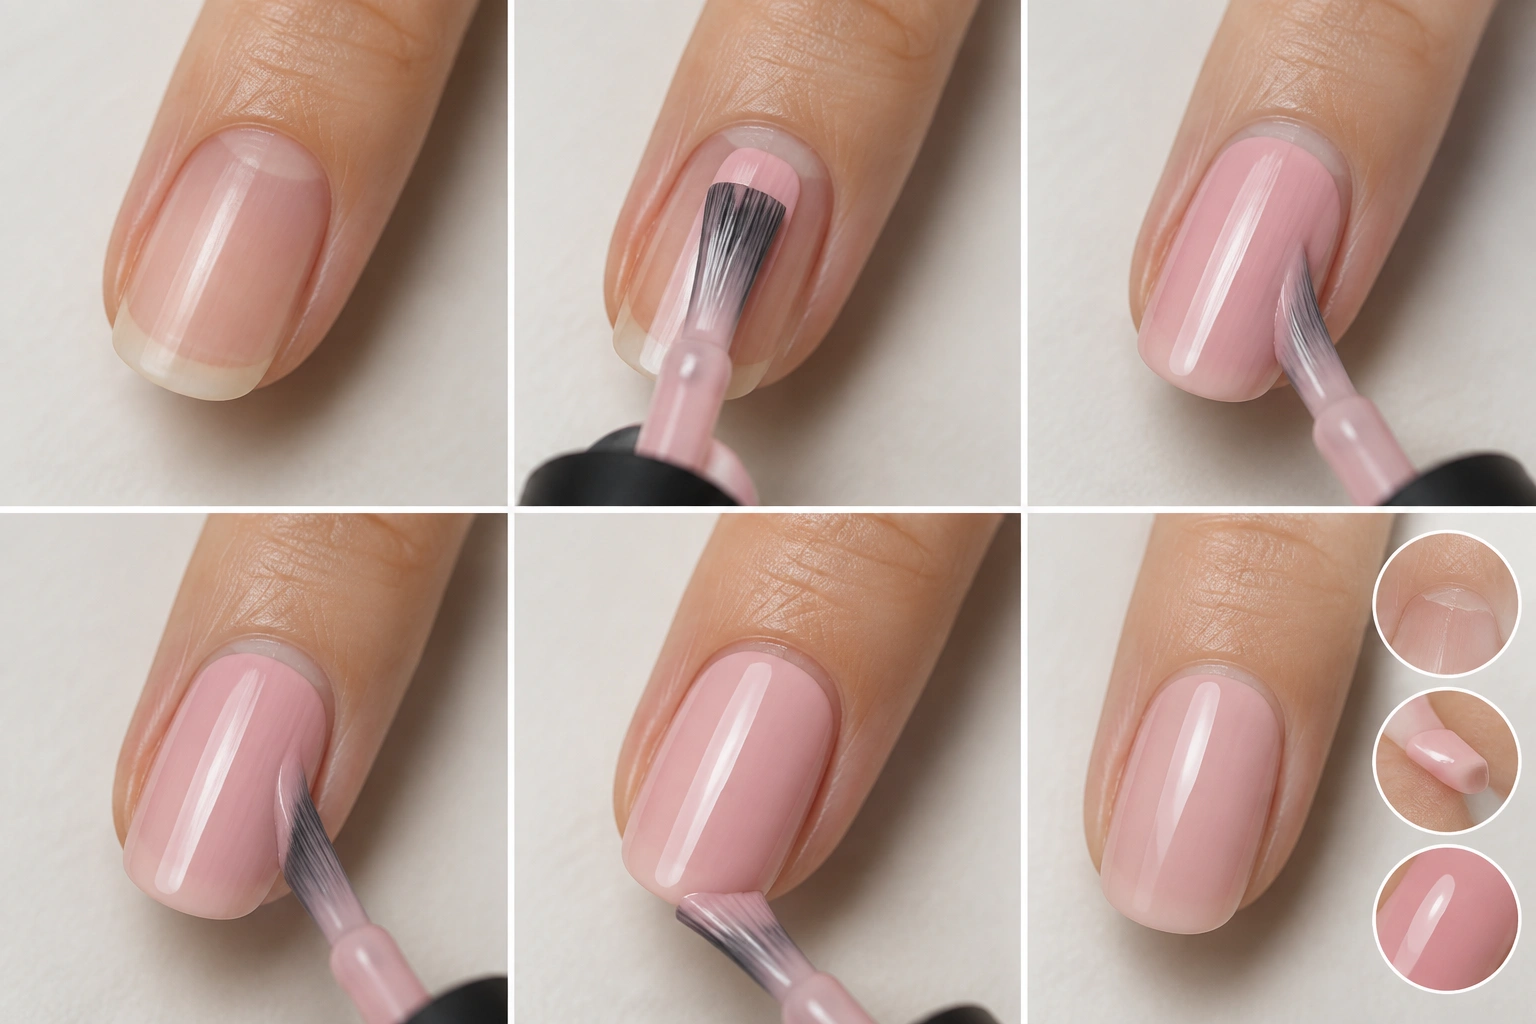
A good visual cue: if the polish looks wet and heavy, you probably used too much. If it looks thin and a little sheer after the first coat, that’s normal.
Keep Polish Off the Skin
Leave a tiny gap around the cuticle and sidewalls instead of flooding the whole nail. If you paint right onto the skin, the manicure may lift faster at the edges.
For the thin side edges, use the corner of the brush to trace close to the sidewall without pressing into the skin. Aim to leave a narrow clean border rather than trying to cover every millimeter. If the brush starts to spread toward the cuticle, lift it away and continue with less polish on the brush.
If you do get a little polish on the skin, fix it before it dries. A small cleanup brush or cotton swab dipped in remover can tidy the edge without redoing the whole nail.
How Many Coats to Use and How Long to Wait
For most beginner manicures, two thin color coats are the sweet spot.
One coat often looks streaky or patchy. Three or more coats can get bulky and take much longer to dry. If your polish is sheer, you may need an extra coat, but keep each one thin.
Between coats, wait until the layer looks set enough that it won’t drag when you touch it lightly. Exact timing varies by product, so it’s better to watch the polish than rely on a fixed number. The same goes for the top coat: apply it after the color layer has settled enough that you won’t pull it around.
How to Dry Nail Polish Faster Without Smudging It
The biggest drying mistake is treating “dry to the touch” like “fully ready for normal use.” Those are not the same thing.
Here’s a simple timing sequence that helps beginners avoid dents and smudges:
- Finish your last coat and keep your hands still for a few minutes.
- Avoid touching fabric, hair, keys, or your phone screen right away.
- Wait longer before using your hands for light tasks like opening packages or digging in a bag.
- Give the manicure enough time before showering, washing dishes, or doing anything that adds pressure or heat.
A few practical habits help right after the final coat:
– Hold your hands flat and relaxed instead of curling your fingers.
– Don’t press your nails into anything soft, like a couch arm, towel, or pocket.
– Keep nails away from hot water, which can soften fresh polish.
– If you need to move around, use the pads of your fingers rather than the tips.
A quick-dry top coat can help if you want a faster finish, but it doesn’t replace careful application. If the layers underneath are too thick, the surface may dry before the lower layers have settled.
Common Beginner Mistakes and Easy Fixes
A few small problems show up again and again when people first learn to polish their nails.
Streaks
Streaks usually mean the coat was too thin in some places and too thick in others. The fix is simple: apply the next coat evenly and resist the urge to keep brushing the same area over and over.
Bubbles
Bubbles often come from shaking the bottle too hard or applying polish too thickly. Roll the bottle gently between your hands instead of whipping it up and down.
Flooded cuticles
If polish reaches the skin, use a cleanup brush or cotton swab with remover before it dries. For the next nail, use less polish on the brush and stop a little short of the skin.
Smudges
If you touch a nail too soon, don’t panic. Sometimes a light touch-up with a little polish can fix a tiny dent. If the smudge is deep, it may be easier to smooth it with a fresh thin coat rather than restarting the whole manicure.
How to Make Your Manicure Last Longer
A longer-lasting manicure usually comes from a few high-impact habits:
- Prep the nail so it’s clean and dry.
- Use a base coat.
- Apply thin coats.
- Cap the free edge with color and top coat.
- Reapply top coat if the shine starts to fade after some wear.
That last point is especially useful if your polish chips at the tips first. A fresh top coat can help refresh the surface and slow down wear.
How to Remove Nail Polish Safely
When it’s time to remove polish, be gentle. Don’t peel it off, even if it starts lifting. Peeling can rough up the nail surface.
Here’s the simple removal method:
- Soak a cotton pad with remover.
- Hold it on the nail for a few seconds.
- Wipe from cuticle to tip.
- Repeat if needed instead of scrubbing hard.
- Wash your hands afterward.
Acetone vs. Non-Acetone Remover
Acetone remover works faster and is usually better for stubborn polish, darker shades, or glitter. The downside is that it can feel more drying.
Non-acetone remover is often a gentler-feeling option, but it may take more time and more passes to remove the color.
If you wear glitter or heavily pigmented polish often, acetone is usually the more efficient choice. If your nails feel dry easily and you don’t mind slower removal, non-acetone may be more comfortable.
Basic Aftercare for Healthy Nails
After removal, your nails may feel a little dry. That’s normal, especially if you used acetone.
A simple aftercare routine helps:
– Wash off remover residue.
– Apply cuticle oil around the nail plate and cuticles.
– Follow with hand cream if your skin feels dry.
– Give your nails a break before the next manicure if they feel rough or overworked.
Cuticle oil is a small step, but it makes a noticeable difference in comfort and appearance. It helps the skin around the nails look less dry, which keeps the whole manicure area looking neater.
When to See a Nail Technician or Dermatologist
Most at-home polish problems are simple to fix. But if your nails are peeling badly, painful, discolored, or repeatedly reacting to products, it’s worth getting professional advice. A nail technician can help with technique and product choices, while a dermatologist can check for possible skin or nail concerns.
FAQs
Do I really need a base coat and top coat?
For the neatest beginner result, yes. A base coat helps the polish go on more smoothly, and a top coat helps protect the finished manicure.
How many coats of nail polish should I apply?
Two thin color coats are usually enough for a beginner manicure. Very sheer shades may need more, but keep each layer thin.
How long should I wait between coats?
Wait until the layer looks set enough that the brush won’t drag it. The exact time depends on the polish, so watch the finish rather than counting minutes.
Can I skip the base coat if I’m in a hurry?
You can, but the manicure may not wear as well and darker shades may stain more easily. If you only have time for one extra step, base coat is the better choice.
What’s the easiest polish finish for beginners?
A cream finish is usually the easiest because it applies more evenly and is less fussy than sheer polish.
How do I remove polish without damaging my nails?
Use remover on a cotton pad, hold it on the nail briefly, then wipe gently. Don’t scrape or peel the polish off.
Is acetone always better than non-acetone remover?
Not always. Acetone is faster, while non-acetone is often gentler-feeling. Choose based on how stubborn the polish is and how dry your nails tend to get.
How can I stop getting polish on my skin?
Use less polish on the brush, keep a small gap near the cuticle, and clean up edges right away with a remover-dampened swab.
If you’ve been wondering how to apply nail polish without making a mess, the biggest lesson is simple: thin coats, clean prep, and a little patience go a long way. Once you get comfortable with the basics, a home manicure becomes much easier to repeat.

