
You can cut fake nails safely at home if you use the right tools and take simple precautions. With sharp clippers made for acrylic or press-on nails and a gentle filing step, you can shorten and shape fake nails without hurting your natural nails.
Start by checking the type of fake nail and how it’s attached, then work slowly to cut small amounts and file for a smooth finish. Follow a few basic safety steps and you’ll save time and money while keeping your nails neat and even.
Key Takeaways
- Know your nail type and attachment before you cut.
- Use proper tools and file after clipping for a smooth edge.
- Stop and seek help if you feel pain or see damage.
Understanding Fake Nails
Fake nails come in different shapes, strengths, and materials. You’ll learn which types exist, what materials they’re made from, and the main pros and cons to help you decide if cutting or wearing them fits your routine.
Types of Fake Nails
Fake nails fall into three common types: press-ons, acrylics, and gel extensions. Press-ons are pre-shaped plastic tips you glue on. They’re easy to apply and remove, but they can lift if not glued well.
Acrylics mix a liquid monomer and powder polymer to form a hard overlay attached to your natural nail or tip. They’re strong and durable, so they hold up to daily tasks. Salons often use them for long, sculpted shapes.
Gel extensions use a builder gel cured under UV or LED light. They look glossier and can feel more flexible than acrylics. Removal usually requires soaking or filing, and curing tools are needed if you apply them yourself.
Materials Used for Artificial Nails
Acrylic nails use a polymer powder and a liquid monomer. When combined, they harden into a tough layer. The finished surface is rigid and resists chipping, but the material is thicker than natural nails.
Gel nails are made from urethane or acrylic-based gels. They stay pliable until cured with a lamp, then become firm. Some gels are soak-off formulas that dissolve in acetone; others require filing to remove.
Press-ons are typically ABS plastic or similar resins. They come pre-painted or plain. The plastic is thin and flexible compared with acrylic and gel, which makes them less durable but easier to trim and reshape at home.
Benefits and Drawbacks
Benefits vary by type. Press-ons give fast results and low cost, so you can change styles often. Acrylics provide long-lasting strength and can support length and heavy designs. Gels offer a natural, glossy finish and smoother edges.
Drawbacks include potential nail damage if applied or removed poorly. Acrylics require more aggressive filing and solvent removal, which can thin your natural nails. Gel and press-on nails can cause lifting or trapping moisture if not sealed properly.
All types need proper care: gentle trimming, regular fills or touch-ups, and safe removal. If you plan to cut fake nails, choose tools suited to the material to avoid cracking or splintering.
Can You Cut Fake Nails?
You can cut fake nails to change length or shape. Use the right tools and steady hands to avoid cracking the fake nail or hurting your natural nail.
Differences Between Cutting and Filing
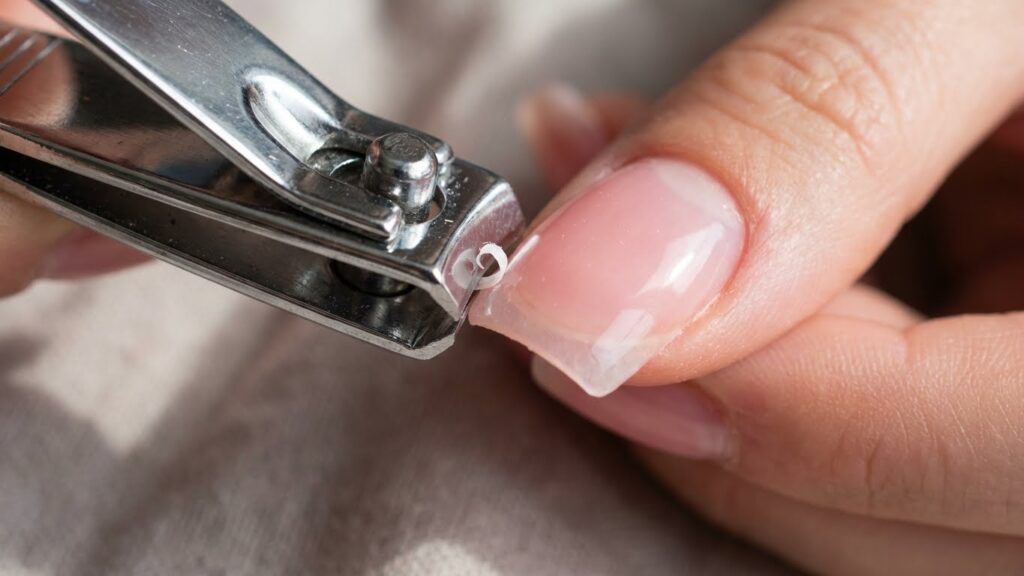
Cutting shortens quickly. Use strong nail clippers made for artificial nails. Position the clipper at the edge of the fake nail and make small, controlled cuts toward the center. Avoid scissors that can crack acrylic or gel. After cutting, file the edges to smooth rough spots and refine the shape.
Filing removes small amounts and helps shape without stress. Use a coarse file for fast length reduction and a finer grit for finishing. File gently from the outer edge toward the center to avoid lifting the fake nail. Combine both methods: cut most of the length, then file to fine-tune.
Safety Considerations
Work on clean, dry nails. Wash hands and remove oils or polish first so tools grip better. Use a light source and steady surface to lower the risk of slips. Keep your fingers away from the clipper’s path and make small cuts rather than one large one.
Wear a dust mask or work near ventilation if you file or buff a lot; acrylic dust can irritate lungs and skin. If the fake nail is lifting or causing pain, stop and see a professional to avoid damaging your natural nail. Dispose of sharp clippings safely.
Preparation Before Cutting
Gather the right tools, clean your hands and nails, and protect your natural nail beds before you cut. This reduces cracking, helps you get an even shape, and lowers the chance of lifting or damage.
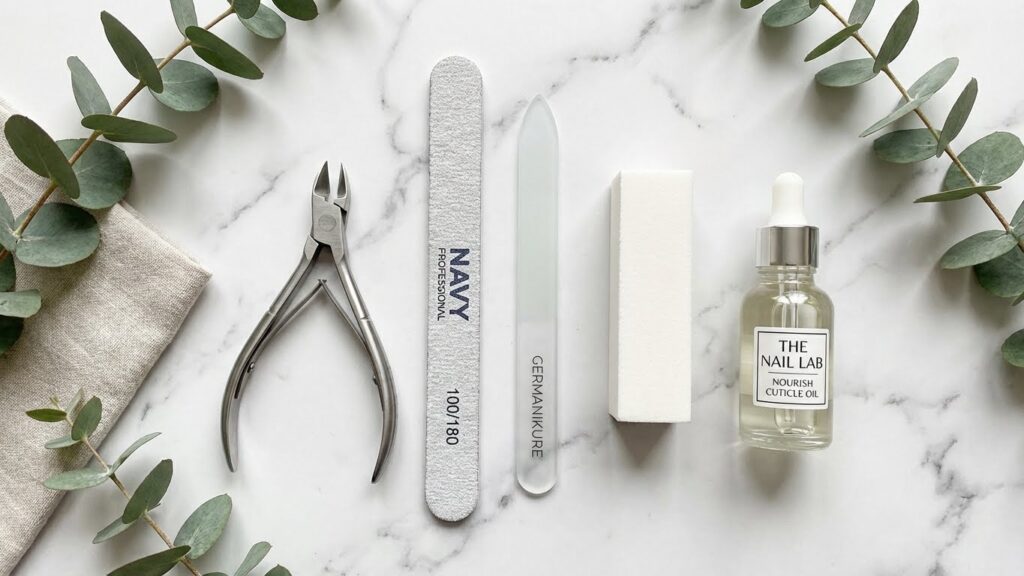
Required Tools and Supplies
You need tools made for thicker material. Use strong acrylic nail clippers or heavy-duty manicure clippers, a coarse nail file (80–100 grit) to shorten, and a finer file (180–240 grit) to smooth edges. Keep a buffer on hand for the natural nail surface and a glass or crystal file if you prefer gentler shaping.
Also have acetone, cotton balls, and foil available in case you need to remove adhesive or soften the nail. Use a small nail brush and a bowl of warm water for cleaning. Work on a flat, well-lit surface and lay down a towel to catch filings.
Cleaning and Sanitizing
Wash your hands with soap and warm water to remove oils and lotion that make nails slippery. Dry completely; fake nails cut better when dry. Clean around and under the fake nail with a soft brush to remove dust or debris that could hide damage.
Sanitize your tools with isopropyl alcohol or a disinfectant wipe before use. If you use acetone to soften or remove glue, work in a well-ventilated area and limit exposure to your skin by using a small bowl or cotton method. Replace cotton and foil if they become saturated.
Protecting Natural Nails
Push back cuticles gently with a cuticle pusher to see the nail edge and avoid cutting the skin. Do not cut into the natural nail plate when trimming the fake nail; leave a thin buffer of fake nail over the tip to protect it.
After cutting, file edges smoothly to prevent snags that lift the fake nail. If you see white or thin spots on the natural nail, stop and consider professional removal to avoid damage. Apply a thin layer of nail oil to the cuticle area after finishing to hydrate the skin and reduce brittleness.
Step-by-Step Guide to Cutting Fake Nails
You need the right tools and steady hands. Use sharp clippers or a file, work slowly, and protect your natural nail underneath.
How to Cut Acrylic Nails
Start with acrylic nail clippers or strong toenail clippers. Trim the acrylic in small sections instead of one big bite to avoid cracking.
Cut from each side toward the center rather than straight down the middle. This reduces stress that can split the tip.
After clipping, use a coarse nail file (100–180 grit) to shape the edge and remove rough spots. File gently in one direction to avoid lifting the acrylic.
If the acrylic is very thick, you can shorten it with a nail clipper and then use a coarse bit on an electric file if you have experience. Always finish with a finer file (180–240 grit) to smooth and blend the cut edge.
How to Cut Gel Nails
Use sharp manicure clippers designed for gel or a strong straight-edge clipper. Clip small amounts and avoid bending the free edge.
Gel can crack if you cut too close to the natural nail, so leave a small lip above the nail bed.
File the trimmed edge with a medium grit (180) to even out the shape. If the gel layer is thin over the natural nail, consider soaking and removal instead of cutting to prevent damage.
Finish with a fine buffer to smooth the surface and apply cuticle oil to rehydrate the nail and skin.
How to Cut Press-On Nails
Press-ons are the easiest to shorten. Use regular nail clippers or small scissors and cut in small steps until you reach the desired length.
If the press-on has a pronounced curve, trim both sides equally to keep the shape balanced.
File the cut edge with a fine file for a clean finish. If the press-on is glued on, remove it first with an adhesive remover or soak in warm soapy water to avoid pulling your natural nail.
Reapply with fresh adhesive tabs or glue after trimming, or store trimmed press-ons flat to keep their shape.
Aftercare and Maintenance
Trimmed nails need smoothing, protection from lifting or cracking, and steps to keep them healthy long-term. Follow targeted steps for edges, damage prevention, and routine care to keep fake nails neat and lasting.
Smoothing Edges
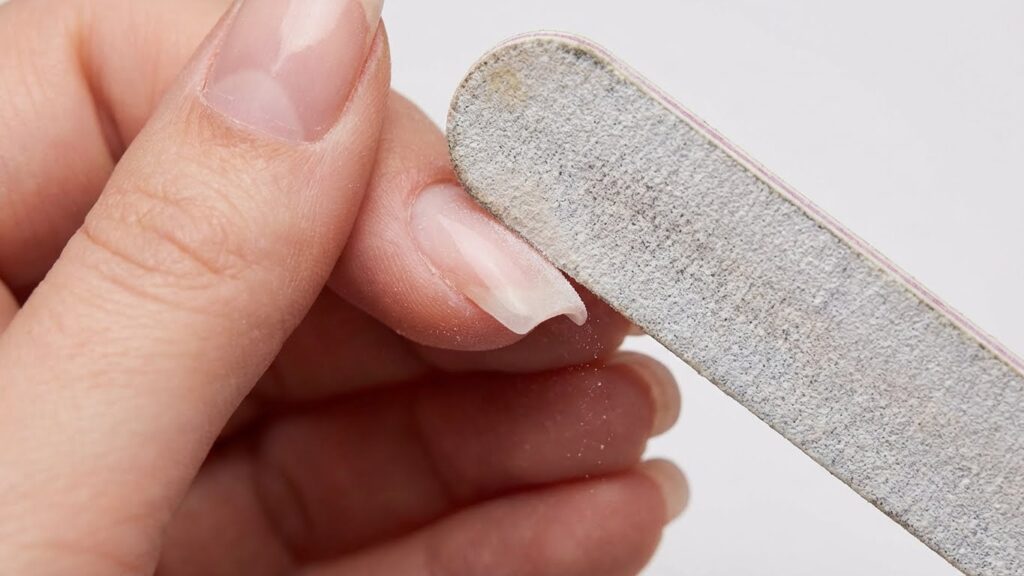
Use a medium-grit nail file (100–180 grit) for acrylics and a finer file (180–240 grit) for gel or press-ons to avoid cracking. File in one direction with light pressure. Avoid a back-and-forth sawing motion that can cause chips or thin spots.
After trimming, hold the file at a slight angle to blend the artificial tip into the natural nail. Check the free edge under good light and buff gently with a fine buffer (240–400 grit) to remove roughness. Wipe nails with rubbing alcohol or a lint-free pad to remove dust before applying polish or top coat.
If a rough edge persists, use a glass nail file for a final smooth finish. For press-ons, press down the edges with a cuticle stick to reseal any lift before sealing with glue or top coat.
Preventing Damage
Avoid using your nails as tools; pick with fingertips instead of edges. Wear nitrile or latex gloves when doing dishes, cleaning, or gardening to keep chemicals and water from lifting or weakening adhesives.
If you feel tugging or notice lifting, apply a small amount of nail glue under the lifted area and press for 30 seconds. For gel or acrylic cracks, do not force the nail; file around the crack to reduce stress and book a fill or repair at a salon if needed.
Keep nails dry and clean. Apply a thin layer of clear top coat every 5–7 days to protect the surface and reduce chipping. Reapply adhesive for loose press-ons rather than reusing old glue.
Long-Term Care Tips
Give your natural nails a break every 6–8 weeks if possible. During breaks, keep nails short, trim the free edge, and use a strengthening base coat or nail oil to support natural growth.
Use cuticle oil daily—apply twice a day if your cuticles feel dry—to maintain moisture and prevent lifting at the base. Choose a 3–5% formaldehyde-free strengthening product if you need extra support; avoid harsh, drying formulas.
Schedule regular fills for acrylics every 2–3 weeks and gel infills every 3–4 weeks to maintain shape and prevent stress at the cuticle line. Track wear time and replace press-ons after 1–2 uses if adhesive or fit degrades.
Common Mistakes to Avoid When Cutting Fake Nails
Using the wrong tool is a top mistake. Regular nail clippers can crush or crack acrylic and gel tips. Use sharp acrylic clippers or a clipper made for false nails to cut cleanly.
Cutting too close to your natural nail can cause pain and damage. Leave a small margin of fake nail above the cuticle to protect the nail plate. If you pull or force a tip off, you can strip layers from your natural nail.
Filing the wrong way weakens the nail. Avoid aggressive back-and-forth sawing. File in one direction with light strokes to shape and smooth the edge without chipping.
Skipping softening steps makes breakage more likely. Soak gel or press-ons in warm water or use a gentle remover if they feel brittle. Softer material cuts cleaner and reduces the chance of shattering.
Rushing leads to uneven results and damage. Take steady, small cuts and check symmetry as you work. If a nail starts to crack, stop and trim less aggressively.
Neglecting aftercare invites lifting and infection. Clean the underside, buff lightly, and apply cuticle oil or nail glue as needed. Keep tools sanitized so you don’t transfer bacteria or fungi.
When to Seek Professional Help
If your fake nail lifts at the base, you should see a pro. Lifting can trap moisture and cause infection or damage to your natural nail if not handled correctly.
You should also get help when a nail is cracked, jagged, or stuck to the skin. A technician has the right tools to trim or remove the nail safely without tearing your natural nail.
If you feel persistent pain, swelling, redness, or pus, seek professional care right away. These signs suggest infection or injury that needs trained attention.
Choose a salon if you’re unsure about the type of adhesive or nail material. Professionals know which solvents and methods work for acrylics, gels, and press-ons to avoid chemical burns or excessive filing.
If you need a major reshaping or length change, let a technician do it. They can use clippers, buffers, or an e-file properly to prevent cracks and uneven edges.
When in doubt, prioritize safety. A brief visit to a licensed nail technician can prevent longer-term damage and keep your nails healthy.
Alternatives to Cutting Fake Nails
If you don’t want to cut your fake nails, consider filing them down. Use a coarse file to shorten the length, then a finer file to smooth edges. Filing gives you more control and reduces the risk of cracking the fake nail.
You can also buff the surface to change the shape or remove shine. Buffing is gentle and lets you refine the nail without altering length much. Work slowly to avoid thinning the fake material too much.
For press-on or glued-on nails, soak and lift is an option. Warm, soapy water or acetone (used carefully) can loosen adhesive so you can remove and replace nails. This avoids cutting and lets you start fresh with new tips.
Use special clippers or tip cutters when trimming is necessary. These tools are made for hard materials and cut more cleanly than regular scissors. Combine clipping with filing to shape the nail safely.
If the nail is damaged or lifting, replace it instead of trimming. Replacing keeps your natural nail healthier and prevents further problems. Keep repair supplies handy: nail glue, nail forms, and a small file.
Quick list of tools and methods:
- Nail file (coarse then fine) for gradual shortening.
- Buffer to reshape or reduce shine.
- Warm, soapy soak or acetone for safe removal.
- Acrylic/tip clippers when cutting is necessary.
- Replacement press-ons or a salon visit for repairs.
FAQs
Can you cut fake nails at home?
Yes. You can shorten acrylics, press-ons, and other artificial nails with proper tools like strong nail clippers or tip cutters. Use slow, small cuts to avoid cracking the material and protect your natural nail.
Will cutting fake nails damage your natural nails?
It can if you cut too close to the natural nail or use dull tools. Leave a small edge, file after clipping, and avoid twisting or prying to reduce lifting and breakage.
What tools should you use?
Use sharp clippers made for artificial nails, heavy-duty toenail clippers, or a nail nipper. Finish with a coarse file and a finer buffer. If you have doubts, consider a pro at a salon for safer results.
How do you shape after cutting?
File in one direction to shape and smooth rough edges. A buffer evens the surface. Take care not to file the natural nail too aggressively.
When should you see a professional?
Go to a salon if nails are heavily lifted, infected, or if you’re unsure how to cut them safely. A technician can remove or reshape nails without harming your natural nail.
Where can you learn more?
For step-by-step safety tips and nail health info, check resources from the American Academy of Dermatology (https://www.aad.org) or reputable beauty guides like wikiHow’s nail pages (https://www.wikihow.com).
Conclusion
You can cut fake nails, but you must do it carefully. Use the right tools—acrylic clippers, a strong file, and a buffer—to avoid cracking or lifting the nail.
Trim in small steps and cut from the sides toward the center. This reduces stress on the tip and keeps the edge smooth. If you feel resistance or hear cracking, stop and file instead.
Protect your natural nail by not cutting too close to the cuticle. Leave a small margin so the adhesive and natural nail stay intact. After cutting, file to shape and buff lightly to remove rough edges.
If the nails are press-ons, consider soaking them off instead of aggressive cutting when removal is needed. For glued or acrylic nails, a salon visit or proper at-home removal will lower the risk of damage.
Follow these quick care tips:
- Use sharp, strong clippers made for fake nails.
- Cut little by little; finish with a file.
- Avoid scissors or weak clippers that can shatter acrylic.
You can manage length at home between salon visits. Stay cautious, use proper tools, and stop if you’re unsure so you don’t harm your natural nails.