Common Nail Polish Mistakes Beginners Make and How to Fix Them

If your manicure chips too fast, looks streaky, or starts peeling at the tips, the problem is usually not your hands — it’s the process. Most at-home polish issues come from a handful of beginner mistakes that are easy to correct once you know what to look for.
The good news: you do not need salon tools to get a much cleaner result. A few simple habits — cleaner nails, thinner coats, and a little more drying time — make a big difference.
Why Nail Polish Goes Wrong So Often
Most polish problems show up in one of four ways:
- Chipping usually means the polish did not grip the nail well or the tip wore down too quickly.
- Streaking often happens when the coat is too thin in some spots and too heavy in others.
- Bubbling can happen when polish is applied too thickly or layered before the last coat has settled.
- Peeling or lifting often starts when oil, moisture, or residue is left on the nail before painting.
That is why the same manicure can look perfect on day one and rough by day three. Small application mistakes affect how well the polish bonds, how evenly it dries, and how much wear it can handle.
For gel polish specifically, poor prep is widely described as a common mistake because gel adheres best to a clean, dry nail plate. Leftover oil, cream, or moisture can interfere with grip and lead to peeling at the edges, faster chipping, or tiny bubbles.
[IMAGE 1: A clean, beginner-friendly nail prep setup]
The Basic Manicure Prep That Makes Polish Last

Good prep is simple, but it matters. Before painting, make sure the nail surface is free of old polish, lotion, dust, and moisture.
A simple prep routine
- Remove old polish fully. Any leftover color or residue can keep the new polish from sitting evenly.
- Wash your hands, then dry them well. If you wash right before painting, let the nails dry completely. Moisture left behind can get in the way of adhesion.
- Push back the cuticle gently if needed. You are not trying to force anything; just clear the nail plate so polish goes on the nail, not the skin.
- Wipe nails with remover or nail cleanser. This helps remove oils and dust from the surface.
- Keep nails dry until you start polishing.
That last step matters more than beginners often think. A nail that looks dry can still hold onto tiny amounts of moisture or lotion. If polish is applied over that, it may not grip as well.
If you want a practical remover comparison, acetone usually removes polish faster and more thoroughly, while non-acetone remover is gentler but may take longer and can leave more residue. For general removal, acetone is usually the easier choice. For quick cleanup around the skin or if your nails and cuticles are sensitive, non-acetone can be the gentler option. For clean prep before repainting, acetone is often the more efficient option because it tends to remove stubborn leftover color more thoroughly.
Mistake 1: Skipping Base Coat or Top Coat
Base coat and top coat do different jobs.
| Product | What it does | When it is needed |
|---|---|---|
| Base coat | Helps polish grip the nail and creates a smoother surface | Use it first, especially if your nails stain easily or polish tends to slide around |
| Top coat | Seals the color and protects the finish from everyday wear | Use it last to help reduce dulling, tip wear, and surface damage |
Skipping either one can make the manicure less durable. A base coat is especially useful if your nails stain easily or if polish tends to slide around on the surface. A top coat helps protect the color from dulling and tip wear.
If you are choosing only one, use the top coat when you want the manicure to look finished and last longer. But for most beginners, both are worth using. That is the simplest decision rule: if you want a cleaner, longer-lasting result, use a base coat and a top coat.
A quick beginner note: some products are labeled as base and top in one, but separate products usually give you more control. If you are unsure, check the bottle directions rather than assuming all clear coats work the same way.
Mistake 2: Using Too Much Polish or Applying Thick Coats
Thick coats look faster, but they usually cause more problems.
A heavy coat dries more slowly, which gives it more time to dent, bubble, or smudge. It can also look uneven because the polish pools near the edges or cuticle. Thin coats take a little more patience, but they usually dry more evenly and give a smoother finish.
A better way to load the brush
- Wipe one side of the brush lightly against the bottle neck.
- Use just enough polish to cover the nail in a few strokes.
- Aim for two to three thin coats instead of one thick one, unless your polish is unusually opaque.
If your first coat looks streaky, that is not always a mistake. Many colors need a second coat to look even. The key is to keep each layer light so it can dry properly.
Overloading the brush also makes it easier to flood the cuticle or sidewalls. That creates cleanup work and can shorten wear if polish sits on the skin instead of the nail.
Mistake 3: Rushing Between Coats
A lot of beginners apply the next coat before the first one has had time to settle. That can trap moisture or solvent under the surface, which may lead to bubbling, dents, or a soft finish that marks easily.
You do not need to wait forever, but the first coat should no longer look wet before you add the next one. A simple beginner rule: wait about 2 to 5 minutes, or until the surface looks mostly set and does not drag when you lightly touch the side of the nail with a clean fingertip. If it still looks glossy-wet or moves around, wait longer.
A simple timing rule
- If the polish still looks glossy-wet and moves around, wait.
- If it looks mostly set but still a little tacky, that is usually the better moment for the next thin coat.
Fast-drying formulas can be especially unforgiving here. Some products dry quickly, so you need to work a little faster and avoid overworking the brush.
If you are not sure whether you are rushing, check the nail under good light. A coat that is not ready often shows ripples, drag marks, or tiny bubbles after the next layer goes on.
Mistake 4: Painting on Wet, Dirty, or Oily Nails
This is one of the biggest reasons polish lifts early.
Lotion, hand cream, cuticle oil, and even traces of soap can leave a film on the nail. That film makes it harder for polish to stick. Water can be a problem too if you wash your hands and paint immediately after without letting the nails dry fully.
Easy fixes
- Do your hand cream after the manicure, not right before.
- If you washed your hands, dry them completely and give them a little extra time.
- Use remover or cleanser on the nail plate right before painting.
- Avoid touching the nail surface with your fingertips after cleaning it.
You do not need special salon prep products to improve this step. The goal is simply a clean, dry nail plate. Once that surface is free of residue, polish has a better chance of staying put.
Mistake 5: Forgetting to Seal the Free Edge
The free edge is the tip of the nail that extends beyond the fingertip. It is one of the first places polish wears down because it gets the most contact from typing, washing dishes, and opening things.
“Capping” or sealing the free edge means lightly brushing polish across that tip as part of each coat. It is a small step, but it can help reduce tip wear and lifting.
How to do it
After painting the nail surface, run the brush very lightly across the tip of the nail. Do this with the base coat, color coats, and top coat.
Keep it subtle. You are not trying to build a thick line at the tip — just seal the edge. If you overload this area, polish can bunch up and look bulky.
This is one of the easiest habits to build into your routine because it takes only a second per nail and can improve wear without changing your products.
Mistake 6: Using Old or Thickened Polish
If your polish is stringy, clumpy, or hard to spread evenly, it may be too thick to apply well. Old polish can leave brush marks, drag across the nail, and dry unevenly.
Signs your polish may be past its best
- The brush pulls up long strings of polish.
- The color looks lumpy instead of smooth.
- The bottle feels harder to swirl or mix.
- The finish looks rough even when your application is careful.
Quick “should I toss this bottle?” checklist
Consider replacing the polish if:
– It stays clumpy even after shaking or rolling gently
– It does not spread smoothly on the nail
– It dries with a grainy or uneven finish
– The formula seems separated and will not mix back together
– The bottle is so thick that application becomes frustrating
Sometimes a polish can be revived a little if it has only thickened slightly, but if it has become very clumpy or unusable, replacing it is the better choice. A polish that does not spread evenly will likely make everything else harder, even if your prep is good.
Store bottles tightly closed and away from heat. That helps slow thickening and keeps the formula easier to use.
Mistake 7: Drying and Aftercare Habits That Ruin a Fresh Manicure
Even a well-applied manicure can be damaged by the first hour after painting.
Common aftercare mistakes
- Touching nails too soon
- Picking up heavy items right away
- Using nails as tools to scrape or pry
- Jumping into hot water or chores immediately
Fresh polish needs time to settle. If you press on it too early, you can leave dents, smudges, or tiny nicks that never fully disappear. Water and repeated hand use can also soften the finish before it has fully set.
A simple rule: treat the manicure gently until it feels fully dry, not just dry on the surface. If you need to get back to tasks quickly, use thin coats and give each layer enough time so the final finish is less vulnerable.
Quick Fixes for Streaks, Bubbles, Chips, and Peeling
Here is a simple troubleshooting guide you can use without starting over every time.
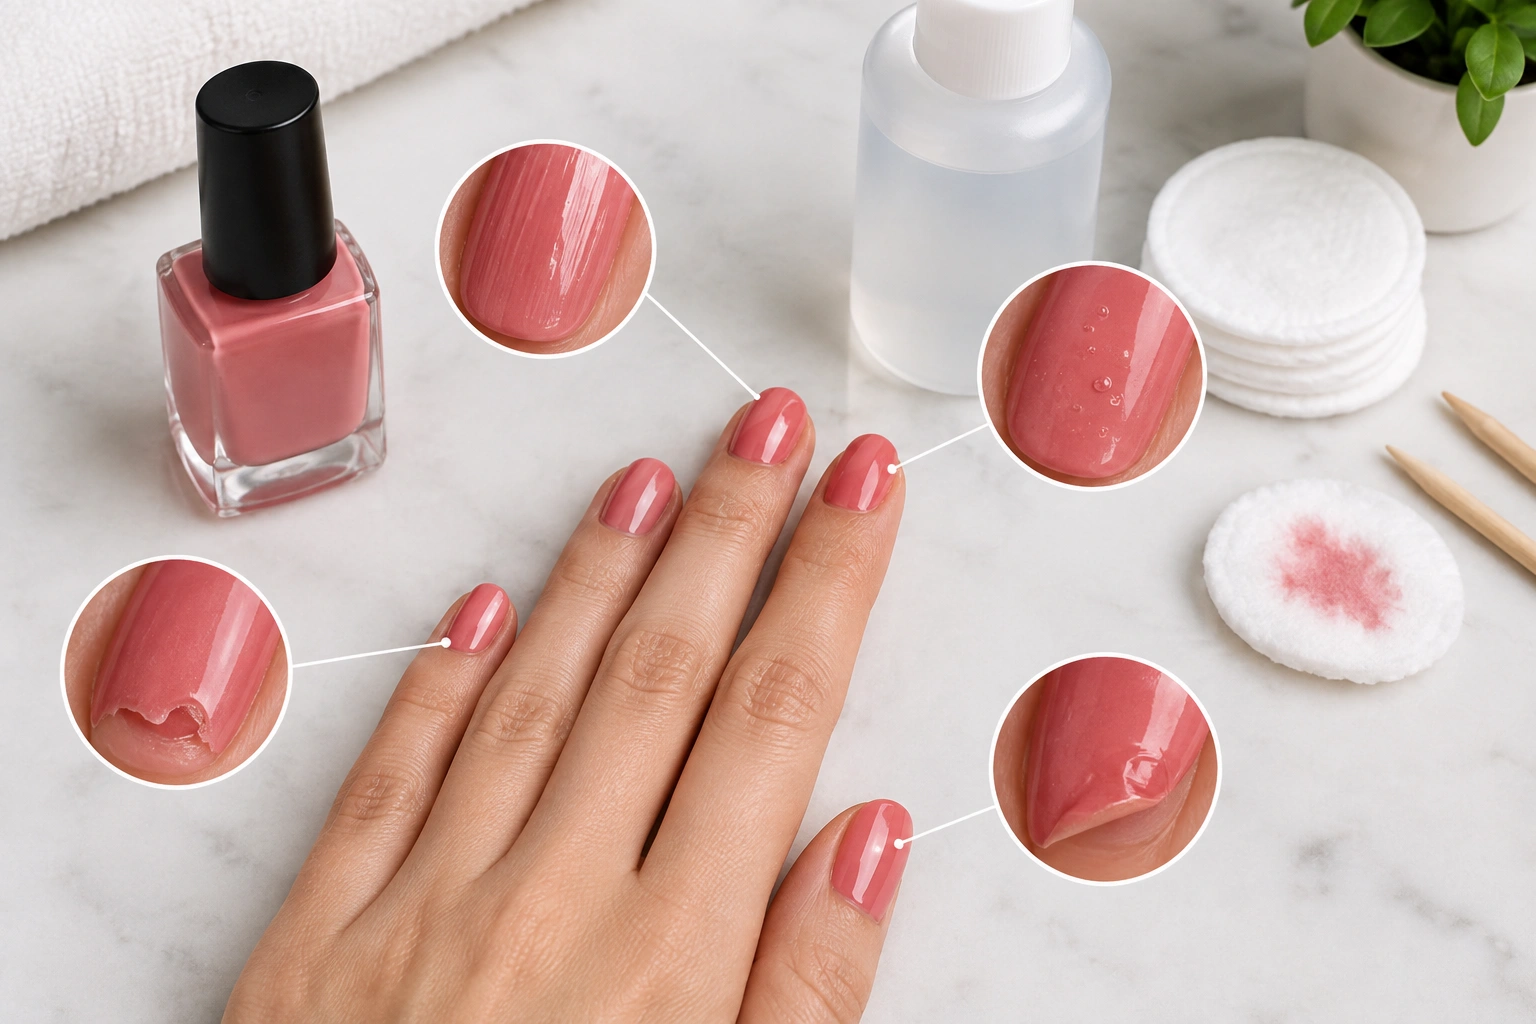
| Visible problem | Likely cause | Quick fix |
|---|---|---|
| Streaky color | Coat was too thin in some spots or brush was overloaded unevenly | Usually salvageable: add one more thin coat and use lighter pressure |
| Bubbles | Coat was too thick or next layer went on too soon | Sometimes salvageable if minor: let the polish settle longer; if bubbling is widespread, remove and start over |
| Chips at the tips | Free edge was not sealed or nails took a lot of wear | Small chips can sometimes be patched; larger chips usually look better if you repaint the nail |
| Peeling or lifting | Nail had oil, lotion, moisture, or old residue | Usually not salvageable: remove and repaint on fully clean, dry nails |
| Smudges | Nails were touched before fully dry | If still fresh, smooth lightly; if the surface is already dragging, it is better to leave it alone and let it dry |
| Polish on cuticle | Brush was too full or the stroke was too wide | Clean the edge with a small remover-dipped brush or correct carefully before it dries |
For a fresh smudge, a small cleanup can sometimes help if the polish is still wet. For a chip or peel, it is usually better to fix the area properly rather than keep layering over damage.
A Simple Step-by-Step Routine for Better Results
If you want a repeatable beginner routine, use this order:
- Remove old polish completely.
- Wash and dry your hands.
- Clean the nail surface with remover or cleanser.
- Apply a thin base coat.
- Apply the first thin color coat.
- Wait until it is no longer wet-looking.
- Apply the second thin color coat.
- Seal the free edge.
- Finish with top coat.
- Let the manicure dry before handling anything rough.
This routine works because it keeps each layer clean, thin, and protected. You are not trying to rush to the finished look. You are building it in a way that gives the polish a better chance to last.
How to Remove Polish Cleanly Before Your Next Manicure
Clean removal matters because leftover residue can affect the next manicure.
Acetone vs non-acetone remover
- Acetone: best for full removal, stubborn color, and prep before repainting because it works faster and more thoroughly.
- Non-acetone remover: best for gentle cleanup, sensitive skin, or lighter touch-ups when you do not need the strongest option.
If your goal is the cleanest possible prep before repainting, acetone is often the more efficient choice. If your skin is very dry or sensitive, non-acetone may feel more comfortable, but you may need a little extra wiping to get the nail fully clean.
Whatever you choose, use remover in a well-ventilated area and avoid letting it sit on your skin longer than needed. If your nails feel dry afterward, follow with hand cream after the manicure is fully finished, not before.
When to See a Nail Technician or Dermatologist
If polish keeps peeling no matter how carefully you prep, or if your nails are splitting, painful, or changing in ways that seem unusual, it is worth getting professional advice. A nail technician can help you review your application routine, while a dermatologist can check for skin or nail issues that may be affecting wear.
FAQs
Do I really need both a base coat and top coat?
For beginners, yes, if you want better wear and a cleaner finish. Base coat helps the polish grip and can smooth the surface. Top coat helps seal and protect the manicure.
How many coats of nail polish should I apply?
Most beginner manicures do best with two thin color coats. Some sheer shades may need a third thin coat, but thick layers usually cause more drying and wear problems.
How long should I wait between coats?
Wait until the previous coat is no longer wet-looking. A simple beginner rule is about 2 to 5 minutes per coat, or longer if the polish still looks glossy or moves when touched lightly.
Why does my nail polish chip so quickly?
The most common reasons are poor prep, skipping the base coat, not sealing the free edge, or using thick coats that do not dry evenly.
Why is my nail polish streaky?
Streaks often come from applying too little polish in some areas or using a brush that is overloaded in others. Thin, even coats usually solve it.
Can I paint my nails right after washing my hands?
Yes, but only if the nails are completely dry. Any leftover moisture can interfere with how well polish sticks.
Which remover should I use: acetone or non-acetone?
Use acetone if you want faster, more thorough removal and cleaner prep. Use non-acetone if you prefer a gentler option for light cleanup or sensitive skin.
Why does polish peel at the tips?
Tip wear often starts when the free edge is not sealed. Capping the tips on each coat helps reduce that.
A better manicure is usually not about more product — it is about fewer avoidable mistakes. The next time you paint your nails, use this quick checklist: clean, dry nails; a base coat; two thin color coats; sealed tips; and a top coat.