
You can remove fake nails without acetone using gentle methods like soaking in warm, soapy water, using oil or cuticle remover to loosen glue, or sliding dental floss under the nail edge to lift them off. These options soften the adhesive and let you safely lift or pry off acrylics or press-ons without harsh chemicals.
Work slowly and protect your natural nails with cuticle oil and a gentle file to reduce damage. If the nails resist or cause pain, stop and get professional help to avoid tearing or infection.
Key Takeaways
- Prepare your nails and soften glue before trying removal.
- Use gentle tools and oils to lift fake nails without harsh solvents.
- Stop and seek pro help if removal becomes painful or difficult.
Understanding Fake Nails and Removal Challenges
You need to know what type of nails you have, what harms can happen if you remove them wrong, and why you might want to skip acetone. Knowing these points helps you pick safer removal steps.
Types of Fake Nails
Fake nails fall into a few clear groups: acrylics, gel (including hard gels and builder gels), press-on or glue-on nails, and dip powder.
Acrylics are a powder-and-liquid mix cured into a hard shell. They bond at the cuticle and often require filing or soaking to loosen. Gel nails are cured with UV/LED light and can form a single hard layer over your nail. They often need thinning or softening before removal. Press-on or glue-on nails attach with adhesive tabs or nail glue and usually lift once the glue softens. Dip powder nails use resin and powder layers; they behave like acrylics when removed.
Each type sticks to your real nail differently. That matters because the best non-acetone method depends on how the fake nail adheres and how thick the product is.
Risks of Improper Removal
Peeling or prying off fake nails can strip layers from your natural nail, causing thinning, ridges, and pain. Forceful removal can detach the nail plate from the nail bed, raising risk of infection and slow regrowth.
Using metal tools carelessly can cut or scrape skin and cuticle tissue, which also raises infection risk. Over-filing to remove product can leave your nails too thin and weak for weeks.
If you skip proper softening steps, you may break or splinter the fake nail, leaving jagged edges that catch on things and tear the underlying nail. You should stop and re-evaluate if removal becomes painful, overly bloody, or shows signs of infection (redness, swelling, pus).
Why Avoid Acetone
Acetone dissolves many nail products fast, but it strips oils from skin and nails. That causes extreme dryness, brittle nails, and irritated skin for several days after use.
Acetone also gives off strong fumes that can irritate your eyes and lungs, especially in small, poorly ventilated spaces. Some people react to acetone with contact dermatitis.
If you have sensitive skin, thin or already damaged nails, or you want to preserve the fake nails for reuse, avoiding acetone can be better. Non-acetone options trade speed for gentler action, like soaking in warm soapy water, using cuticle oil to loosen glue, gentle filing, or using dental floss to work under press-ons. Each gentler method needs more time and patience, but it lowers the chance of long-term damage.
Preparation Before Removing Fake Nails
Gather the right items and protect your skin and nail beds before you start. Read labels and plan for patience—this helps prevent damage and speeds the process.
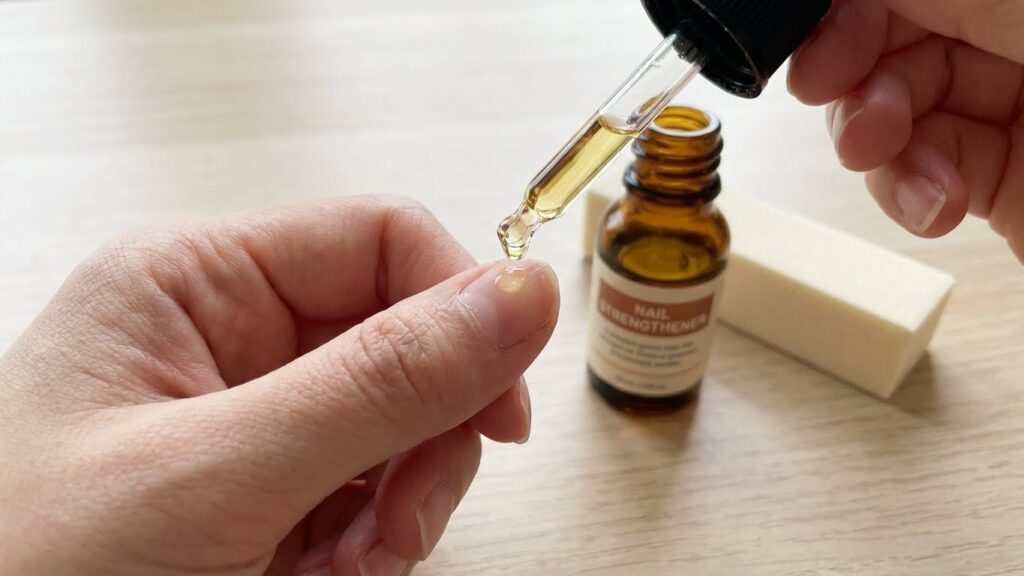
Essential Tools and Supplies
Have these items ready: a coarse nail file, a buffer, a bowl of warm soapy water, a wooden or metal cuticle stick, dental floss or a thin orange stick, rubbing alcohol or hand sanitizer, small cotton balls, and petroleum jelly or cuticle oil. Use non-acetone nail polish remover if you need to remove topcoat first.
If you plan to soak, fill a bowl with warm water and mild dish soap; the warmth helps soften glue and lifts edges. Keep a towel, a timer, and a trash bag nearby. Work at a well-lit table so you can see the nail edges clearly.
Buy or have on hand nail glue solvent labeled “non-acetone” only if it specifically lists removal for press-on nails. For acrylic or gel where acetone is not an option, a professional-grade remover or salon visit may be safer.
Protecting Your Natural Nails
Trim any long fake nail tips down with clippers before working. Shorter tips reduce leverage and lower the chance of pulling your natural nail. File the surface of the fake nail gently to remove the shiny top layer; this helps water and gentle solvents penetrate.
Apply petroleum jelly or cuticle oil around the skin and the nail fold to protect skin from irritation and drying. Avoid scraping aggressively; if a fake nail resists, stop and soak longer rather than forcing it.
Keep your nails dry and clean after removal. Use a soft file to smooth rough edges and apply a strengthening treatment or oil to restore moisture and support regrowth.
Safe Methods to Remove Fake Nails Without Acetone
You can soften the glue, slip the fake nail off, or lift edges gently using common items at home. Pick a method that fits the type of fake nail and how firmly it’s attached.
Warm Soapy Water Soak
Fill a bowl with warm water and add a few drops of dish soap or hand soap. Soak your fingertips for 15–30 minutes to soften the adhesive.
After soaking, use a soft cloth to press and roll the fake nail edge. If the nail lifts, gently push from the cuticle toward the tip with a clean orangewood stick. Repeat soaking if the nail feels stuck; never force it off.
Keep nails and skin moisturized during and after the process. Warm water is safest for most people, but stop if you feel pain or pressure.
Dental Floss Technique
Slide a length of dental floss under the free edge of the fake nail. Use waxed floss for smoother movement and hold the floss like a saw.
Work the floss back and forth, keeping it close to the natural nail so you separate adhesive, not the nail plate. Move slowly and stop if you feel resistance. Use short, steady strokes rather than pulling hard.
This method works best for single nails or small areas where the edge has already lifted. Clean the area with soap and water afterward and apply oil or lotion.
Natural Oil Removal

2. Gentle Dental Floss Lift
Use olive oil, coconut oil, or cuticle oil to weaken the glue bond. Warm the oil slightly (test temperature on skin), then soak cotton balls and place them on the nails.
Wrap each finger in plastic wrap or use small adhesive bandages to hold the oil-soaked cotton in place for 20–40 minutes. After soaking, use an orangewood stick to gently lift the nail edges while pushing from the cuticle.
Oil also hydrates your natural nail and skin. Reapply oil and repeat the soak if the nail doesn’t move easily.
Cuticle Stick Method
After softening the nail with warm water or oil, use an orangewood or metal cuticle pusher to lift the fake nail edge. Start at the sides and work toward the center.
Use gentle, sweeping motions and keep the tool parallel to your nail to avoid scraping the nail plate. If you meet resistance, stop and soak longer rather than pry.
Discard or file down the removed fake nail remnants. Finish by washing, applying oil, and trimming any rough edges on your natural nails.
Step-By-Step Guide for Each Removal Technique
You will find clear steps for three safe, acetone-free removal options. Each method lists tools, timing, and key safety tips so you can pick the best fit for your nails.
Detailed Soapy Water Removal Steps
Tools: warm water, antibacterial soap, bowl, nail file (180–240 grit), orange stick, towel, cuticle oil.
- Fill a bowl with warm water and add a few drops of antibacterial soap.
- Soak your fingertips for 15–20 minutes to soften the glue and edges of the fake nails.
- Gently file the top surface of the fake nail to remove shine. This helps water penetrate the adhesive.
- After soaking, use an orange stick to lift the edge of the fake nail. Work from the sides toward the center; do not force it.
- Repeat soaking for 10 minutes and try lifting again. Stop if you feel sharp pain.
- When the nail loosens, slide the orange stick under and push gently to remove the fake nail.
- Clean under your natural nail, dry, and apply cuticle oil.
Key safety note: if the nail resists after two cycles, switch to oils or see a professional to avoid ripping your natural nail.
How to Use Dental Floss Safely

Tools: unwaxed dental floss, cuticle oil, towel, orange stick, small mirror.
- Soften the adhesive first with warm soapy water or oil for 10–15 minutes.
- Thread a short length of floss under the lifted edge of the fake nail. Hold one end in each hand.
- Keep the floss flat against the nail bed. Use a gentle sawing motion to work the floss toward the base. Move slowly to avoid cutting skin.
- If you hit resistance, stop and re-soak or apply oil. For thick acrylics, flossing may not work and can damage the nail.
- Once loosened, lift the fake nail with the floss or an orange stick.
- Clean the nail surface and push back cuticles. Apply oil to rehydrate the nail and skin.
Safety tip: use unwaxed floss and never force the floss under a tight fit.
Effective Use of Natural Oils
Tools: olive oil or coconut oil, cuticle oil, petroleum jelly, cotton pads, bowl, towel.
- Warm 2–3 tablespoons of your chosen oil for a few seconds in the microwave or by placing the bowl in warm water. Test the temperature on your wrist.
- Apply petroleum jelly around the skin to protect it from extended oil exposure.
- Soak each fingertip in the warm oil for 15–25 minutes. Reapply warm oil as needed.
- After soaking, use an orange stick or soft nail file edge to gently pry the fake nail from the side. The oil will weaken the adhesive bond.
- If the nail stays tight, re-soak for another 10–15 minutes. Avoid prying aggressively.
- Once removed, wash hands with soap, pat dry, and massage cuticle oil into each nail.
Note: oil methods are slow but gentle. Choose them if your nails are thin or already damaged.
Post-Removal Nail Care and Recovery
Focus on rehydrating the nail plate and cuticles, rebuilding strength with targeted treatments, and protecting your nails from new damage while they grow out.
Hydrating and Restoring Nails
Start by soaking your nails in warm water for 5–10 minutes to remove any leftover residue and soften the nail plate. Pat your hands dry and apply a moisturizing oil or cream right away. Use cuticle oil with ingredients like jojoba, vitamin E, or almond oil twice daily to restore moisture and reduce peeling.
Add a weekly treatment: apply a protein-rich nail treatment or a biotin supplement topically if recommended, or use a mild nail strengthener that contains keratin or calcium. Avoid harsh nail polish removers and let your nails breathe for several days before applying polish. Keep nails short and gently file any rough edges with a fine-grit file to prevent snags.
Preventing Damage After Removal
Protect newly exposed nails by wearing gloves when doing chores, especially when using detergents or cleaning products. Water and chemicals soften nails and raise the chance of splitting, so limit soaked time and dry nails thoroughly after exposure.
Trim nails to a safe, even length and file in one direction to avoid layering. If you want polish, use a breathable base coat and avoid prolonged use of gel or acrylic systems for at least 6–8 weeks to let nails recover. Track progress: take a photo every two weeks to see growth and adjust care if you notice persistent thinning, pain, or discoloration, in which case see a clinician.
Mistakes to Avoid When Removing Fake Nails Without Acetone
You can protect your natural nails by avoiding a few common errors. Focus on gentle techniques and proper aftercare to prevent peeling, thinning, or infection.
Using Excessive Force
Do not pry, pull, or peel fake nails off quickly. Force can lift layers of your natural nail and cause splitting or bleeding. If a fake nail resists, stop and soften the adhesive with warm, soapy water, oil (olive or cuticle oil), or by soaking the nail bed longer.
Use gentle tools only: a soft cuticle pusher or dental floss slid carefully under the edge. Work slowly and lift a little at a time. If the nail still won’t budge after extended soaking, file the top layer thinner first or see a technician. Avoid metal picks or vigorous scraping; they cut and weaken the nail plate.
Skipping Post-Removal Care
After removal, your nails will likely be dry, thin, or rough. Do not skip moisturization and repair steps. Gently buff away adhesive residue with a fine buffer, then wash and dry your hands.
Apply a nourishing oil or hand cream every day for at least a week. Use a nail strengthener or a protein-based treatment if your nails feel soft or peel. Trim hangnails and avoid new polish for a few days so nails can recover. If you notice persistent pain, swelling, or discoloration, get professional care.
When to Seek Professional Help
If your natural nails feel painful, swollen, or show signs of infection (redness, pus, or spreading warmth), stop home removal and see a professional or a doctor right away. These symptoms can mean an infection or nail bed damage that needs trained care.
When nails are deeply glued, lifting or pulling them causes tearing or heavy thinning. If you notice large chips, deep grooves, or repeated splitting, a nail technician can remove the fake nails safely and trim or treat the natural nail to prevent further harm.
You should also seek help if you have a medical condition that affects healing, such as diabetes or a blood clotting disorder. A professional will use sterile tools and techniques that lower infection risk and protect fragile skin.
If you tried gentle, acetone-free methods for a while with no progress, a salon can use safer removal tools and controlled solvents. This reduces the chance you’ll over-file, peel, or otherwise damage the nail plate while trying to force the nails off.
When in doubt, ask a licensed nail technician. They can assess adhesive type, nail health, and the safest removal plan for your situation.
FAQs
What are safe ways to remove fake nails without acetone?
You can soak your nails in warm, soapy water to soften the glue, then gently lift the tips with a cuticle pusher or an orangewood stick. Oils like olive or coconut oil, or petroleum jelly, help break down adhesive and protect your skin while you work.
Will warm water alone work for all types of fake nails?
Warm water helps most press-on and glue-on nails, but it may not fully remove gel or strong acrylics. For tougher glue, try a mix of warm water and dish soap, and allow more soaking time.
Can you use dental floss or a tool to remove nails?
Yes. Slide dental floss under the edge and saw gently to lift the nail away. Use caution to avoid pulling or tearing your natural nail. A soft cuticle pusher works better for controlled lifting.
How long should you soak and how patient must you be?
Expect 15–30 minutes for press-ons and longer for stubborn glue. Patience reduces damage; stop if you feel pain and try more soaking or oil instead.
Will these methods damage your natural nails?
If you work slowly and use oil or soap to soften the adhesive, you lower the risk of damage. After removal, gently buff and moisturize your nails and cuticles to help recovery.
Where can you find more trusted nail-care tips?
Check reputable health sites like the American Academy of Dermatology for skin-safe practices and nail care advice.
Conclusion
You can remove fake nails without acetone using gentle methods that protect your natural nails. Soaking in warm, soapy water, using oil or lotion, and gently lifting with a cuticle pusher all work when you take your time.
Be patient and avoid force. Rushing or prying nails off can tear the nail plate and cause pain or infection.
Keep your tools clean and use small, careful motions. If glue or acrylic resists, repeat soaking or try an oil-based remover rather than force.
After removal, care for your nails. Trim and file rough edges, push back cuticles gently, and apply a moisturizing oil or hand cream daily.
If you feel pain, see a professional. A salon can remove stubborn nails safely, especially if the fake nails were applied with strong adhesive or damaged your natural nails.
Tips at a glance:
- Soak: warm soapy water for 15–30 minutes.
- Lift gently: use a cuticle pusher or orange stick.
- Moisturize: oil or cream after removal.
- Seek help: go to a pro for pain or heavy adhesive.
These steps keep your nails healthier and reduce the need for harsh chemicals.