
Tired of dealing with lifting, tearing, or slow salon trips? You can remove fake nails at home safely and quickly with a few simple tools and a patient, gentle approach. Soak acrylic or gel nails in acetone (or use soaking alternatives when needed), gently loosen them, and protect your natural nails with proper aftercare to avoid damage.
You’ll learn step-by-step options for glue-on, acrylic, gel, and dip nails, plus easy swaps if you don’t have acetone. Follow clear precautions to avoid pain or thinning, and know when a pro should handle the job.
Key Takeaways
- Prepare your nails and gather safe supplies before starting removal.
- Use gentle, timed methods to lift and remove fake nails without force.
- Treat and protect your natural nails after removal to restore health.
Preparing to Remove Fake Nails
You will check what kind of fake nails you have, gather the proper tools, and protect your skin and cuticles before starting. Doing these steps carefully makes removal safer and faster.
Assessing Nail Type
Look closely at each nail to identify the type: acrylic, gel, press-on (glue-on), or dip powder. Acrylics are hard and thick at the free edge and may show a visible seam at the cuticle. Gel nails often look glossy and may be slightly flexible. Press-ons usually have a small gap at the cuticle or visible adhesive residue.
Note any signs of damage or lifting. If you see swelling, redness, pus, or severe pain, stop and seek professional help. Also check how long the nails have been on and whether polish or topcoat covers them; you should remove polish before any soaking or filing steps.
Gathering Necessary Tools
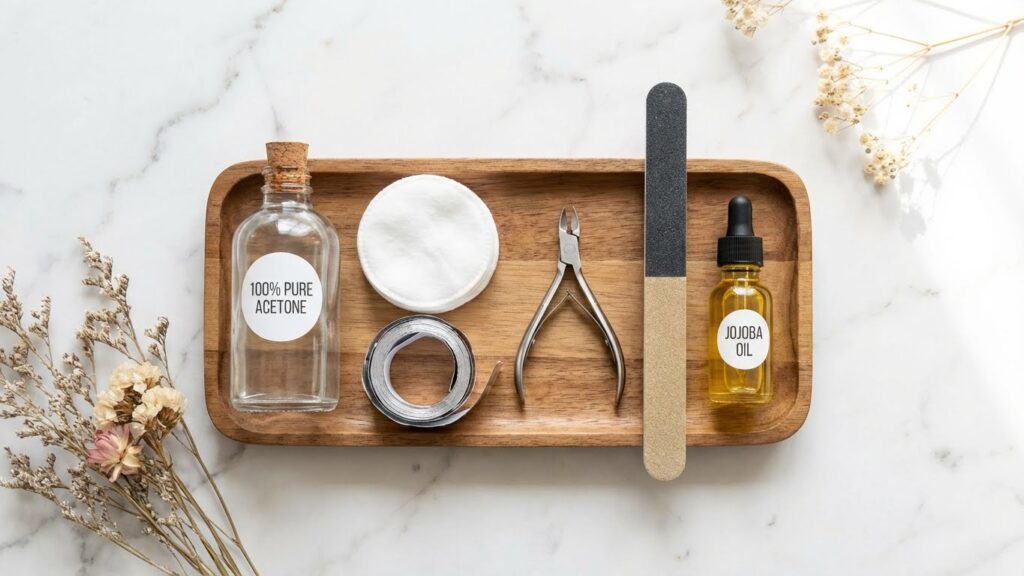
Collect items before you start to avoid interruptions. You will need acetone (100% or high-purity) for acrylic and gel, nail clippers, a coarse and fine nail file, a glass or metal bowl for soaking, cotton balls or pads, aluminum foil strips, a wooden or metal cuticle pusher, and a towel. For press-ons, have dental floss or a cuticle stick and some gentle oil (olive or cuticle oil).
Keep an acetone-free nail polish remover if you prefer less drying options for glue-ons. Place tools on a clean surface and open windows or use a fan; acetone fumes can be strong.
Protecting the Skin and Cuticles
Protect the skin around your nails to prevent irritation. Apply a thin layer of petroleum jelly or a thick cream to the skin and cuticle area before you work with acetone. This barrier limits acetone contact and reduces dryness.
Use cotton soaked in acetone that covers only the fake nail, then wrap with foil to confine the solvent. Do not let acetone sit on skin longer than needed; remove foil and rinse skin with soap and water after removal. Keep cuticle oil or a soothing moisturizer nearby to rehydrate the nail folds immediately after the procedure.
Safe At-Home Methods
You can remove fake nails at home using simple tools and common products. Follow clear steps, work slowly, and protect your natural nails and skin.
Soaking Off Acrylic Nails
File the top layer of the acrylic gently to break the seal and let acetone penetrate faster. Use a coarse file for 1–2 minutes until the shiny surface is gone, but stop if you feel heat or pain.
Soak cotton balls in 100% acetone and place one on each nail. Wrap each finger tightly with aluminum foil to hold the cotton in place and trap heat. Leave the wraps on for 15–30 minutes, checking one nail after 15 minutes.
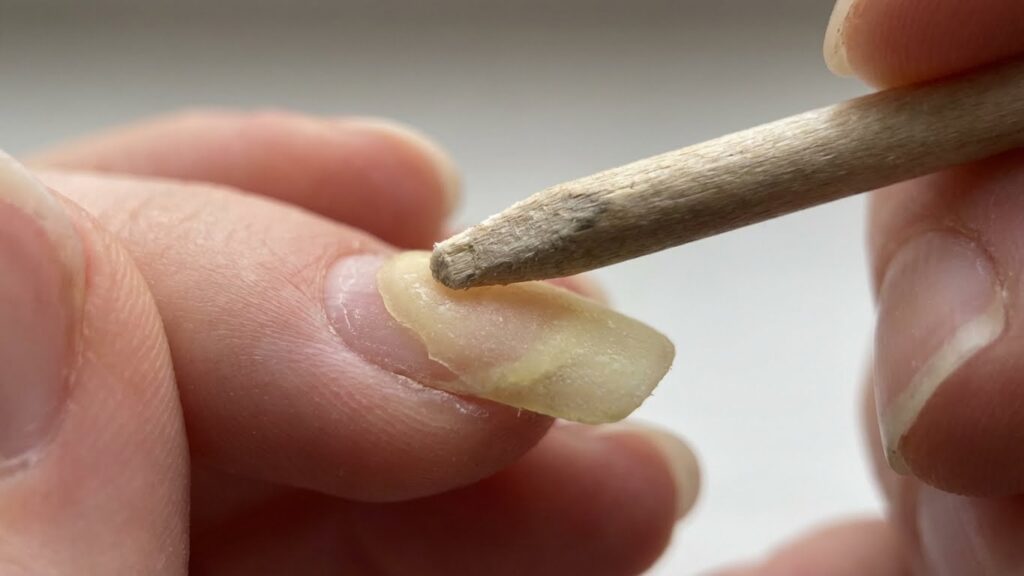
When the acrylic softens, push it off gently with a wooden cuticle stick or orange stick. Do not pry or force stubborn pieces; re-soak for another 10 minutes instead. Finish by buffing the nail surface lightly and applying cuticle oil and a moisturizer.
Gently Removing Gel Nails
File the topcoat and matte surface to let acetone work. Use a fine-to-medium file and remove shine without cutting into the natural nail plate.
Use acetone-soaked cotton on each nail and cover with foil, or use an acetone nail soak bowl. Check nails at 10-minute intervals. When the gel peels or flakes, use a soft nail tool to lift loosened gel; stop if you hit resistance.
After removal, buff gently to smooth ridges and apply a nourishing oil. Avoid peeling or forceful scraping, which thins and weakens your natural nails.
Using Foil Wraps for Press-On Nails
If you have glue-on press-ons, soak them first in warm, soapy water for 10–15 minutes to loosen the adhesive. This often softens glue enough to remove some nails without chemicals.
For stubborn press-ons, use acetone-soaked cotton and foil wraps over each nail for 10–20 minutes. Press gently at the cuticle edge with an orange stick to lift the press-on as the glue softens. Work one nail at a time.
Clean adhesive residue with a gentle buffer or oil. Rehydrate skin with hand cream and cuticle oil after removing press-ons to restore moisture.
Step-By-Step Removal Process
You will shorten and soften the fake nails, apply a remover suited to the nail type, then work gently to lift and remove the artificial tips without peeling or ripping your natural nails.
Trimming and Filing Fake Nails
Start by clipping the visible length of each fake nail with nail clippers. Cut straight across to avoid stress points. Keep clippings small so you remove as much bulk as possible before filing.
Use a coarse nail file (100–180 grit) to file the top layer and edges. File in one direction to avoid tearing the fake material. If the nails are press-ons, lift an edge first with a cuticle stick and then clip; do not pry hard.
Thin acrylic or gel overlays will take longer to file. Stop when most of the top layer is gone and the nail feels thinner. Clean dust away with a soft brush or cloth before you move to the remover step.
Applying Remover Solution
Choose acetone for acrylics and hard gels. Use pure acetone in a well-ventilated area and protect skin with petroleum jelly along the nail folds. For press-ons or soft gels, warm soapy water, cuticle oil, or non-acetone remover may work.
If using acetone, soak cotton balls in acetone, place one on each nail, and wrap with aluminum foil or use reusable nail clips. Check every 10–15 minutes. For press-ons, lift an edge and soak the exposed glue with warm soapy water for 10–20 minutes instead.
Keep a bowl of warm water nearby to rinse or cool your fingers if they get too dry. Replace cotton and rewrap nails if needed until the material looks softened and lifts with gentle pressure.
Loosening and Lifting Artificial Nails
After soaking, test one nail by gently pushing the softened edge with a wooden cuticle stick. Use light, steady pressure; stop if you feel resistance. The product should lift without forcing.
Work around the nail in small sections, re-soaking any stubborn spots. For acrylics that resist, file a little more and repeat the acetone soak. For press-ons, slide the edge slowly while applying warm water to dissolve the glue.
When a fake nail detaches, clean the natural nail surface with a soft file or buffer to remove residue. Finish by washing hands, applying cuticle oil, and moisturizing to restore hydration.
Aftercare and Nail Health
Focus on rehydrating your nails and cuticles, repairing any lifting or thinness, and stopping habits or products that cause damage. Use targeted oils, gentle treatments, and a simple routine to help your nails recover.
Moisturizing Nails and Cuticles
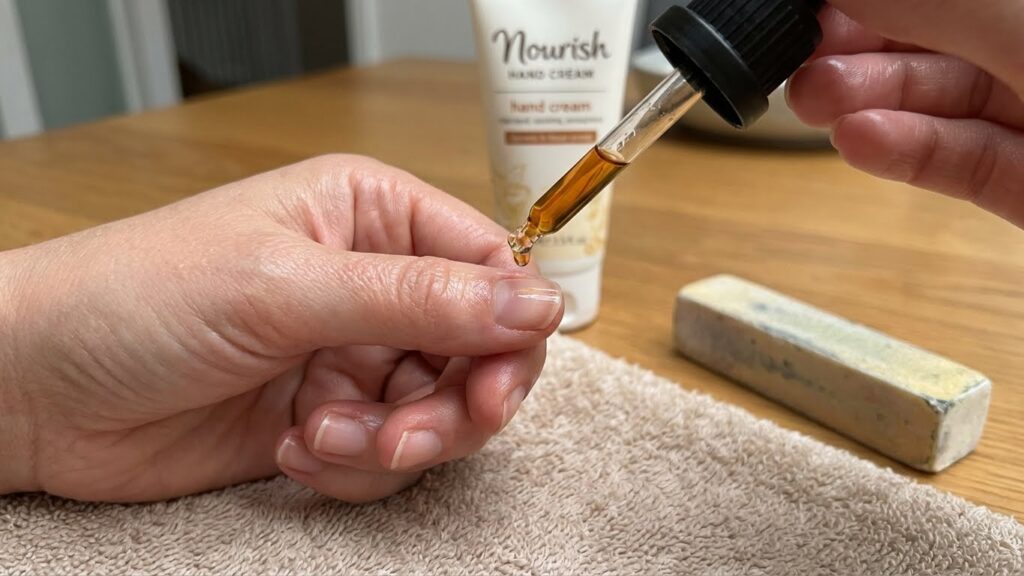
Apply cuticle oil twice daily for at least two weeks after removal. Use oils with jojoba, vitamin E, or almond oil; put one drop on each nail and massage for 30 seconds. This restores natural oils and reduces peeling.
Use a hand cream after washing hands. Look for creams with glycerin or shea butter and rub them into nails and surrounding skin. Avoid alcohol-based sanitizers when possible, or follow with lotion right away.
Soak your nails in warm olive oil for 10–15 minutes once or twice a week. That extra moisture helps brittle nails and relieves tight, dry cuticles without harsh chemicals.
Repairing Natural Nails
Trim and file gently to remove snags. Use a fine-grit file and file in one direction to prevent splitting. Keep nails short until they feel stronger.
Apply a nail strengthener or protein treatment every other day for 4–6 weeks. Choose products labeled “protein” or “keratin” and follow the bottle’s directions. Stop using if nails become harder but more brittle.
If you see white spots, thinning, or pain, stop home treatments and see a professional. Persistent issues can mean infection or long-term damage that needs medical or salon care.
Preventing Future Nail Damage
Limit wearing fake nails to avoid repeated weakening. Give your nails a break of at least 2–4 weeks between sets to recover.
Use a non-acetone remover when possible and avoid aggressive peeling. When applying press-ons, prep nails by gently buffing and using the correct adhesive amount — not too much.
Wear gloves for chores and use cuticle oil daily. If you bite or pick at nails, try a bitter polish or fidget substitute to break the habit and protect new growth.
Common Mistakes to Avoid
Avoid quick fixes that strip or tear your nails, skip protection, or mishandle strong solvents. Small steps now keep your natural nails thicker, free of lifts, and less likely to get infected.
Forcing or Peeling Off Fake Nails
Do not pry, peel, or yank fake nails off. Pulling at glued or acrylic nails can remove layers of your natural nail, cause painful lifting (onycholysis), and create ragged edges that trap dirt and bacteria.
If a nail won’t come off easily, soak it in acetone or use a professional remover tool instead. Work one nail at a time and let the adhesive dissolve fully before lifting any part of the fake nail.
Use a wooden or plastic cuticle stick to gently ease the fake nail once the glue softens. Stop immediately if you feel resistance or sharp pain; give the nail more soak time and repeat rather than forcing it.
Skipping Nail Protection
After removal, your natural nails are fragile and thin. Skip harsh activities for at least a week and keep nails short to prevent tearing.
Apply cuticle oil and a thick hand cream daily. These restore moisture and reduce peeling. Consider a strengthening polish or a short course of biotin supplements if your nails stay brittle for several weeks.
When cleaning or using detergents, wear gloves. Avoid picking at rough spots; instead, lightly buff any uneven edges with a fine buffer to prevent snags and breaks.
Using Harsh Chemicals Incorrectly
Acetone works best but is a strong solvent that dries skin and nails. Never soak for longer than recommended—typically 10–20 minutes per nail with fresh acetone—and avoid repeated long soaks in one day.
Protect skin and cuticles by applying petroleum jelly around each nail before soaking. Use cotton soaked in acetone and wrap with foil or clips to control exposure and reduce skin contact.
Do not mix chemicals (like acetone with household cleaners) or use flammable products near heat. Rinse and moisturize thoroughly after removal to restore oils and reduce cracking or brittleness.
When to See a Professional
If your nails look infected, extremely thin, or the fake nails won’t come off after safe home attempts, get help. A pro can remove the nails without causing more damage and can treat infections or deeply weakened nail beds.
Recognizing Nail Infections
Look for redness, swelling, and pain around the nail fold that gets worse over 24–48 hours. Pus, a bad smell, or spreading redness toward your finger are signs you should stop home removal and see a professional right away.
If your nail plate lifts and the skin underneath looks dark, discolored, or irritated, that may mean infection or trauma. A salon technician or medical provider can clean the area, remove the product safely, and advise antibiotics or topical treatment if needed.
Also watch for fever, increased warmth, or severe throbbing. These symptoms suggest a deeper infection that requires medical care, not just salon treatment.
Dealing With Stubborn Fake Nails
If the adhesive or acrylic won’t budge after a proper acetone soak or gentle filing, stop pulling or prying. Forcible removal often rips layers of your natural nail away and causes long-term thinning.
Seek a nail technician when nails have been on for more than 6–8 weeks, if multiple layers are built up, or if the product resists standard removal methods. Professionals use tools and techniques—controlled filing, professional-grade acetone baths, and steam—that lessen damage.
Tell the technician about any thin, split, or peeling nails before they start. They can choose a gentler approach and recommend aftercare like strengthening treatments to help your natural nails recover.
Alternative Nail Removal Options
If you want to avoid acetone, try warm soapy water first. Soak your nails for 15–30 minutes to soften the glue and lift edges. This works best for glue-on or press-on nails.
Use oil-based methods like olive oil, coconut oil, or cuticle oil to loosen adhesive. Apply oil around the nail base and under lifted edges, then wait 10–20 minutes and gently pry with a cuticle pusher.
Dental floss or thin thread can slide under press-on nails to break the bond. Work slowly from one side to the other and stop if you feel resistance to protect your natural nail.
A gentle mechanical approach uses a nail file and a cuticle pusher. File the top of acrylic or gel to thin it, then push from the sides to lift. Be careful not to file into your real nail.
Non-acetone polish remover can help with some adhesives. Soak cotton in remover and press to the nail for 20–30 minutes, then try lifting. It takes longer than acetone and may not work on all types.
Home remedies are slower but kinder to skin and nails. Always stop if you feel pain. After removal, wash hands and apply a moisturizer or cuticle oil to restore hydration.
FAQs
What if the fake nails won’t lift?
Try gentle filing and an acetone soak. File the top coat first to let acetone work faster. If nails still resist after 30–40 minutes of soaking, stop and see a pro to avoid damage.
Can acetone hurt my skin or nails?
Acetone dries skin and can weaken nails with repeated use. Limit soak time, apply cuticle oil afterward, and moisturize your hands. If you have cuts or irritation, skip acetone and consult a technician or dermatologist.
Are there non-acetone options?
Yes. Warm soapy water, oil soaks, or gentle lifting with dental floss can remove press-ons or glue-on nails. These methods take longer but reduce chemical exposure.
How do I know when to go to a salon?
Go if your natural nails are thin, damaged, infected, or if home removal causes pain. Professionals can remove acrylics or gels safely and check for infection. For medical guidance, visit a trusted site like the American Academy of Dermatology (https://www.aad.org).
Will removal damage my natural nails?
You can avoid most damage by being patient, filing gently, and using proper soaking techniques. Do not pry or force nails off. Repair and strengthen nails with a nail-specific treatment after removal.
How do I care for nails after removal?
Trim, buff lightly, and apply a hydrating nail oil. Give your nails a break from enhancements for a few weeks and keep them clean and moisturized. For tips on nail health, check credible nail care resources like Mayo Clinic (https://www.mayoclinic.org).
Conclusion
You can remove fake nails at home safely if you take your time and use the right method. Pick acetone soaks for acrylics and gel, gentle lifting for press-ons, and warm soapy water for lightly glued nails.
Protect your natural nails during the process. Keep them hydrated with cuticle oil and avoid forceful prying that can peel or thin the nail plate.
Watch for signs that need pro care. If you feel pain, see redness or pus, or your nails are very damaged, book a salon or medical visit.
Quick checklist to remember:
- Work slowly and be patient.
- Use proper tools and acetone when needed.
- Moisturize and rest your nails after removal.
You’ll keep your nails healthier by repeating gentle care and giving them breaks between enhancements. Follow these steps and your nails will recover faster and look better for longer.