
You can remove fake nails without acetone using gentle soaking and careful lifting, soak methods and simple tools that protect your natural nails. Use warm, soapy water or oil soaks to soften glue, then slide a cuticle pusher or dental floss under the edge and work slowly to lift the nail without prying or forcing.
Prepare a small kit with warm water, mild soap, olive or cuticle oil, a soft nail file, a cuticle pusher, and dental floss so you can stay calm and avoid damage. Take your time, check progress often, and stop if you feel pain or see lifting of your natural nail.
Key Takeaways
- Soak nails to soften adhesive before attempting removal.
- Use gentle tools and slow motions to lift fake nails safely.
- Care for nails after removal with oil and light filing.
Preparation for Safe Nail Removal
Gather basic supplies, reduce nail length, and protect skin before you start. Have everything ready so you can work steadily and avoid rushing.
Gathering Essential Tools
Make a checklist and lay items out on a clean towel or tray. You will need: a bowl for warm water, mild dish soap, cuticle oil or olive oil, a soft nail file, orangewood stick or cuticle pusher, nail clippers, a buffer, cotton pads, and a towel. If you plan to soak, use bowls large enough for your fingertips and a timer to track soaking times.
Choose a gentle, non-acetone polish remover if you want extra adhesive help. Keep a moisturizer and hand cream nearby for aftercare. Good lighting and a chair with back support make the process safer and more comfortable.
Trimming and Filing Nails
Trim the free edge of the fake nails as short as you can with clippers. Cut small amounts at a time to avoid cracking the artificial tip or pulling on your real nail. Work slowly and stop if you feel tugging or pressure.
File the top surface lightly to break the shiny seal so oils and soaks penetrate better. Use a fine-grit file and file in one direction to limit lifting. Don’t file down to the natural nail; stop when the surface looks dull.
Protecting Your Skin and Cuticles
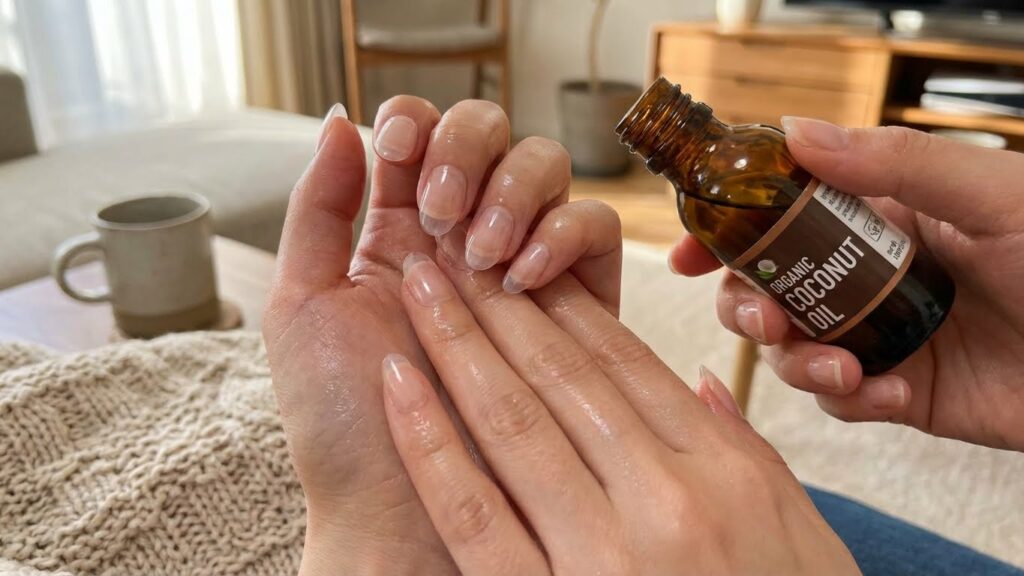
Apply a thin layer of petroleum jelly, coconut oil, or cuticle oil around the nail bed and onto the surrounding skin. This creates a barrier that helps protect skin from irritation during soaking and from any adhesive residue.
If you have cuts, redness, or infected areas, avoid DIY removal. Cover nearby skin with small pieces of cotton or a barrier cream during any soaking. Keep antiseptic wipes and bandages on hand in case you need to clean and protect the skin afterward.
Soaking Techniques Without Acetone
These methods weaken the glue so you can lift or slide fake nails off with less force. Each technique uses common items and focuses on soaking time, gentle lifting, and nail care afterward.
Using Warm Water and Soap
Fill a bowl with very warm water — as hot as you can tolerate without burning — and add a few drops of dish soap or liquid hand soap. Soak your nails for 20–30 minutes to soften the adhesive. Refill with warm water if it cools.
After soaking, try gently pushing at the edge of the fake nail with an orange stick or a soft cuticle pusher. Work slowly from the sides and center. If the nail resists, soak another 10–15 minutes instead of forcing it.
Dry your hands and rub a moisturizing oil or cream into the nail beds. Buff any glue residue lightly with a soft nail buffer once the nail is off. This method is low-risk but slower than chemical options.
Oil-Based Soak Method
Use olive oil, coconut oil, or baby oil warmed slightly (not hot). Pour enough oil into a bowl to cover your fingertips and soak for 15–30 minutes. Oil seeps under the false nail and helps break down the adhesive’s grip.
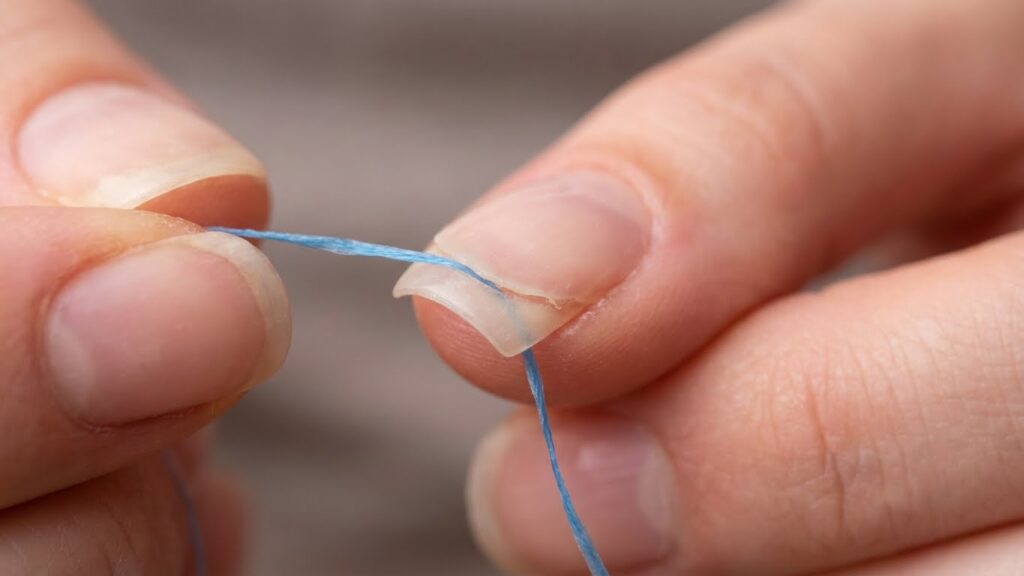
After soaking, slide a floss thread or dental floss gently under the edge of the fake nail. Move it back and forth in a sawing motion while holding the finger steady. Stop if you feel pain and soak longer instead.
Wipe off excess oil and wash with soap to remove residue. Apply cuticle oil and a gentle hand cream to rehydrate nails and skin. This method also nourishes the natural nail as you remove the fake one.
Baking Soda and Toothpaste Method
Mix equal parts baking soda and white toothpaste to make a paste with a little warm water. Spread the paste around the base and edges of the fake nail, then let it sit for 15–20 minutes. The mildly abrasive paste helps loosen glue without harsh solvents.
Use an orange stick to lift the edges after the paste has worked. If the nail won’t move, repeat the paste application and soak another 10–15 minutes. Rinse thoroughly with warm soapy water to remove residue.
Finish by massaging a small amount of olive oil into the nail and cuticle to restore moisture. This method is affordable and gentle but may require multiple applications for strong adhesives.
Gentle Mechanical Removal Methods
You will work slowly and use gentle tools to loosen fake nails without chemicals. Focus on reducing pressure, protecting the nail bed, and stopping if you feel pain.
Lifting Edges with an Orange Stick
File the top coat of the fake nail lightly to remove shine. This helps the tool grip and prevents slipping.
Soak your nails in warm, soapy water for 10–15 minutes to soften the glue. Dry your hands and use a wooden orange stick with a flat, rounded tip to lift at the edge where the fake nail meets your natural nail.
Work from one side toward the center in small, gentle pushes. Don’t force the nail; if it resists, stop and soak longer. If you see a gap form, slide the stick slowly along that gap to separate more adhesive.
Keep cuticle oil or mineral oil nearby and apply it to the lifted area as you go. The oil lubricates the bond and lowers pulling on your nail. Take breaks between nails and file any rough spots on the fake nail surface to ease prying.
Dental Floss Technique
Trim the fake nail short so it won’t catch on the floss. Soak your nails in warm water for 10 minutes to soften glue and dry them lightly.
Slide a length of unwaxed dental floss under the lifted edge. Use a gentle sawing motion, moving the floss back and forth while pulling it toward the free edge. Keep the floss close to the natural nail to avoid digging into the nail bed.
Pause if you feel tightness or pain; re-soak and try again. Apply oil to the separation line as you work to reduce friction and help the adhesive slip. Finish by buffing the natural nail surface lightly and massaging cuticle oil into the nail and skin.
Aftercare for Natural Nails Post-Removal
You need to restore moisture, rebuild strength, and protect weakened nail edges. Focus on hydration, gentle shaping, and targeted treatments that speed recovery without harsh chemicals.
Moisturizing and Nourishing the Nails
Apply a cuticle oil (jojoba, sweet almond, or vitamin E) twice daily. Put a drop at each nail base, massage for 20–30 seconds, then rub the excess into your fingertips. Oils improve flexibility and slow splitting.
Use a rich hand cream after washing hands and before bed. Look for creams with glycerin, shea butter, or ceramides. Wear cotton gloves overnight after a heavy application to boost absorption.
Add a weekly 10–15 minute soak: warm water with a teaspoon of olive or coconut oil and a drop of mild soap. Pat nails dry and reapply cuticle oil. Avoid long exposure to hot water and harsh soaps while nails recover.
Repairing Nail Damage
Trim and file nails straight across, then round the tips slightly to prevent catching. Use a fine-grit file and file in one direction to reduce peeling.
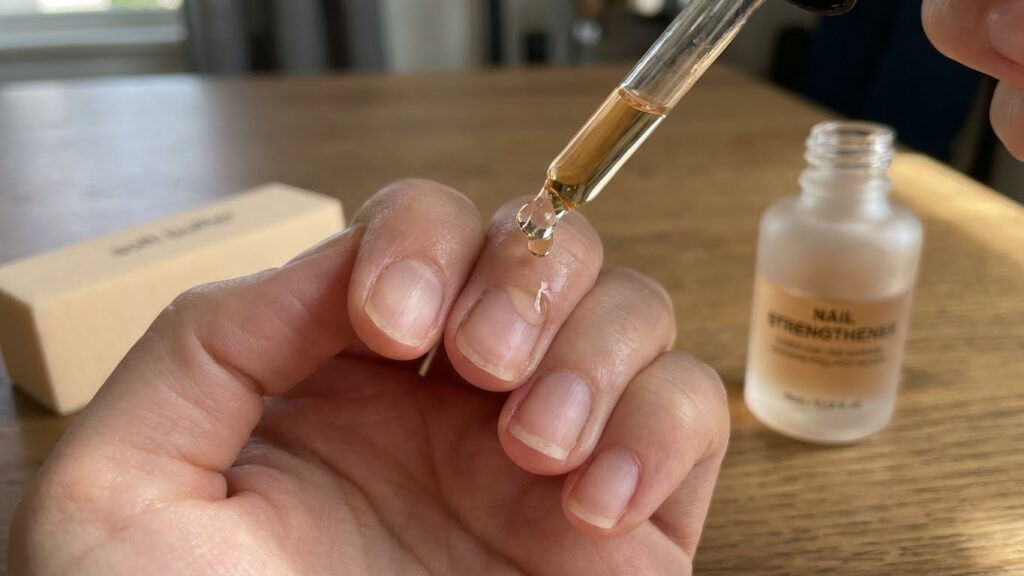
If nails are thin or soft, use a protein-based nail strengthener 2–3 times a week. Choose products without formaldehyde or strong solvents. Stop using strengtheners if you notice increased brittleness and switch to oil and moisturizer instead.
Avoid acrylics, gels, or aggressive manicures for at least 4–6 weeks. Protect nails when cleaning by wearing nitrile or cotton-lined gloves. If you see severe lifting, persistent pain, or signs of infection (redness, pus), contact a dermatologist.
Common Mistakes to Avoid
Trying to peel or force fake nails off can rip layers from your natural nail. Stop as soon as you feel strong resistance. Work slowly and use softening methods first.
Skipping nail-softening steps wastes time and raises injury risk. Warm, soapy water or oil needs time to loosen adhesive. Be patient and repeat soaks if needed.
Using sharp metal tools without care can cut your cuticles or skin. If you use a cuticle pusher, choose a blunt tool and apply gentle pressure. Avoid digging under the nail edge.
Believing household solvents are safe substitutes can harm your skin. Nail polish remover with acetone alternatives or strong cleaning chemicals may irritate or dry the skin. Test a small area and limit exposure.
Rough filing the natural nail to remove adhesive weakens it. File only the fake nail surface and stop when you see the real nail color. Use a light hand and a fine grit file.
Skipping moisturization after removal leaves nails brittle and flaky. Apply cuticle oil or a gentle hand cream right away. Regular care helps nails recover faster.
Alternative Products for Removing Fake Nails
You can remove fake nails without acetone using milder solvents and ready-made kits. These options soften glue and lift tips while being gentler on your skin and cuticles.
Non-Acetone Nail Polish Removers
Non-acetone removers use solvents like ethyl acetate or isopropyl alcohol. They work slower than acetone but reduce extreme drying. Soak a cotton ball, place it on the nail, and wrap with foil for 20–40 minutes. Check progress every 10 minutes and gently push the fake nail off with an orange stick or cuticle pusher when the bond has loosened.
Look for removers labeled “for artificial nails” or “for glitter/gels” because they often contain stronger non-acetone blends. Follow with oil or a rich hand cream to restore moisture. If nails resist, stop and soak longer rather than forcefully prying to avoid lifting or splitting your natural nail.
Drugstore Nail Removal Kits
Drugstore kits often combine soaking solution, nail clips or foil, and a tool for prying. Kits aimed at nail tips or press-ons use a weaker solvent plus mechanical removal aids so you can remove extensions at home with less mess.
Read the instructions and use the included soak time; typical kits require 15–30 minutes. Use the provided paddle or a soft pusher to lift the fake nail once the adhesive loosens. Replace any single-use pads or solution after one use to avoid contamination. Finish with cuticle oil and a short filing session to smooth the nail edge.
When to Seek Professional Help
If your nails are painful, red, swollen, or bleeding, stop trying to remove the fake nails yourself. These signs can mean you have an infection or tissue damage that needs medical or salon attention. A professional can clean the area and remove nails safely.
If the fake nails are glued on tightly or bonded with hard acrylic or gel, and your removal attempts cause lifting or tearing of the natural nail, see a nail technician. They have tools and solvents to remove product without harming your nail bed.
If your natural nails are very thin, cracked, or peeling under the fake nails, a pro can assess nail health and recommend treatments. They can also advise on how long to wait before reapplying artificial nails and which options are gentler for recovery.
If you have a medical condition like diabetes, poor circulation, or a weakened immune system, get help from a healthcare provider or licensed technician. Complications can escalate quickly, and professionals know how to minimize risk.
If you feel unsure, anxious, or lack the right tools, choose a salon visit. A professional removal is often faster, safer, and less likely to cause long-term damage to your natural nails.
FAQs
What methods work best without acetone?
You can use warm soapy water, oil, or gentle filing to loosen fake nails. These methods are slower than acetone but reduce drying and irritation to your skin.
Will these ways damage my natural nails?
If you take your time and avoid force, damage is unlikely. Use a soft file and oil the nail bed often to protect the nail plate and cuticle.
How long will non-acetone removal take?
Expect 20–60 minutes depending on the glue and nail type. Soaking in warm soapy water or applying oil repeatedly can take longer than filing or salon removal.
Can you remove press-on nails with household items?
Yes. Try dental floss to slide under press-ons or soak in warm soapy water to soften the adhesive. For stubborn press-ons, use an oil like olive or cuticle oil to break the bond.
When should you see a professional?
See a technician or dermatologist if you feel pain, see redness, or if nails won’t lift after gentle efforts. A pro can safely remove the nails and check for infection. For general nail health info, visit the American Academy of Dermatology at https://www.aad.org. For safe salon guidance, check CDC recommendations on nail care at https://www.cdc.gov.
Conclusion
You can remove fake nails without acetone using gentle methods that protect your natural nails. Warm, soapy water and careful soaking often loosen glue enough to lift press-ons or thin acrylics.
Work slowly and use soft tools like a cuticle pusher or orangewood stick to ease nails off. If nails resist, repeat soaking rather than force removal to avoid tearing the nail plate.
Keep your nails hydrated after removal. Apply cuticle oil and a basic hand cream to restore moisture and reduce brittleness.
If you notice pain, swelling, or signs of infection, stop and see a professional. A salon visit can safely handle stubborn or glued-on nails.
Use this checklist to stay safe:
- Soak in warm, soapy water for 15–30 minutes.
- Gently push and lift with a soft tool.
- Trim and file rough edges after removal.
- Moisturize and rest your nails for a few days.
Follow these steps and you’ll remove fake nails with less damage and better nail health.