
You can make strong, attractive fake nails at home using simple supplies and a few clear steps. With basic tools and a little practice, you can create press-ons or glued tips that fit your nails, look polished, and last for days.
This guide walks you through the materials, prepping your natural nails, applying the fake nails, and finishing touches so you get a salon-style look without the cost. Follow the step-by-step tips and quick fixes to avoid common problems and customize the style to match your taste.
Key Takeaways
- Gather a few basic tools and materials to make fake nails at home.
- Proper nail prep and correct application improve fit and wear time.
- Simple finishing and care steps keep nails looking neat longer.
Essential Materials for Making Fake Nails
You need a few specific items to make fake nails that fit well and last. Focus on nail tips that match your nail width, a strong adhesive suited to the material, and the shapes and lengths you want to wear.
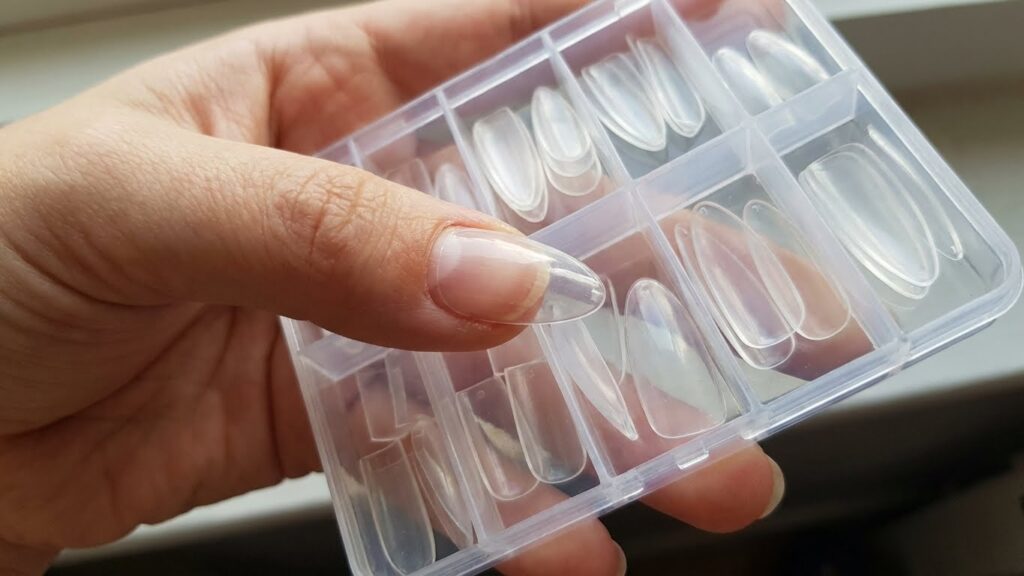
Choosing the Right Nail Tips
Pick tips that match your natural nail width and curvature for a secure, natural fit. Tips come in sizes 0–9 or A–K depending on brand; try them on before glueing to find the best match. If a tip gaps at the sides, file the edge or choose a narrower size.
Decide on material: ABS plastic is common for pre-shaped tips because it bends slightly and trims cleanly. Soft gel tips give more flexibility but need specific glue or resin. If you plan to sculpt acrylic over tips, choose thicker tips made for enhancement.
Keep a tip sizing chart and a fine nail file nearby. That helps you shape the contact edge and smooth transitions. Label sizes if you reuse tips to save time.
Selecting Nail Glue and Adhesives
Choose adhesive based on the tip material and how long you want them to last. Cyanoacrylate (nail glue) bonds fast and holds 1–3 weeks for normal wear. Use 2–3mm beads of glue spread across the natural nail for even coverage.
For temporary wear, use adhesive tabs or double-sided nail stickers; they peel off cleanly in days. For extensions with gel or acrylic, use a monomer-resin system or brush-on gel adhesive made for enhancements—these form a more durable bond than standard glue.
Avoid skin contact with strong glue and work in a ventilated area. Keep acetone and an adhesive remover on hand for safe removal.
Picking Nail Shapes and Lengths
Choose shapes that suit your finger length and lifestyle. Short, rounded or squoval shapes work well for active hands and reduce snagging. Almond and oval shapes visually lengthen fingers. Coffin and stiletto are dramatic but more fragile.
Pick length based on daily tasks. Short (1–3 mm past the fingertip) stays practical. Medium (3–8 mm) balances style and function. Long (over 8 mm) looks striking but needs careful maintenance.
Measure length from the free edge of your natural nail and file tips incrementally. If you’re unsure, start shorter—you can always file longer shapes later.
Preparing Your Natural Nails

Clean nails, trimmed edges, a smooth surface, and healthy cuticles help fake nails stick and look natural. Work methodically: remove polish and oils, trim and file to fit, lightly buff the surface, and push back or trim cuticles without cutting live skin.
Cleaning and Trimming Nails
Remove any polish with an acetone-free remover or alcohol wipe to avoid drying your nail plate. Wipe each nail thoroughly, then wash hands with soap and water to remove residue and oils.
Trim nails so the free edge is short; this gives glue or tips a better base. Use clippers and a fine nail file to shape the edge to match the fake nail you’ll apply. Size each fake nail to your natural width before application.
Dry nails completely. Any moisture or oil will reduce adhesion and cause lifting. Finish with a lint-free wipe and avoid lotions before you glue or press on nails.
Buffing and Shaping the Nail Surface
Use a 240–320 grit buffer to gently scuff the top of each nail. Work in light, even strokes for 5–10 seconds per nail; you want a matte look, not raw or thin nail bed. Over-buffing weakens your natural nail.
Shape the nail with a fine file to make the edge match the fake nail tip. Keep files moving in one direction to prevent splitting. Check fit again after shaping so the fake nail sits flush without gaps.
Clean off dust with a soft brush or alcohol wipe. A clean, slightly roughened surface helps glue bond and reduces air pockets under press-ons or tips.
Cuticle Care and Protection
Soak your fingers in warm, soapy water for 1–2 minutes to soften cuticles. Gently push cuticles back with a wooden or rubber pusher; avoid cutting live skin, which can cause infection and lifting.
If you have excess hangnails or dead skin, trim only the loose bits with small cuticle nippers. Do not cut the cuticle line. Apply a small amount of cuticle oil afterward and let it absorb, then remove excess oil before application.
Use a thin barrier of nail dehydrator or alcohol just before gluing to remove last traces of oil. This step protects the nail edge and improves adhesion without harming the cuticle.
Applying Fake Nails Step by Step
Get your nails clean, dry, and trimmed. Match sizes, use a thin glue bead, and press firmly for a full 30 seconds to set each nail.
Sizing Nail Tips Accurately
Pick a full set of tips and lay them out by finger. Match each tip to your natural nail from cuticle to free edge. The tip should cover the entire nail bed side-to-side with no gaps. If a tip is slightly wide, file the sidewalls gently. If it’s too narrow, move to the next size up.
Label tips with a small dot of tape or a marker so you can apply them in order. For a custom fit, clip the tip’s free edge shorter than you want, then file and shape the curve so it sits flush against your cuticle line. A good fit prevents lifting and reduces pressure on your natural nail.
Proper Application of Nail Glue
Work one nail at a time; glue dries fast. Apply a thin bead of glue to the underside center of the tip or to your natural nail—in either case avoid flooding the cuticle area.
Align the back edge of the tip with your cuticle and then rock the tip down toward the free edge. Press from the center outward to expel air and glue; hold steady for 30 seconds. Wipe away any excess glue with a cotton swab dipped in acetone. If you use brush-on adhesive, apply evenly to avoid gaps and cure times.
Securing and Shaping Fake Nails
After the tip sets, check for gaps at the sidewalls and cuticle. Fill small gaps with a thin layer of glue or builder gel, then press and cure as needed. For long-term hold, apply a thin layer of gel or clear topcoat over the seam and cure.
Shape the nail with a 180-grit file for the desired length and a 240-grit or buffer for smooth edges. File in one direction to avoid splitting. Finish with a wipe of rubbing alcohol to remove dust, then apply polish or topcoat. Keep pressure even while filing and avoid aggressive thumping at the cuticle to protect the bond.
Finishing and Customizing Fake Nails
You will smooth edges, pick a polish or gel finish, and add designs that fit your style. Focus on even shapes, secure polish layers, and nail art that won’t lift or chip.
Filing and Smoothing Edges
File nails to shape and remove excess length. Hold the file at a slight angle and use light, even strokes from the outside edge toward the center. Avoid sawing back and forth; that causes splits and weak edges.
Use a buffer (180–240 grit) to smooth the surface and blend the seam where the fake nail meets your natural nail. Work in small sections and check your progress often under good light. If you used acrylic or resin, lightly buff to remove high spots, then finish with a finer buffer (320–400 grit) for shine.
Clean the dust with a soft brush or lint-free wipe dampened with alcohol. Make sure the nail curve looks uniform, and the tip is free of roughness that could catch on fabric.
Applying Polish or Gel

Start with a clean, de-greased nail. Apply a thin base coat to help polish stick and prevent staining.
For regular polish: use two thin color coats, letting each dry fully before the next. Finish with a fast-dry top coat. For gel: apply thin layers, curing each under an LED lamp for the time shown on the product label. Keep layers thin to avoid pooling at the cuticle.
Seal the free edge with top coat to reduce chipping. Remove any polish on the skin with a small brush dipped in remover. For longer wear, use a tack-free top coat and reapply top coat every 7–10 days if you notice wear.
Adding Nail Art Designs
Plan your design before you start. Simple options include dots, stripes, French tips, or glitter accents. Use thin brushes, dotting tools, or striping tape for clean lines.
For encapsulated designs (glitter or foil): place the material on a tacky layer of gel or a small dab of clear acrylic, then seal with a top coat or builder gel. For stickers and decals, press firmly and seal with two thin top coats to prevent lifting.
Protect detailed work by finishing with a high-quality top coat. Cure gel top coats fully. Check edges and re-seal any chips quickly to keep the design looking sharp.
Caring for Fake Nails and Longevity Tips
Keep the nail edges clean, avoid heavy pressure, and fix any lift right away to stop water and dirt from getting under the nail. Use quality glue or adhesive tabs, moisturize your cuticles, and protect your hands during chores.
Daily Maintenance
Wipe your nails each morning with a lint-free pad and a bit of rubbing alcohol or nail cleanser to remove oils. Oil and dirt break the bond between the fake nail and your natural nail, so this small step helps hold them longer.
Moisturize your cuticles with a light cuticle oil twice a day. Apply oil to the skin around the nail, not under the fake nail; this keeps the surrounding skin healthy and prevents peeling.
If you wear press-ons, press and hold each nail for 30 seconds after applying glue or adhesive for a stronger set. Keep a small tube of nail glue and a file in your bag to reattach or smooth any rough edges quickly.
Avoiding Damage and Lifting
Never use your nails as tools. Pry, open, or pick tasks will lift or crack fake nails fast. Use the pads of your fingers or proper tools instead to protect the nail base.
Wear gloves for dishes, cleaning, gardening, or heavy work. Hot water and solvents weaken glue bonds, so warm water and dish soap can let nails lift or fall off sooner.
If you see lifting, do not force the nail off. Apply a drop of glue under the lifted edge, press down for 30 seconds, and wipe away excess. For persistent lifting, replace the nail or visit a technician to avoid damage to your natural nail.
Safely Removing Fake Nails
Soak press-ons in a bowl of warm, soapy water for 10–15 minutes to loosen adhesive; use an orangewood stick to gently lift the edge. If glue resists, switch to an acetone soak, but limit acetone contact to avoid drying your skin and nail.
For acrylic or gel nails, file down the top layer first, then soak in 100% acetone using cotton and foil wraps for 10–20 minutes. Gently push off softened product with a cuticle tool; stop if you feel resistance to avoid tearing your natural nail.
After removal, buff your nail surface lightly, apply a hydrating nail oil, and give your nails a few days of breath time before reapplying false nails. Use a strengthening base coat if your nails feel weak.
DIY Fake Nail Hacks and Troubleshooting
Keep nail edges smooth, secure tips with the right adhesive, and fix chips or lifts fast to avoid more damage. Use simple tools like a nail file, buffer, acetone, and spare tips or cotton to handle most problems at home.
Common Mistakes to Avoid
Avoid applying fake nails to dirty or oily nails. Clean your nails with alcohol or acetone and push back cuticles first. If you skip this, the adhesive won’t hold and nails will lift quickly.
Don’t file the natural nail too thin. Over-filing weakens the nail bed and causes pain or breaks. File only the free edge lightly and roughen the fake tip’s base for better glue contact.
Use the right amount of adhesive. Too much glue makes a mess and can seep under the nail; too little causes gaps and lifts. Apply a thin, even layer to the tip or use adhesive tabs for easier removal.
Avoid using mismatched sizes. A tip that is too wide or narrow can trap moisture or stress the nail. Match each tip to your nail width and press from cuticle to tip to seat it properly.
Quick Fixes for Broken Nails
If a fake nail cracks, file the crack smooth, then apply a small drop of nail glue along the break. Hold for 30 seconds and buff lightly once cured to blend the seam.
For a full break or lost tip, use a spare tip or cut a plastic bottle piece to size. Glue it, hold firmly until set, then trim and shape to match the other nails.
When nails lift at the edges, clean under the lift with alcohol and push back any trapped debris. Apply a thin bead of glue under the lifted edge, press down, and clip an O-shaped piece of foil over it for 5–10 minutes to keep pressure while curing.
For quick chips in polish or gel, use clear top coat or builder gel to fill and smooth. Cure if needed, then file and finish with a top coat to match the shine.
Popular Alternatives to Traditional Fake Nails
You can choose options that fit your time, budget, and nail health. Each alternative has different prep, wear time, and removal steps to consider.
Press-On Nails
Press-on nails come pre-shaped or blank so you can file and paint them. They attach with adhesive tabs or nail glue. Tabs are gentler on your natural nail and work well for short-term wear, while glue gives a stronger hold for several days to a week.
To apply, clean and dry your nails, push back cuticles, and lightly buff the nail surface. Match sizes, press at the cuticle, then hold for 10–20 seconds. Trim and file edges for a natural fit.
For removal, soak in warm soapy water or use a gentle oil around the edges to lift tabs. Avoid forceful prying to reduce nail damage. Press-ons are low-cost and good for quick looks or testing shapes.
Acrylic Nails
Acrylic nails use a liquid monomer and powder polymer to build a hard overlay or full tip. A technician typically sculpts the acrylic or applies tips, then files and shapes the nail. Acrylics are strong and last 2–3 weeks with fills.
Acrylic application requires odor control and careful technique. You must maintain them with fills every 2–3 weeks as your natural nail grows. Improper removal—like picking—can thin or lift your natural nail.
To remove acrylics safely, soak in acetone and use an orange stick or gentle file to loosen the material. If you have brittle or thinning nails, consider press-ons or shorter acrylics and take breaks between sets.
Gel Extensions
Gel extensions use a builder gel cured under a UV or LED lamp. You can apply gel over tips or sculpt directly on the nail with forms. Gel gives a glossy, flexible finish and often looks more natural than acrylic.
Curing time ranges from 30 seconds to 2 minutes per layer depending on the lamp. Gel tends to be lighter on the nail and can last 2–3 weeks with proper care. Removal usually needs soaking in acetone or filing down to avoid damaging the natural nail.
If you try gel at home, buy a reliable lamp and base/top coats labeled for builder gel. Follow curing times and avoid under-curing, which can cause stickiness or lifting.
FAQs
What supplies do you need to make fake nails at home?
You’ll need nail tips or forms, nail glue or acrylic/gel system, a file, buffer, and polish. For longer-lasting sets, use a UV/LED lamp and base/top coats. The CDC and nail health resources can help with safe product use: https://www.cdc.gov.
How do you choose the right size and shape?
Match tips to your natural nail bed for the best fit. File edges and shape lightly; you can trim before gluing to avoid lifting.
Can you make fake nails without glue?
Yes. You can use adhesive tabs, press-on systems, or build extensions with forms and gel. Each option lasts different times, so pick what fits your schedule and comfort.
How long will DIY fake nails last?
Longevity depends on materials and care. Glue-on tips last about 5–10 days. Gel or acrylic extensions can last 2–4 weeks with fills.
Are fake nails safe for your natural nails?
They are safe if you follow hygiene and removal steps. Avoid peeling tips off and use proper acetone soaking to remove. For health questions, check guidance from reputable dermatology sources like the American Academy of Dermatology: https://www.aad.org.
What if you get an infection or irritation?
Stop using the product and clean the area. See a healthcare provider if redness, swelling, or pain worsens. Quick action prevents bigger problems.
How can you make nails look professional?
Practice shaping, smoothing cuticles, and applying thin layers of product. Use clean tools and follow curing times for gel and acrylic products.
Conclusion
You can make fake nails at home with a few tools, patience, and safe steps. Start simple, practice the basics, and build your skills over time.
Focus on fit, prep, and application to get durable results. Small fixes like filing and sealing edges keep nails looking clean and lasting longer.
If you try acrylics, tips, or press-ons, pick the method that fits your comfort and budget. Replace or remove nails gently to protect your natural nails.
Keep sanitation and ventilation in mind while working. Clean tools, avoid inhaling dust, and follow product instructions to reduce risks.
Tips to remember:
- Test one nail first to learn the process.
- Use a primer or dehydrator when recommended.
- File gently and avoid over-thinning your natural nail.
You’ll improve with practice. Track what works, adjust your technique, and enjoy customizing colors and shapes that suit your style.