
Removing fake nails can damage your natural nails if you rush or use the wrong tools, but you can take them off at home safely with the right steps and a little patience. Start by gathering basic supplies and choosing a gentle method that matches the type of fake nails you have so you avoid pulling or filing too hard.
Use a proper soak or lift method and protect your nail bed to remove fake nails without harming your natural nails. Follow clear step-by-step care and finish with simple aftercare to restore strength and moisture to your nails.
Key Takeways
- Prepare supplies and pick a removal method that fits your nail type.
- Remove nails slowly using soaking or gentle lifting to avoid damage.
- Treat nails with hydration and rest after removal to help recovery.
Essential Preparation Before Removing Fake Nails
Prepare your space and gather supplies so removal is safe and gentle. Take time to trim and file the fake nails, set up a warm, well-lit area, and have aftercare products ready.
Gather the Right Tools and Supplies
Bring these items before you start: acetone (or acetone-free remover if you prefer), a small glass or metal bowl, cotton balls or pads, aluminum foil strips, a nail file, nail clippers, a cuticle pusher, and a clean towel. If you use acetone, also have petroleum jelly or cuticle oil and a moisturizer for aftercare.
Clip the tips of long fake nails first to reduce soak time and risk of lifting. Gently file the top coat or shine to help remover penetrate. Use foil wraps with soaked cotton for controlled soaking, or prepare a bowl for an acetone soak. Keep a bowl of warm soapy water and a soft brush nearby to clean residue and glue gently.
Choose a Safe Removal Environment
Pick a flat, stable surface near good lighting. Sit at a table with a towel or paper towel to protect the surface and catch debris. Ensure proper ventilation if you use acetone; open a window or use a fan to avoid strong fumes.
Keep a chair and extra light so you can sit comfortably for 15–45 minutes depending on method. Have a phone or timer handy to track soak time. If you feel pain, burning, or severe discomfort at any point, stop and consider visiting a professional nail technician or clinic.
Proven Methods to Safely Remove Fake Nails
You will find step-by-step, practical methods here that protect your natural nails and skin. Each method lists tools, time, and key cautions so you can pick the safest option for your nail type.
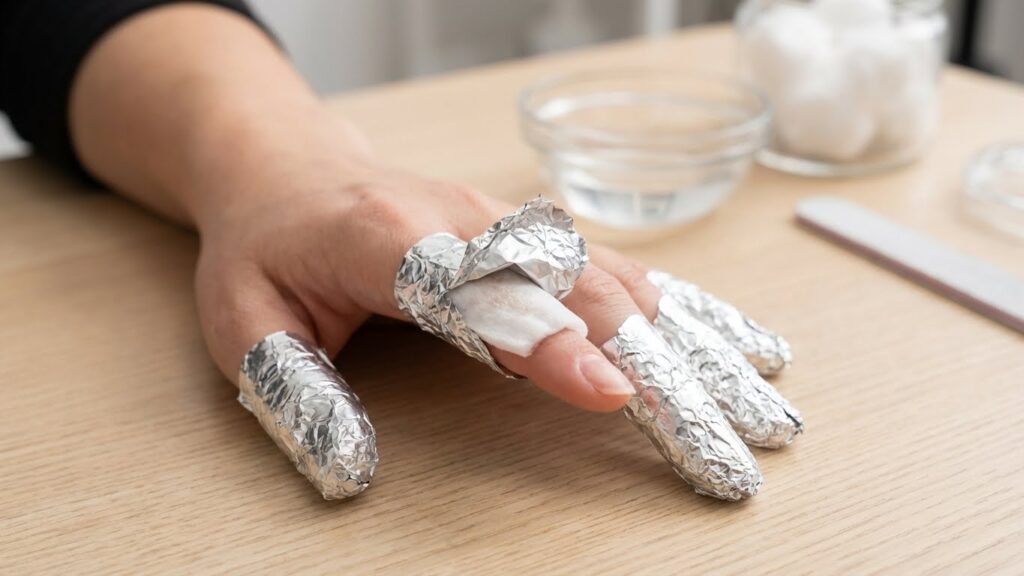
Soaking Off Acrylic Nails with Acetone
Use 100% acetone for the fastest, safest acrylic removal. Trim the tips short with clippers, then file the shiny top layer lightly to let acetone penetrate. Soak cotton balls in acetone, place them on each nail, and wrap with aluminum foil. Keep wraps on for 15–30 minutes depending on thickness. Check one nail first; if acrylic lifts easily, gently push it off with a cuticle pusher. Do not force any stuck pieces.
After removal, wash hands, then apply cuticle oil and a rich hand cream. Work the oil into nails and cuticles to restore moisture. Avoid picking or peeling remaining adhesive to prevent nail damage.
Tools checklist:
- 100% acetone
- Nail clippers
- Emery board or coarse file
- Cotton balls/pads
- Aluminum foil
- Cuticle pusher
- Cuticle oil and hand cream
Alternatives to Acetone Removal
If you cannot use acetone, try a warm soapy soak or oil method for glue-on or thin gel layers. Mix warm water with dish soap and a few drops of olive oil. Soak nails for 10–20 minutes to soften glue. Use a cuticle pusher to ease the edges; repeat soaking if needed. This method takes longer and may not fully remove strong acrylics.
For gel polish, consider the foil-acetone method but use non-acetone gel removers labeled for gel polish, or visit a salon for an e-file removal. Always follow with moisturizing oil and cream. If nails feel weak or thin after removal, pause on enhancements for a few weeks and use a strengthening treatment.
Gently Lifting Press-On Nails
Press-on nails usually come off with minimal tools and time. Start by soaking fingertips in warm, soapy water for 5–10 minutes to loosen adhesive. Slide dental floss or a thin ribbon under the edge, using a gentle sawing motion to lift the press-on slowly. Work from one side to the other to avoid bending your natural nail.
If adhesive residue remains, rub it off with an oil-soaked cotton pad or use a safe adhesive remover. Trim and file your natural nails, then rub in cuticle oil. Do not pry sharply or rip the press-ons off; that can peel layers from your real nail.
Step-By-Step Process for At-Home Removal
Remove length and bulk first, then loosen glue, and finally lift the extensions without pulling. Work on one nail at a time, use the right tools, and keep acetone and an oil or moisturizer nearby.
Trimming and Filing Down the Fake Nails
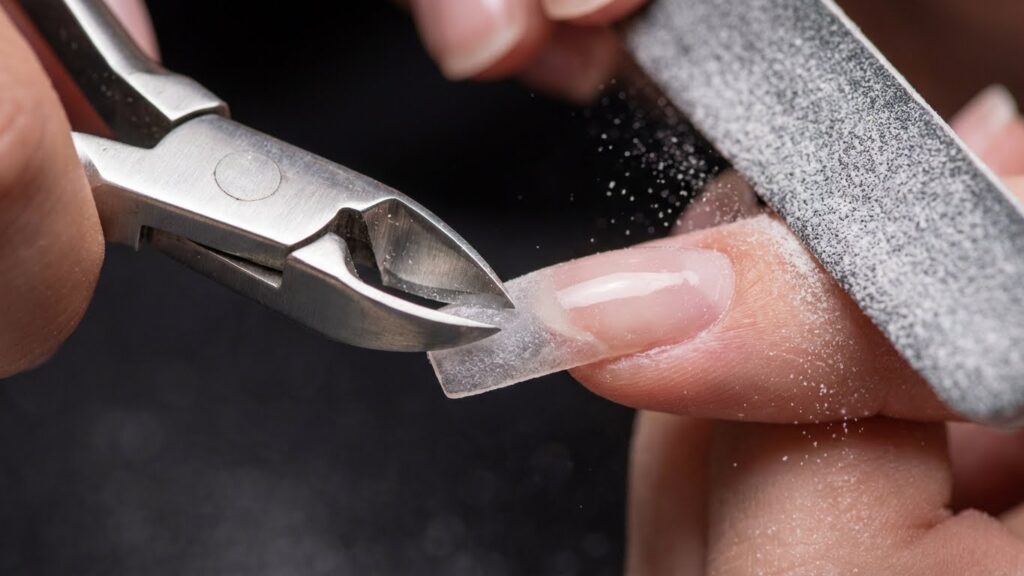
Trim the tips with nail clippers made for artificial nails. Cut straight across to avoid stress points that can crack the extension.
Use a coarse nail file (100–180 grit) to file the top surface and remove any polish or top coat. File in one direction with light pressure to lower the height; don’t saw back and forth.
Reduce thickness until the fake nail feels much thinner. Thinner material soaks faster and separates easier from the natural nail. Wipe away dust with a lint-free wipe or damp cotton.
Keep the natural nail visible at the cuticle. Stop filing if you feel heat or your nail plate becoming sensitive.
Softening Adhesive for Easier Removal
Gather 100% acetone, cotton balls, aluminum foil strips, or an acetone-safe bowl for a soak. Work in a ventilated area and protect skin with petroleum jelly around the nail folds.
For the foil method: soak cotton in acetone, place it on the nail, and wrap with foil for 15–30 minutes. For a soak: pour warm acetone into a small bowl and soak fingertips for 10–20 minutes, checking every 5 minutes.
If you prefer a gentler route, use warm soapy water plus cuticle oil and repeat soaking; this takes longer and may not fully dissolve strong adhesives. Reapply acetone if nails still feel glued after the initial time.
Safely Lifting Off the Nail Extensions
After softening, use a wooden or metal cuticle pusher at a low angle to gently nudge the edge of the fake nail. Work from the side toward the center, moving slowly.
If you meet resistance, re-soak rather than force. Slowly lift in small sections; stop if you feel pulling pain. Use a nail clipper to trim any loose parts and continue with the remaining bonded areas.
Once an extension releases, buff off residue with a fine buffer and apply cuticle oil. Finish by washing hands and moisturizing the nails and cuticles to restore hydration.
Aftercare for Natural Nails Post-Removal
Focus on rehydrating the nail plate, repairing any thin or split areas, and giving nails a break from polish or enhancements while they rebuild strength.
Moisturizing and Strengthening Your Nails
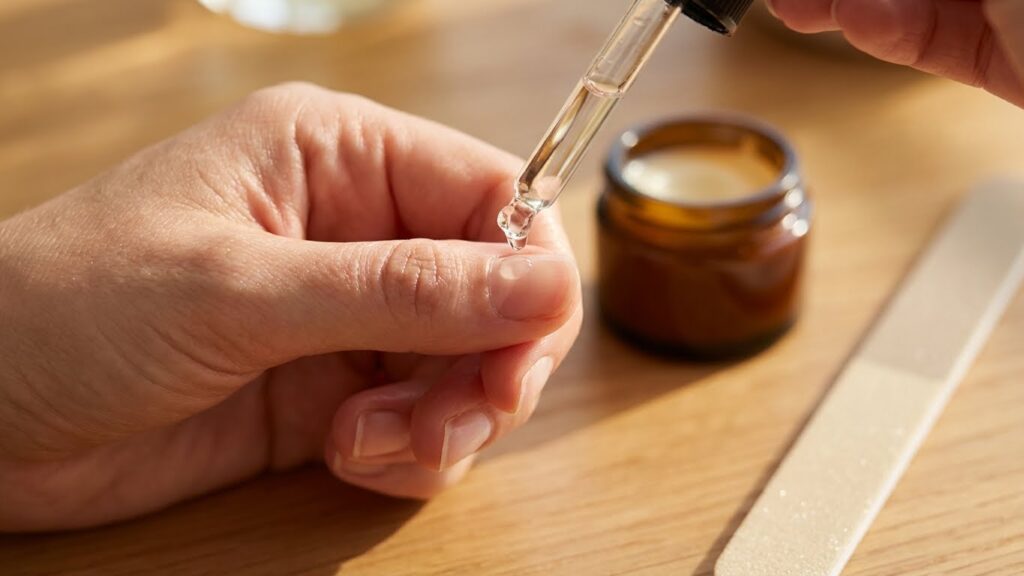
Apply cuticle oil twice daily to the base and underside of each nail to restore lost moisture. Use oils with vitamin E, jojoba, or almond oil for best results. Massage oil into the cuticle for 20–30 seconds to boost circulation and absorption.
Switch to a rich hand cream after washing hands and before bed. Look for products with glycerin, shea butter, or ceramides. Avoid alcohol-heavy sanitizers when possible; they dry nails and skin.
Use a strengthener or nail treatment with biotin or protein once every 2–3 days. Don’t overuse hardening products; they can cause brittleness. Trim and file gently with a fine-grit file to prevent snags.
Treating and Preventing Damage
If nails are thin, file them short to reduce the chance of tearing. File in one direction with a light touch. Avoid ripping or peeling any remaining adhesive or layers.
Treat splits and ridges with a protein-rich base coat or a thin layer of nail glue on long splits to hold them while they grow out. For pain, soak nails in warm water with a pinch of salt for 5–10 minutes to reduce inflammation.
Prevent infection by keeping nails clean and dry. If you see redness, pus, or severe pain, seek medical care. Trim hangnails with clean clippers and avoid picking at skin or nail edges.
Allowing Nails Time to Recover
Give nails at least 4–6 weeks before getting new acrylics or gels. Nails grow about 2–3 mm per month, so waiting lets damaged areas grow out.
Limit polish use for a week or two and let nails breathe. When you do use polish again, apply a protective base coat first to seal and smooth the surface.
Monitor progress weekly. Take photos or measure growth if you want to track improvement. If nails do not improve after two months, consult a dermatologist for targeted treatments.
Common Risks and How to Avoid Them
Removing fake nails can tear or thin your natural nails and can irritate the skin around them. Take steps that protect the nail bed and the skin to reduce pain, infection, and lasting damage.
Preventing Nail Bed Injury
Never pry or pull an artificial nail off. Use an acetone soak or a recommended removal kit so the adhesive dissolves slowly. If you use acetone, file the top coat lightly first to let the solvent work faster, then soak each nail in a small bowl or cotton soaked in acetone wrapped with foil for 10–20 minutes.
Gently test one nail after soaking; if it still resists, soak longer rather than force it. Use a wooden cuticle stick to lift loosened edges; stop if you feel pressure or pain. If the nail is deeply stuck or your natural nail is thin, visit a pro to avoid ripping, splitting, or exposing the nail bed.
Minimizing Skin Irritation
Acetone dries and can irritate skin. Protect the skin by applying petroleum jelly or a thick hand cream to the cuticles and surrounding skin before soaking. After removal, wash hands with mild soap and warm water to remove residue.
If your skin becomes red or sore, apply a fragrance-free moisturizer or cuticle oil several times a day. For any open cuts, clean with saline, apply an antibiotic ointment, and cover with a bandage. Seek medical care if you see swelling, pus, spreading redness, or severe pain.
When to Seek Professional Nail Removal
If your nails feel painful, swollen, or you see discoloration, get a pro to check them. If the removal looks risky or you don’t have the right tools, a salon can protect your natural nails.
Recognizing Signs of Infection
Watch for persistent pain, redness, or swelling around the nail bed that gets worse over 24–48 hours. Pus, a bad smell, or spreading red streaks toward your finger or hand suggest an infection that needs medical attention.
If your skin is warm to the touch or you have a fever, stop home removal and see a professional or a doctor. Professionals can clean the area, prescribe antibiotics, and remove product safely without forcing or peeling, which can worsen infection.
Also seek help if the nail plate lifts away from the nail bed or you notice black, green, or brown discoloration under the nail. Those signs often mean bacteria or fungus are present and require clinic-grade treatment.
Knowing Your Removal Limits
If you have acrylics, gel, or dip powder fused to your natural nail and you cannot clip them short safely, go to a salon. Professionals use tools and acetone wraps and can thin product without harming your nail bed.
Avoid DIY removal if you have thin, brittle, or recently damaged nails. If nails peel or tear when you try to lift product, stop. A nail tech can file product down, soak properly, and protect the nail’s surface during removal.
Also see a pro if you’re unsure what material is on your nails. Salons can identify acrylic vs. gel vs. press-on and use the correct method, preventing over-filing, burns from acetone, or accidental loss of natural nail.
Tips for Healthier Nails After Removing Fakes
Focus on rebuilding strength, restoring moisture, and protecting the nail edge. Use targeted products and a steady care routine to reduce peeling, splitting, and slow growth.
Choosing Nourishing Nail Products
Pick a nail strengthener with ingredients that add protein and moisture. Look for products containing keratin, biotin, or collagen to help rebuild the nail plate, and panthenol or glycerin to lock in hydration. Use a clear strengthener every other day for two weeks, then reduce to twice weekly as nails improve.
Choose a cuticle oil you can apply daily. Oils with jojoba, sweet almond, or vitamin E soak into the nail fold and skin. Massage oil into the base of each nail for 20–30 seconds to boost circulation and absorbency.
Avoid products with formaldehyde, toluene, or harsh solvents while nails recover. If you want polish, use a breathable base coat or water-based polish until nails feel strong again.
Establishing a Long-Term Nail Care Routine
Trim and file gently to prevent snags and splits. Use a fine-grit file and file in one direction only. Keep nails short while they rebuild; longer nails are more likely to bend and chip.
Moisturize hands and nails daily. Apply a rich hand cream after washing and reapply cuticle oil before bed. Consider overnight gloves after oiling for deeper penetration.
Give your nails breaks from polish and enhancements for at least 4–6 weeks. During this time, wear gloves for chores that use water or chemicals. If you get professional services, ask the technician to use gentle removal and strengthening treatments.
FAQs
What is the safest way to remove fake nails at home?
Use a soak method with pure acetone, cotton, and foil for acrylics or gels. File the top layer first, then soak until the nail lifts. If you prefer non-acetone options, try warm soapy water or cuticle oil for press-ons.
How long does removal take?
Expect 15–45 minutes for press-ons and up to 1–2 hours for acrylics or gel, depending on thickness. Patience prevents pulling and reduces damage to your natural nails.
Will acetone harm my skin or nails?
Acetone dries skin and cuticles, so protect your skin with petroleum jelly and moisturize after removal. If you have sensitive skin, follow guidance from a reputable source like the American Academy of Dermatology for care tips: https://www.aad.org.
Can you remove fake nails without tools?
You can, but tools make the process safer and faster. Use a nail file, cuticle pusher, and small foil squares. If you’re unsure, a salon visit avoids mistakes.
What if the nail won’t come off?
Stop pulling and soak more. For stubborn areas, gently file or use a cuticle pusher to lift softened adhesive. If the nail still resists, consult a professional to avoid injury.
How do you care for nails after removal?
Trim and gently buff your nails, apply cuticle oil, and use a hydrating hand cream. Give your nails a week or two to recover before applying new enhancements.
Conclusion
Removing fake nails safely protects your natural nails and keeps your hands healthy. Take your time and use gentle methods, like acetone soaks or warm soapy water, depending on the type of enhancement.
Follow basic steps: file the top layer, soak or use foil wraps with pure acetone for acrylics or gels, and gently lift glue-ons with dental floss or a remover. Stop if you feel pain and let nails rest between enhancements.
Care for your nails after removal. Trim and file edges, push back cuticles gently, and apply a moisturizing oil or hand cream. If nails look thin or damaged, give them a break and use strengthening treatments.
If you notice swelling, severe pain, or signs of infection, seek professional help. A nail technician or healthcare provider can remove stubborn enhancements safely and treat any damage.
Keep these quick tips in mind:
- Be patient and avoid prying or force.
- Use the right products for each nail type.
- Protect skin from acetone with short soak times and moisturizer.
You can remove fake nails at home without harm when you use proper steps and care.