
How to Use Dehydrator Before Gel Nails: Step-by-Step Guide

Quick Answer
Use nail dehydrator after shaping, cuticle prep, light buffing, and removing nail dust. Apply one thin coat to the natural nail, let it air-dry completely, then continue with primer if your gel system requires it and your base coat. Nail dehydrator normally does not go under a lamp. For broader manicure safety, review these gel manicure tips from the American Academy of Dermatology.
Quick Steps
- Prep the nails: Shape the free edge and gently prepare the cuticle area.
- Remove shine: Lightly buff only if your gel system recommends it.
- Remove dust: Leave the nail clean, dry, and free from visible debris.
- Apply dehydrator: Brush on one thin, even coat without flooding the skin.
- Let it air-dry: Wait until the product has fully evaporated. Do not wipe it away.
- Continue immediately: Apply compatible primer if needed, followed by your gel base system.
If you are learning how to use dehydrator before gel nails, the biggest mistake is treating it like another gel layer. It is a nail-prep product, not a coating that normally needs curing.
In my gel-prep routine, I focus more on a clean, controlled application than using extra product. A light coat on properly prepared nails is usually all you need.
In This Guide
- What does nail dehydrator do before gel nails?
- How do you use dehydrator before gel nails?
- When should dehydrator go in gel nail prep?
- Dehydrator vs cleanser vs primer vs base coat
- How much dehydrator should you use, and do you cure it?
- Why can gel nails still lift after using dehydrator?
- How can you use nail dehydrator safely?
- Frequently asked questions
- Final takeaway
What Does Nail Dehydrator Do Before Gel Nails?
A nail dehydrator temporarily removes surface oil and residual moisture from the natural nail. That leaves a cleaner, drier surface for your compatible gel products to grip.
Definition: A nail dehydrator is a fast-evaporating nail-prep liquid used before gel, acrylic, and some extension systems to reduce oil and moisture on the natural nail plate.
Oil, dust, cuticle residue, and moisture can interfere with adhesion. Dehydrator handles only part of that problem, so it cannot replace the rest of your prep.
- It helps remove surface oil: This can improve contact between the natural nail and the next product.
- It reduces residual moisture: The nail looks temporarily matte and dry after application.
- It evaporates quickly: Most conventional dehydrators air-dry rather than cure under a lamp.
- It supports adhesion: It may help reduce lifting when oil or moisture contributes to poor retention.
Dehydrator is not automatically necessary for every gel manicure. Some brands use their own prep liquid or specifically instruct users to skip separate dehydrator.
Always treat the instructions for your base coat, builder gel, or gel-polish system as the final authority. Mixing incompatible prep products can create new adhesion problems.
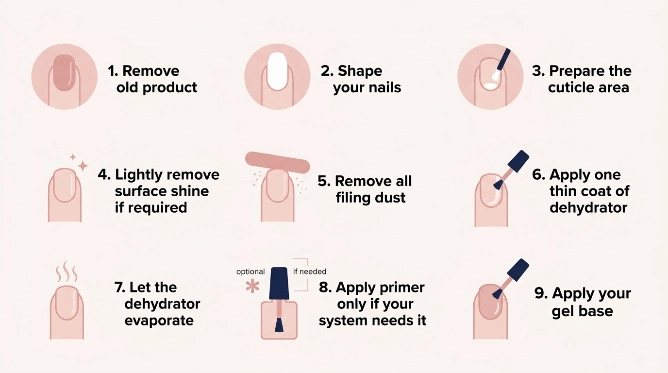
How Do You Use Dehydrator Before Gel Nails?
Apply dehydrator near the end of nail preparation, once the nail is shaped, clean, and free from dust. Use a thin coat and allow it to evaporate before applying the next compatible product.
Step 1: Remove old product properly
Start with a clean natural nail. Remove old gel according to the product’s removal directions instead of peeling or forcefully scraping it away.
Step 2: Shape your nails
File the free edge to your preferred shape before applying prep liquids. Doing this first prevents new filing dust from landing on a dehydrated nail.
Step 3: Prepare the cuticle area
Gently push back the cuticle and remove dead tissue sitting on the nail plate. Do not aggressively cut living skin around the nail.
Invisible cuticle residue near the base of the nail can contribute to lifting. Give this area careful attention without damaging it.
Step 4: Lightly remove surface shine if required
If your gel system calls for buffing, use a fine buffer and a light touch. Your goal is to remove surface shine, not thin the natural nail.
- Use gentle, controlled strokes.
- Avoid repeatedly filing the same area.
- Stop if the nail becomes hot, sore, or tender.
Step 5: Remove all filing dust
Brush away visible dust and clean the nail as required by your product system. A lint-free wipe helps prevent fibers from being left behind.
After this point, avoid touching the nail plate with your fingertips. Skin oils can contaminate the clean surface again.
Step 6: Apply one thin coat of dehydrator
Wipe excess liquid from the brush against the bottle neck first. Then cover the natural nail with a thin, controlled layer.
- Cover the main nail plate evenly.
- Reach the side areas without touching skin.
- Do not flood the cuticle.
- Do not apply a thick, wet layer.
Step 7: Let the dehydrator evaporate
Leave the nails exposed to air until the dehydrator has fully flashed off. Many formulas evaporate within roughly 30 to 60 seconds, but follow your bottle’s instructions.
The nail often appears temporarily chalky or matte. Do not wipe the surface after the dehydrator has dried unless the manufacturer specifically tells you to.
Step 8: Apply primer only if your system needs it
Some gel systems use primer after dehydrator, while others move directly to base coat. Primer and dehydrator perform different jobs.
Do not assume more prep products create better retention. Follow the sequence recommended for the gel products you own.
Step 9: Apply your gel base
Once prep is complete, continue with the compatible base coat or bonding layer. Apply and cure that gel according to its manufacturer’s lamp and timing requirements.
Section Takeaway: Nail dehydrator should be a thin, controlled prep step on a clean natural nail. Let it evaporate fully, avoid touching the nail afterward, and then continue with the product sequence required by your gel system.
When Should Dehydrator Go in Gel Nail Prep?
Dehydrator normally goes after physical preparation and cleaning but before primer or your first gel layer. Think of it as the final drying step before adhesion products begin.
A typical gel manicure prep order looks like this:
- Remove previous product.
- Shape the natural nail.
- Prepare the cuticle area.
- Lightly buff if required.
- Remove filing dust and clean the nail.
- Apply nail dehydrator.
- Apply primer or bonder if required.
- Apply gel base coat.
- Cure the gel as directed.
- Continue with color and top coat.
Do not apply dehydrator and then return to filing or cuticle work. Those steps can put dust, oil, or debris back onto the prepared surface.
It also makes little sense to place dehydrator over cured gel. Dehydrator is designed mainly for the natural nail during preparation.
Dehydrator vs Cleanser vs Primer vs Base Coat: What Is the Difference?
These products are often grouped together, but they are not interchangeable. Each has a different place in the gel nail process.
| Product | Main Job | Typical Position | Lamp? |
|---|---|---|---|
| Cleanser | Removes surface contamination or residue | Before dehydrator or as directed | No |
| Dehydrator | Temporarily reduces surface oil and moisture | After cleaning, before primer/base | Normally no |
| Primer/Bonder | Promotes bonding between nail and enhancement | After dehydrator when required | Depends on formula |
| Gel Base Coat | Creates the first gel layer and foundation | After nail prep | Yes, when it is a UV/LED gel |
The biggest source of confusion is primer. Some primers air-dry, while certain bonding products are designed to cure.
Check the label instead of using one rule for every bottle. The same advice applies when combining products from different brands.
How Much Dehydrator Should You Use, and Do You Cure It?
Use only enough dehydrator to leave a thin film across the natural nail. More liquid does not mean better adhesion.
I usually think of it as a light swipe rather than a polish coat. The nail should not look flooded or have liquid pooling around the sidewalls.
- One thin coat: This is enough for most conventional nail dehydrators.
- No pooling: Keep product away from surrounding skin.
- Air-dry: Allow the liquid to evaporate completely.
- No wiping: Leave the prepared nail untouched after evaporation.
- No lamp: Standard dehydrator normally does not require UV or LED curing.
If the bottle specifically says it is a combined dehydrator, primer, bonder, or gel-prep product, its directions may differ. Follow those instructions instead of assuming it works like a basic dehydrator.
Can you apply dehydrator twice?
A second coat is usually unnecessary unless the manufacturer recommends it. Repeated application can expose the nail and surrounding skin to more solvent without fixing poor preparation.
If your gel continually lifts, first examine your cuticle prep, contamination, gel thickness, lamp compatibility, and curing. Adding more dehydrator may not solve the real problem.
Why Can Gel Nails Still Lift After Using Dehydrator?
Dehydrator cannot compensate for every adhesion mistake. Gel can still lift when the nail was contaminated, the cuticle area was poorly prepared, or the gel was applied or cured incorrectly.
Check these common problems before blaming the dehydrator:
- Cuticle on the nail plate: Gel sitting partly on dead skin may separate as the nail grows.
- Touching prepared nails: Fingertip oils can contaminate the plate again.
- Gel touching skin: Flooding the cuticle can encourage lifting and unnecessary skin exposure.
- Overly thick coats: Thick gel may cure poorly, wrinkle, or separate.
- Wrong lamp: A lamp that is unsuitable for the gel system may not cure the product correctly.
- Under-curing: Cutting cure times short can leave gel incompletely cured.
- Over-buffing: Excess filing thins and weakens the natural nail instead of improving adhesion.
- Mixing incompatible systems: A primer, base, gel, and lamp from unrelated systems may not perform well together.
Water exposure immediately before application can also make preparation less predictable. Start with clean nails and make sure they are fully dry before proceeding.
What if lifting always starts near the cuticle?
Focus on cuticle removal, product placement, and avoiding skin contact. Dehydrator alone cannot correct gel that overlaps living skin or hidden cuticle tissue.
What if lifting starts at the free edge?
Check nail flexibility, edge preparation, product thickness, and your system’s instructions for sealing the free edge. Daily wear can also put more stress on this area.
How Can You Use Nail Dehydrator Safely?
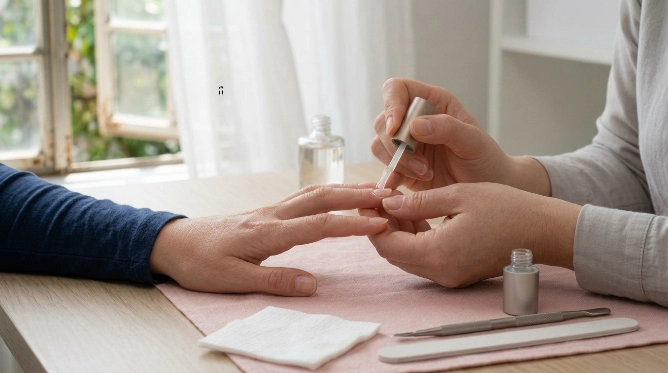
Use nail dehydrator exactly as its label directs and avoid unnecessary skin contact. Nail-prep products can contain fast-evaporating solvents that may irritate skin or eyes.
The FDA’s nail care product guidance recommends following product directions and warning statements. Ingredient labels are also useful when you have known sensitivities.
- Keep it off skin: Apply only to the intended nail surface.
- Avoid damaged skin: Do not flood cuts, cracks, or inflamed areas.
- Use ventilation: Work where fresh air can circulate.
- Close the bottle: Replace the cap promptly after use.
- Avoid eyes: Wash thoroughly and follow label directions after accidental exposure.
- Stop after a reaction: Burning, swelling, persistent redness, or rash needs attention.
For people using nail products frequently, OSHA also recommends good ventilation and reducing unnecessary chemical exposure in nail work areas. Its nail salon chemical safety guidance explains those precautions in more detail.
Watch for signs of an allergy
Gel and artificial-nail systems can cause contact dermatitis in some people. A reaction may involve itching, redness, swelling, cracking, or a rash around the fingers or elsewhere.
The American Academy of Dermatology explains that contact dermatitis from nail products can sometimes appear away from the nails. Stop using the suspected product and seek medical advice if symptoms persist or become severe.
Health note: Persistent pain, swelling, nail separation, infection signs, or an ongoing rash should be assessed by a qualified healthcare professional or dermatologist.
As of 2026, gel systems still vary widely in their preparation and curing requirements. The directions supplied with your specific products should take priority over a generic routine.
Frequently Asked Questions
Do you put dehydrator on before or after primer?
Apply dehydrator before primer in systems that use both products. Let the dehydrator evaporate fully, then apply the primer according to its directions.
Do you cure nail dehydrator under a UV or LED lamp?
Standard nail dehydrator normally air-dries and does not need curing. If you have a hybrid prep or bonding product, check the label because its instructions may differ.
How long should dehydrator dry before gel?
Wait until it has completely evaporated and the nail looks dry. Many formulas flash off within roughly 30 to 60 seconds, but use the timing provided by your manufacturer.
Can I use nail dehydrator without primer?
Yes, when your gel system does not require a separate primer. Some base coats are designed to go directly onto a properly prepared and dehydrated natural nail.
Can rubbing alcohol replace nail dehydrator?
Isopropyl alcohol can remove surface oils and contamination, but it is not automatically identical to a dedicated dehydrator. For predictable retention, use the preparation method recommended by your gel brand.
Can acetone be used instead of nail dehydrator?
Acetone removes oil and evaporates quickly, but it can be drying and may not be the prep product your gel system was designed around. Avoid substitutions when the manufacturer specifies a dedicated prep solution.
Should I dehydrate my nails before every gel manicure?
Use dehydrator when your gel system recommends it or when it forms part of your successful prep routine. It is especially useful when surface oil or moisture contributes to lifting, but more product is not always better.
Final Takeaway
The best way to use dehydrator before gel nails is simple: finish your nail prep, remove dust, apply one thin coat, and let it evaporate. Then continue with primer if required and your compatible gel base.
Good retention depends on the whole process, not one bottle. Clean prep, controlled product placement, correct curing, and keeping gel off the skin matter just as much as dehydration.
If your manicure still lifts, troubleshoot the exact area where lifting starts before adding extra prep products. That approach usually tells you far more than applying another coat of dehydrator.

