
You want mocha nails that look high-end without spending a fortune. I’ve tested glossy and matte top coats and watched how different formulas change depth, shine, and wear — and I’ll save you time. A rich, high-gloss top coat with durable, chip-resistant ingredients gives mocha polish the most expensive, salon-quality finish.
I’m Ella Hart, and I’ll walk you through which top coats work best, plus quick application tips to make your mocha manicure last and look luxe. Stick with me and you’ll know exactly what to buy and how to use it for a flawless, pricey-looking result.
Key Takeaways
- Choose a high-gloss, long-wear top coat for a luxe look.
- Proper application and curing extend shine and durability.
- Small upgrades in formula and technique make nails look salon-finished.
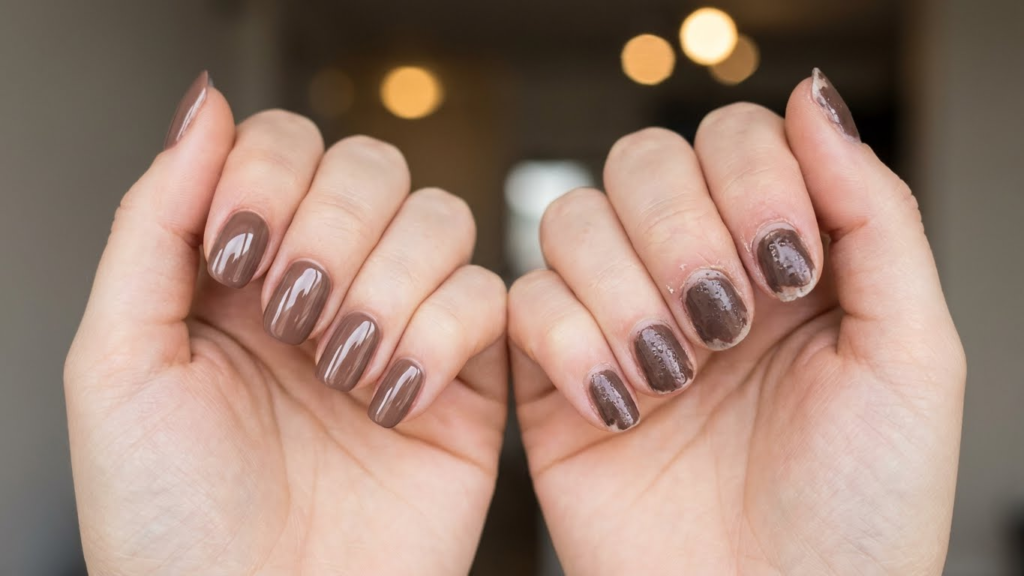
The Best Top Coats for Expensive-Looking Mocha Nails
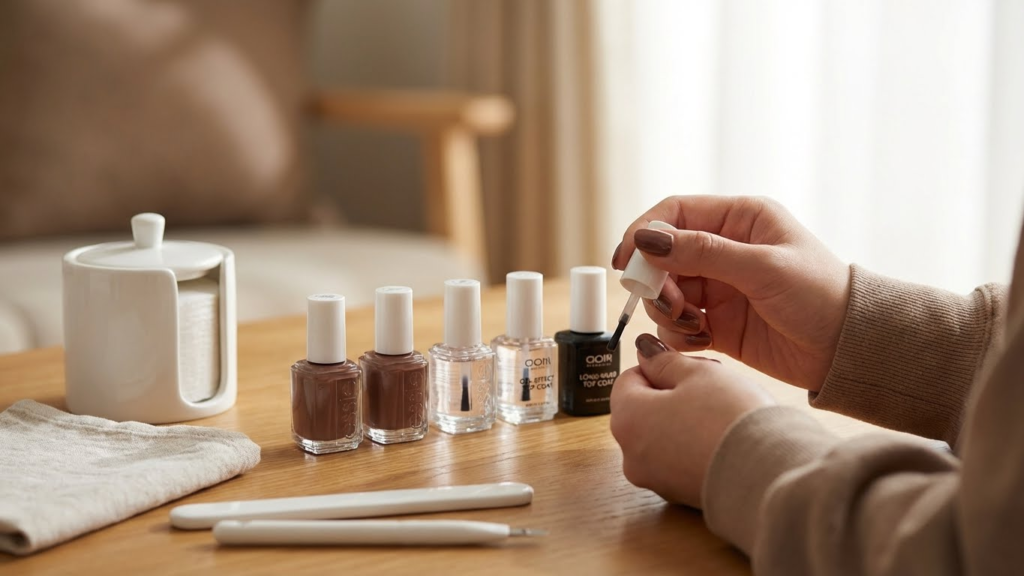
I look for top coats that boost depth, enhance shine, and protect against chips so mocha shades read rich and polished. The right finish makes brown tones look intentional, not dull.
Glossy Gel Top Coats
Gel-style top coats give mocha nails a thick, glass-like shine that deepens brown tones. I prefer ones labeled “no-UV cure needed” if I’m not using a lamp, because they still add that reflective, salon-quality look without extra tools.
Choose a gel top coat with a high-gloss finish and medium viscosity. That helps smooth brush strokes and fills tiny ridges so the mocha appears even and saturated. Apply thin layers to avoid pooling at the cuticle; a single neat coat often looks better than several sloppy ones.
Look for formulas that promise flexibility and chip resistance. Those keep the glossy surface intact on busy hands. I also lightly wipe the nail free edge after drying to maintain a crisp, professional outline.
High-Shine Quick-Dry Top Coats
When time is short, a quick-dry top coat saves the finished mocha from smudges while preserving shine. I pick fast-dry formulas that advertise a glassy finish and drying times under three minutes for practical use.
These top coats typically have a thinner consistency, so I make sure to use two thin coats rather than one thick coat. That prevents shrinkage and keeps the mocha’s color depth intact. Quick-dry sprays and brush-on liquids both work; I use a brush-on for control around the cuticle.
Watch for wording like “high-shine” or “diamond gloss” and check that the formula is non-yellowing. Non-yellowing keeps warm mocha tones true over time, instead of washing them out or turning them muddy.
Long-Lasting Top Coats
For durability, I choose top coats rated for 7+ days of wear without chipping. Long-wear formulas often contain polymers that bond to the polish and form a hard shell. That shell preserves the mocha’s smooth surface and prevents loss of luster.
Apply a base coat first, then color, then a generous sealing edge with the long-lasting top coat to stop tip wear. I let each layer dry fully between steps. Bonding or “gel-effect” long-wear top coats pair well with rich mocha shades because they hold the finish and prevent micro-scratches that make brown polish look cheap.
Pick a long-lasting top coat with clear labeling about flexibility and chip resistance. Those traits keep the nails looking freshly done, which makes mocha hues read more expensive on the hand.
Choosing the Right Top Coat Finish
I recommend choosing a finish that matches the depth and warmth of mocha tones while protecting the polish and enhancing texture. Think about shine level, wear time, and how the finish alters color depth.
Glossy vs. Matte
Glossy top coats deepen mocha shades and add a wet, polished look that makes brown and caramel layers pop. I use a fast-dry, high-shine formula to amplify contrast between lighter swirls and darker cocoa tones. Gloss also reflects light, which hides tiny ridges and makes nails look smoother.
For longevity, pick a glossy top coat labeled “chip-resistant” or “gel-like.” These often contain stronger resins that lock color in place. If you want to read ingredient tips or safety notes, the FDA provides guidance on nail product labeling and claims.
Matte top coats mute shine and give mocha nails a soft, velvety finish. I choose matte when the design leans earthy or vintage; it tones down bright highlights and makes gradients look subtle. Matte can show surface texture more, so buff and clean nails well before applying.
Matte top coats often wear faster at the tips. To extend life, seal edges and reapply a thin matte layer after a few days. If you want professional application tips, a reputable beauty school or salon resource can offer step-by-step advice.
Satin Finish Top Coats
Satin finishes sit between glossy and matte, offering low sheen with a soft glow. I use satin when I want mocha nails to read upscale without high shine. Satin keeps color depth while reducing harsh reflections, so brown gradients look rich and smooth.
Satin top coats are great for nails with shimmer or metallic accents. They preserve subtle sparkle without making it look glittery. I look for “satin” or “soft gloss” on the label and choose formulas that claim long wear.
Application matters: apply thin, even layers and seal the free edge to avoid premature wear. For added durability, use a base coat to promote adhesion and prevent staining from rich brown pigments.
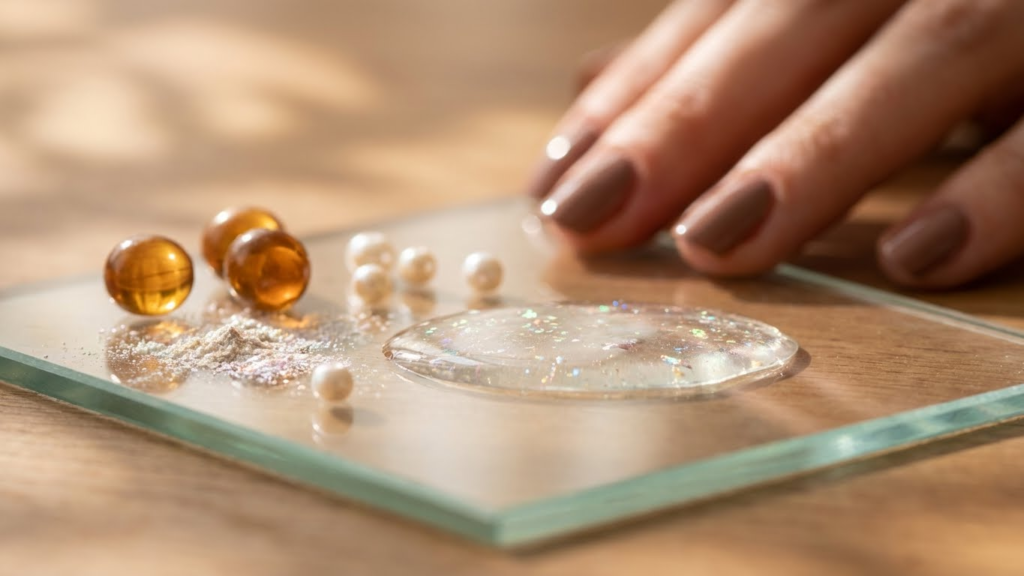
Luxury Ingredients in Top Coats
I focus on ingredients that add real shine, durability, and a subtle luxury glow to mocha nails. The two main types I look for are mineral infusions that reflect light and oil-rich blends that smooth and protect.
Diamond and Pearl Infusions
I choose top coats with finely milled diamond or pearl powder to boost brilliance without visible glitter. Diamond powder is usually silica or aluminum oxide treated to refract light; it adds sharp, reflective shine that makes deep mocha tones pop. Pearl (mica) gives a softer, warm glow that complements brown and caramel shades.
Look for labels that specify particle size (micron range) and list mica or synthetic diamond derivatives. Smaller particles sit smoother on the nail and reduce gritty texture. Use a thin application: one even layer for shine, two thin layers for longer wear. Avoid heavy coats, which can dull the reflective effect and cause bubbling.
Oil-Enriched Formulas
I prefer top coats that include oils like argan, jojoba, or vitamin E for hydration and flex. These oils fill micro-gaps in the polish film, which reduces chipping and keeps the mocha finish smooth and glassy.
Check ingredient lists for “argania spinosa (argan) oil,” “simmondsia chinensis (jojoba) oil,” or “tocopherol (vitamin E).” These oils also add subtle warmth to brown tones, enriching the depth of mocha shades. Apply a nourishing top coat after a cured top seal for weekly maintenance to refresh shine and prevent edge wear.
Application Techniques for a Salon-Quality Finish
I focus on build, shine, and durability when I finish mocha nails. Precise layering and the right drying method turn a good manicure into an expensive-looking one.
Layering for Depth
I start with a thin base coat to protect the nail and give polish something to grip. I apply one thin layer of mocha polish, let it level for 30–60 seconds, then add a second thin layer to deepen color without brush marks.
For an expensive, glazed look I use a sheer brown or caramel tint as a third thin glaze. I paint the glaze from the center outward in one smooth stroke to avoid streaks. If I want extra dimension, I sparingly sponge a slightly darker brown at the free edge and buff the transition with a soft brush.
Always seal the color with a high-quality top coat. I cap the free edge by dragging the brush across the tip; this reduces chipping and sharpens the finished line. Wipe the brush on the rim, not the bottle mouth, to keep layers even.
Curing and Drying Methods
If I use gel polish I cure each thin layer under an LED lamp for 30–60 seconds depending on the product. I follow the manufacturer’s time exactly; under-curing leaves tacky spots, over-curing can lift or yellow the mocha tones.
For regular polish I use a quick-dry top coat and let nails rest flat for 5–10 minutes before touching anything. I avoid air blasters that blow dust; instead I hold my hand about 6 inches above a fan for gentle airflow.
When using fast-dry drops or sprays, I place one small drop at the nail center and let it spread. I don’t use too much—excess can dull shine. Finally, I finish with a shine boost: a second thin layer of glossy top coat after 10–15 minutes for long-lasting gloss.
Enhancing Mocha Nails with Special Effects
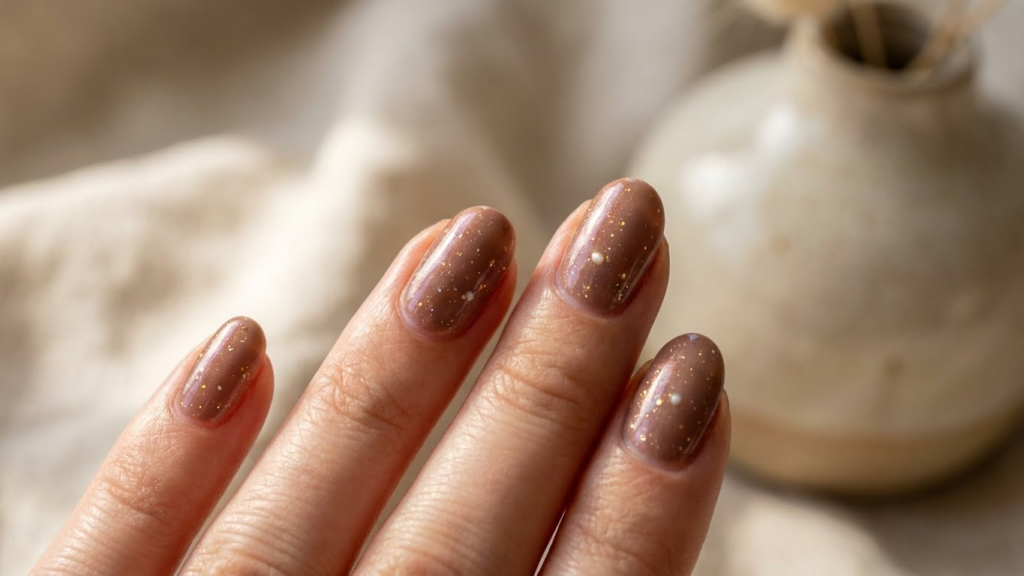
I recommend focusing on finishes that add depth without stealing the mocha shade. Small, targeted effects can lift a simple brown polish into a luxe-looking manicure.
Iridescent Top Coats
I like iridescent top coats for mocha because they add a soft, color-shifting glow that complements brown tones. Look for formulas labeled “pearl,” “duochrome,” or “shift” that show gold, pink, or green flashes over brown. Apply one thin layer over cured mocha polish to keep the base color visible while adding dimension.
If you want more punch, layer a very thin coat, cure, then add a second sparse coat only on the nail center or tips. That technique keeps the effect controlled and elegant. Avoid heavy application; too much shift looks candy-like rather than expensive.
Recommended finish: glossy pearl or subtle duochrome. Avoid chunky flakes or bright holographic shifts—they compete with the warm mocha.
Subtle Glitter Overlays
I use very fine, micro-glitter for a refined sparkle that reads as shimmer rather than disco. Choose ultrafine gold, bronze, or coffee-colored glitter suspended in a clear top coat. Apply by dabbing lightly with a sponge to concentrate shimmer near the cuticle or tip for a soft gradient.
For longer wear, seal glitter with a high-build glossy top coat and cure if using gel. Keep the glitter density low—about one light coat or a controlled gradient—to maintain a luxury look. Coarser glitters or full-coverage sparkles make the manicure look costume-like, so avoid them for a high-end mocha finish.
Maintaining a Luxe Mocha Manicure
I focus on small daily habits and the right top coat touch-ups to keep mocha nails glossy and chip-free. Proper hydration, gentle handling, and timely reapplication of a high-shine top coat make a big visual difference.
Daily Nail Care Tips
I wash my hands with a mild soap and pat them dry to protect the polish. I avoid hot water right after a fresh manicure because heat can soften polish and cause early dents.
I use cuticle oil every morning and night to prevent dryness and lifting. A lightweight, vitamin E–rich oil keeps the nail edge sealed and reduces peeling around the cuticle.
I wear gloves for chores like dishwashing and cleaning to block harsh detergents. For quick fixes, I carry a small bottle of clear top coat and a cotton swab to smooth chips before they spread.
I file only when needed and always in one direction to prevent splits. If my nail edges catch, I gently buff the tip with a fine file and then reseal with top coat.
Top Coat Reapplication Frequency
I reapply a glossy top coat every 3–4 days to maintain a salon shine and protect mocha polish from chipping. If I use a fast-dry, high-gloss formula, I still follow the same schedule to replenish the wear layer.
After washing or heavy use, I press a thin layer of top coat along the free edge to restore the seal. For the best long-term strength, I choose a strengthening top coat with UV protection to prevent color fade; studies show UV can alter pigments over time, so a UV-blocking clear coat helps preserve depth.
When nails chip, I clean the area with rubbing alcohol, apply a thin coat over the repaired spot, and finish with a full top coat layer. For reference on top coat types and care, I check resources like the American Academy of Dermatology and reputable beauty reviews for product comparisons.
Mistakes to Avoid with Mocha Nail Top Coats
I often see people skip sealing the free edge, and that ruins a polished look fast. Not running the brush along the tip lets chips start at the edge and makes mocha shades look cheap.
I avoid thick top coat layers because they bubble and peel. Thin, even coats dry smoother and keep glossy or matte finishes looking high-end.
I don’t forget to wait between layers. Applying top coat over tacky polish drags color and creates streaks. I wait the recommended time so the mocha tone stays even.
I rarely use a quick-dry that leaves a cloudy film. Some fast formulas can dull rich brown tones. I test a small swatch first to make sure the finish matches my intent.
I don’t ignore base and polish compatibility. Incompatible products can lift or crack the top coat. I use products that work together or a proven multi-use top coat.
I don’t skip edge-to-cuticle coverage. Uneven coverage makes nails look unfinished. I make smooth, single strokes and cap the tip for a salon-quality finish.
Common mistake checklist:
- Applying thick coats
- Skipping edge sealing
- Not waiting between layers
- Using incompatible products
- Choosing a quick-dry without testing
I follow these steps and my mocha nails keep a polished, expensive look longer.
FAQ.
Do I need a gel top coat?
Not always. A gel-like or gel top coat gives that salon shine without UV curing. It also adds thickness and durability, so your mocha mani resists chips longer.
What about matte top coats?
Matte can look modern and chic on mocha shades. I use matte when I want a soft, velvety effect instead of high shine. Pair it with a glossy accent for contrast.
How do I make the top coat last longer?
I clean the nail surface, cap the free edge, and apply thin even layers. A quick-dry top coat helps if I’m short on time. Reapplying a thin layer every 3–5 days extends wear.
Are “strengthening” or “non-toxic” top coats worth it?
Yes, if you need added protection or prefer gentler formulas. I look for products labeled chip-resistant and free of common harsh solvents. These options protect polish and reduce damage to natural nails.
Can a top coat change the mocha shade?
A glossy top coat deepens and slightly intensifies color. Matte will soften tones and mute shine. I choose the top coat based on the final look I want.
Conclusion
I recommend a high-gloss or gel-effect top coat if I want mocha nails to read as rich and polished. These finishes deepen color and add a reflective shine that makes neutral browns look more luxurious without extra effort.
If I prefer a modern, soft look, I choose a satin or matte top coat. It mutes shine but keeps tones sophisticated and fashion-forward. I often pair matte with a glossy accent nail to add contrast.
I look for quick-dry formulas and chip resistance to keep the manicure looking fresh longer. A top coat with UV protection or strengthening ingredients helps prevent yellowing and wear over time.
For salon-level results at home, I follow a simple routine: clean base, thin color layers, and two thin top coat layers. I cap the free edge and allow proper drying time to avoid smudges and peeling.
My final tip: test finishes on one nail first. That saves time and helps me choose the perfect sheen for my skin tone and outfit.