
You want mocha nails that look rich, not muddy. I explain this for you and for my site visitors so you can pick the right shade and avoid that dull, brown-gray wash that cancels out your manicure. The undertone that makes mocha nails look muddy is a cool, grayish or overly olive undertone—choose warm, slightly golden or neutral undertones instead.
I’m Ella Hart and I’ll walk you through how to spot muddy undertones, what to look for in swatches, and simple fixes you can use at home or ask for at the salon. You’ll learn quick checks for lighting and skin contrast so your mocha always reads warm and polished.
Key Takeways
- Check for cool, gray, or olive hints that flatten mocha into a muddy tone.
- Prefer warm, golden, or neutral undertones to keep mocha vibrant.
- Use proper lighting and contrast tests before you buy or ask for a polish.
Understanding Mocha Nail Color Undertones
I explain how small shifts in color change a mocha polish from rich to dull, which undertones usually appear, and how those undertones change what you see on the nail.
Definition of Undertones in Nail Polish
I define undertones as the hidden color that sits beneath the main shade and shows through depending on lighting and skin tone.
Undertones are not the surface color you see in the bottle; they are the subtle hints — warm (yellow, golden, red), cool (gray, blue), or neutral (balanced brown/taupe) — that mix with the base brown.
In practice, a mocha polish with warm undertones looks creamier or golden on warm skin, while a cool-undertone mocha leans ashy or muted.
Technically, manufacturers add pigments like iron oxides (warm) or ultramarine/black (cool) to create these effects.
Knowing the undertone helps me predict whether a mocha will brighten my hands or make them look sallow.
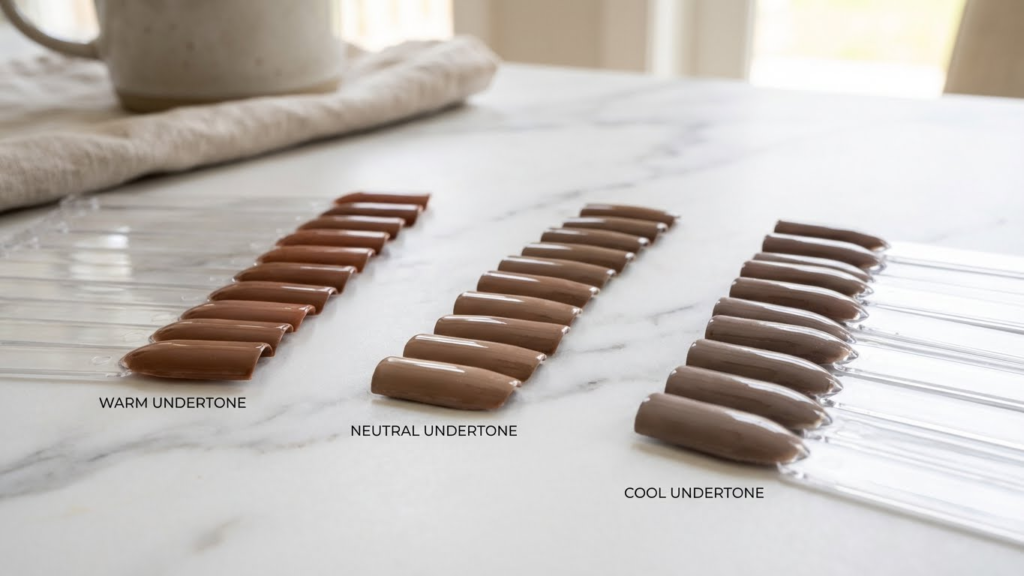
Common Undertones Found in Mocha Shades
Mocha nail polishes often include three main undertone types: warm, cool, and neutral.
Warm mocha uses yellow, amber, or red pigments that give a creamy or caramel look. It suits warm or olive skin tones well.
Cool mocha mixes gray, blue, or black pigments, creating an ashy or taupe finish. It can look sophisticated but risks appearing muddy on darker or very warm complexions.
Neutral mocha blends both types to sit between caramel and ashy; it’s the safest pick for most skin tones.
I check polish swatches in natural light to spot these undertones.
If the brown reads slightly golden, it’s warm; if it reads gray or muted, it’s cool; if neither stands out, it’s neutral.
How Undertones Affect Nail Color Appearance
Undertones change contrast between nail and skin, which alters how vibrant the color looks.
A warm undertone increases perceived warmth and can make nails look lively on yellow or olive skin.
A cool undertone lowers contrast and can make the polish seem dull or “muddy,” especially when paired with deep or warm skin tones.
That muddiness comes from too much gray or black pigment diluting the brown’s richness.
Neutral undertones keep the color balanced and reduce the risk of muddiness.
When I choose a mocha, I match undertone to my skin’s dominant tones and test a small swatch to judge how light, depth, and clarity hold up in different lighting.
Why Mocha Nails Can Appear Muddy
Mocha can look rich and polished or dull and muddy depending on small shifts in undertone, depth, and mixing. I focus on how cool vs warm base tones, stray yellow/green hints, and neutral or ashy mixes change the final color on nails.
Influence of Cool Versus Warm Undertones
Cool undertones pull mocha toward gray and taupe. If a brown polish contains blue or gray pigments, it reduces warmth and can make the color read flat on the nail. I notice this most on medium to deep skin tones where the polish lacks contrast and looks muted.
Warm undertones add caramel and red notes that keep mocha lively. When a mocha contains red or orange pigments, it reflects light and appears fresher. For a true mocha finish, choose polishes labeled “warm brown,” “cocoa,” or with names that suggest warmth.
If you’re unsure, test a swatch in natural light and next to your skin. This quick check shows whether the polish tilts cool (muddy) or warm (clean).
Role of Yellow and Greenish Hues
Yellow or greenish undertones can make mocha look dirty rather than warm. Small amounts of yellow shift a brown toward olive or chartreuse, which clashes with the expected cocoa tone.
I find that lower-quality formulas sometimes use yellow/green pigments to stretch color. This is common in drugstore lines but also happens in salon mixes when pigments aren’t balanced well. Check product reviews or brand ingredient notes when possible.
To correct a greenish cast, I use a warm topcoat or layer a warm sheer polish. For professional guidance on color theory and pigment behavior, resources like the Pantone color guides and nail industry articles help explain how tiny pigment shifts cause visible changes.
Mixing Neutral and Ashy Undertones
Neutral browns should balance warm and cool, but too much ash (gray) will deaden mocha and create a muddy look. Ashy undertones reduce saturation and lower contrast, especially on short or square nails.
When salons custom-blend colors, technicians sometimes add gray to tone down brightness. That technique works for muted looks but can read muddy if overdone. I recommend asking for small test swatches before committing to a full set.
If you prefer a cleaner mocha, request a base with slightly higher chroma (more pigment saturation) or add a glossy topcoat to boost reflectivity and revive the shade. For technical reading on pigment mixing, authoritative color theory sources like university design pages provide clear explanations.
Identifying Muddy Undertones in Mocha Nails

I explain how to spot when a mocha polish looks muddy and what causes that dull, unsatisfying finish. The points below show visual clues, how to compare swatches, and common color mistakes that worsen muddiness.
Visual Signs of a Muddy Appearance
I look for dullness and lack of depth first. A mocha shade that should read warm and creamy instead looks gray or brown-green on the nail — that’s muddy.
Edges and nail tips can show uneven color; if the polish pools darker at the cuticle or tip and loses clarity in the middle, the tone is fighting with itself.
Shimmer and gloss reveal muddiness too. A true mocha will reflect light evenly; a muddy one reflects unevenly or seems flat even when glossy.
On different skin tones, a muddy mocha often leans murky or ashy rather than rich or chocolatey. I check under natural light to avoid misleading indoor bulbs.
Comparing Swatches for Clarity
I place swatches side by side to judge clarity. Put the suspect mocha next to a clear warm brown and a neutral brown to spot shifts toward gray, green, or black.
If the mocha looks noticeably duller or colder than both neighbors, it’s muddy. I test on a white card and on my skin because background changes perceived undertone.
Use two quick tests: swipe a thin layer then a full-coverage layer. Mud shows more in thin layers; if the thin swipe looks ashy while the full swipe barely improves, the base pigment mix is the problem.
Photograph swatches in daylight for later comparison. The image helps confirm what I saw in person and avoids memory bias.
Errors When Choosing Complementary Colors
I avoid pairing muddy mocha with cool grays or olive greens. Those colors deepen the murky tones and make nails look dirty.
Choosing a matte topcoat over a shade that already reads flat can erase any remaining warmth and push the color further into muddiness.
I also watch for wrong metallics. Yellow gold brightens warm mocha, but silver or gunmetal pulls it toward gray-brown.
Finally, I don’t layer sheer glitters with muddy bases. Sheer, warm toppers can rescue slightly muddy mocha; cool or multichrome toppers usually worsen the problem.
Tips for Selecting Flattering Mocha Nail Shades
I focus on skin undertone, shade depth, and contrast to keep mocha nails looking rich instead of muddy. I aim for clear matches, the right intensity, and smart pairings to make the color pop.
Matching Undertones to Skin Tone
I check the undertone of skin—warm (yellow/golden), cool (pink/blue), or neutral—before picking a mocha. For warm skin, I choose mocha shades with golden or caramel tones; they bring out warmth and avoid ashy looks. For cool skin, I pick mochas with cocoa or espresso hints that have slight blue or gray bases; these stop the color from looking orange or brassy.
If skin is neutral, I can wear a wider range: taupe-mocho blends and mid-tone browns both work. I test polish on one nail or use a swatch chip near my wrist to see the true effect in natural light.
Choosing the Right Mocha Intensity
I match intensity to skin contrast and personal style. Light skin with low contrast looks best in mid-tone mochas—not too pale, not too dark—so the color reads smooth and warm. Medium skin handles richer, milk-chocolate mochas that keep nails visible without overpowering fingers.
Dark skin pairs well with deep, cool mocha shades like dark espresso or mocha with a slight plum cast; these preserve depth and avoid washing out the nail line. I also consider gloss versus matte: glossy finishes add life, while matte can mute the hue and risk a muddy feel if the shade is too dull.
Avoiding Unflattering Shade Combinations
I avoid mixing mochas with colors that clash in undertone or temperature. Pairing a warm golden mocha with cool gray accent nails often creates a dirty look. Likewise, using too many desaturated tones together—like ashy mocha with gray-beige—flattens dimension and makes the manicure look muddled.
I use small accents to keep the manicure crisp: a cream or warm nude for negative space, thin gold striping for warmth, or a glossy topcoat to brighten deeper shades. When doing ombré or marbling, I limit the palette to three harmonizing tones and test the blend in natural light to ensure clarity.
How Lighting and Application Techniques Impact Mocha Nails
I focus on two things that change how mocha nails read: the light hitting your hands and how you paint them. Both can make the same polish look creamy or dull and muddy.
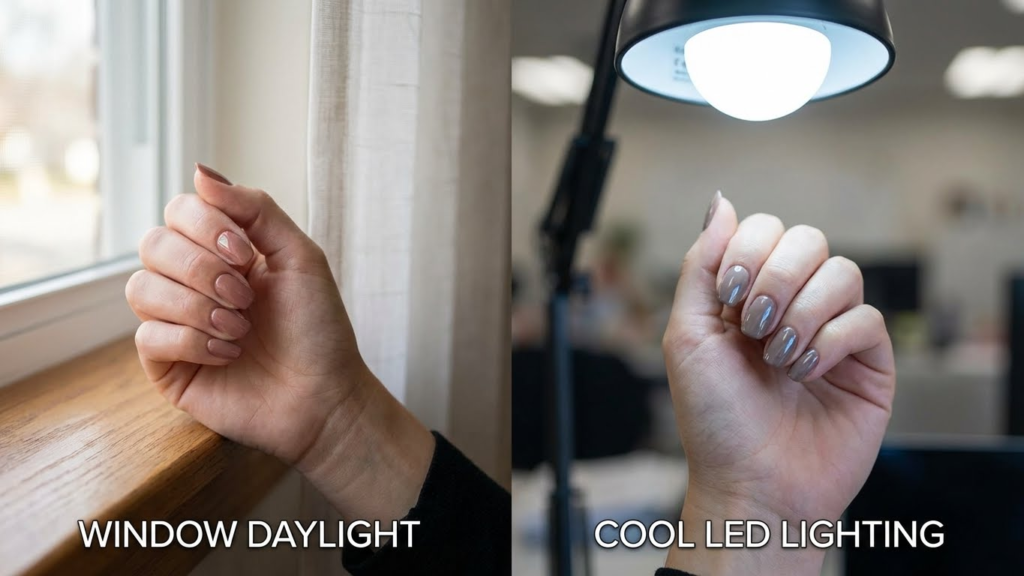
Effect of Natural and Artificial Lighting
Natural daylight shows true color best. I check nails in north-facing indirect light to avoid yellow or blue casts. Morning sun warms mocha, making brown tones pop. Overcast light flattens depth and can make the shade look gray-brown.
Indoor lights vary: warm bulbs (2700–3000K) boost red and orange in mocha, while cool LEDs (5000–6500K) pull out ashy or taupe notes. I test nails near a window and then under home lighting to see the difference. For accurate color matching, I use a daylight lamp like those used by nail techs; the FDA and lighting guides note how color temperature affects appearance (example source: U.S. Department of Energy).
Application Tips to Prevent Muddy Looks
I start with clean, buffed nails and a ridge-filling base coat to create an even surface. Uneven application traps light and makes mocha look streaky or muddy. I apply thin coats, letting each dry fully; thick layers reduce depth and shift the tone toward dull brown.
Use a high-opacity formula or an extra thin white-tinted base if the polish reads too warm on your skin. I finish with a glossy top coat to reflect light and restore richness. For gradient or marbled designs, work wet-to-wet and wipe excess polish from the brush to avoid muddied blends. For professional techniques and polish care, I follow guidance from reputable nail education sites like the Professional Beauty Association.
Recommendations for Brands and Product Selection
I look for polish formulas with good pigment payoff so the color reads true and not muddy. High-pigment polishes cover in two coats and keep the mocha tone vibrant against your skin tone.
I prefer brands that offer both warm and neutral brown shades. Warm browns with golden or caramel undertones can prevent a flat, grayish look on warmer skin, while neutral browns suit many tones without shifting too cool.
Choose a base and top coat that boost adhesion and shine. A glossy top coat brightens mocha shades and reduces the muddied, matte effect that dulls the color.
I trust brand lines that list undertone descriptors (warm, neutral, cool) and swatch on different skin tones. Products that show swatches on light, medium, and deep skin help you predict how the mocha will read.
Consider cream, satin, and jelly finishes depending on your goal. Cream finishes show undertone most clearly; satin can soften contrast; jelly allows depth without opaque muddiness.
Quick checklist:
- High pigment: 2-coat coverage
- Clear undertone labeling: warm/neutral/cool
- Glossy top coat recommended
- Swatches on multiple skin tones
- Finish choice: cream for clarity, jelly for depth
I also recommend testing a single nail before committing to a full set. A quick patch shows if the chosen shade looks rich or if it drifts toward a muddy, gray-brown on your skin.
Final Thoughts on Achieving the Perfect Mocha Manicure
I focus on undertone first because it changes how brown reads on your nails. Cool or ashy browns can make a mocha shade look flat or muddy, while warm, slightly golden tones keep the color rich and lively.
I recommend testing polish against your skin before committing. Swipe a small patch on the side of a finger or on a nail wheel to see if the shade brightens or dulls your complexion.
I keep formulas and finish in mind. A glossy top coat revives deeper shades and reduces a muddy appearance. Matte finishes can emphasize dullness, so I use them carefully.
I suggest simple tweaks that help a lot: add a sheer warm top layer, mix polishes to warm a shade, or pick a mocha with subtle caramel or peach undertones. These small moves keep the color looking fresh.
I balance design and color. Minimal accents—thin gold lines or a soft shimmer—lift the manicure without overpowering the mocha base. This keeps the look elegant and modern.
I recommend a quick checklist before you polish:
- Test undertone on skin
- Choose finish to match shade
- Warm the shade if it looks ashy
- Add subtle accents for brightness
I aim for a manicure that complements your skin and style. With mindful undertone choices and a few simple tricks, you can make mocha nails look polished and far from muddy.
FAQs
What makes mocha nails look muddy on some people?
I find that muddy-looking mocha often comes from a strong cool or olive undertone in the skin that clashes with warm brown shades. The contrast can dull the color, making it appear gray or washed out instead of rich.
Can I fix muddy mocha with a different shade?
Yes. I recommend choosing mocha with warmer golden or caramel undertones for cool skin, or a cooler taupe mocha for warmer skin. A slightly lighter or darker value can also prevent the color from blending into the skin too much.
Should I use nail art or accents to avoid muddiness?
I often suggest adding a cream, beige, or glossy topcoat as an accent to brighten the set. Metallic stripes, a single accent nail, or tiny white details can lift the whole look and add contrast.
Do lighting and finish affect the muddy look?
They do. Matte or low-sheen finishes can emphasize muddiness, while glossy or satin finishes reflect light and keep mocha looking fresh. I check colors in natural light before I commit.
How can I test a mocha shade before painting all my nails?
I paint a single nail or use a swatch stick and view it in different lights and next to my skin. If it looks gray or flat in multiple settings, I try a different undertone or a variant with more warmth or coolness.
Conclusion
I found that undertones change how mocha nails read on the hand. Cool undertones can pull brown toward gray, making the polish look flat or muddy. Warm undertones usually keep mocha looking rich and cozy.
I recommend testing a small swatch on your finger or a nail wheel first. Compare the polish next to your skin in natural light. That quick check helps you see if the color deepens, dulls, or stays true.
If mocha looks muddy, try these fixes: pick a shade with warmer, golden notes; add a glossy topcoat to boost shine; or use lighter accents like cream or soft beige to brighten the look. I also suggest matching the polish finish to your style—satin or glossy tends to read cleaner than matte.
My final tip: don’t rely on pictures alone. Photos can shift tones. Trust what you see in person and adjust the shade or undertone until the mocha flatters your skin instead of washing it out.