How Does Nail Polish Dry? A Practical Guide to Faster, Smudge-Free Manicures

If you’ve ever painted your nails, waited “long enough,” and still ended up with a dent, a wrinkle, or a sheet of lint stuck to the top, you’ve already met the gap between feels dry and is actually dry.
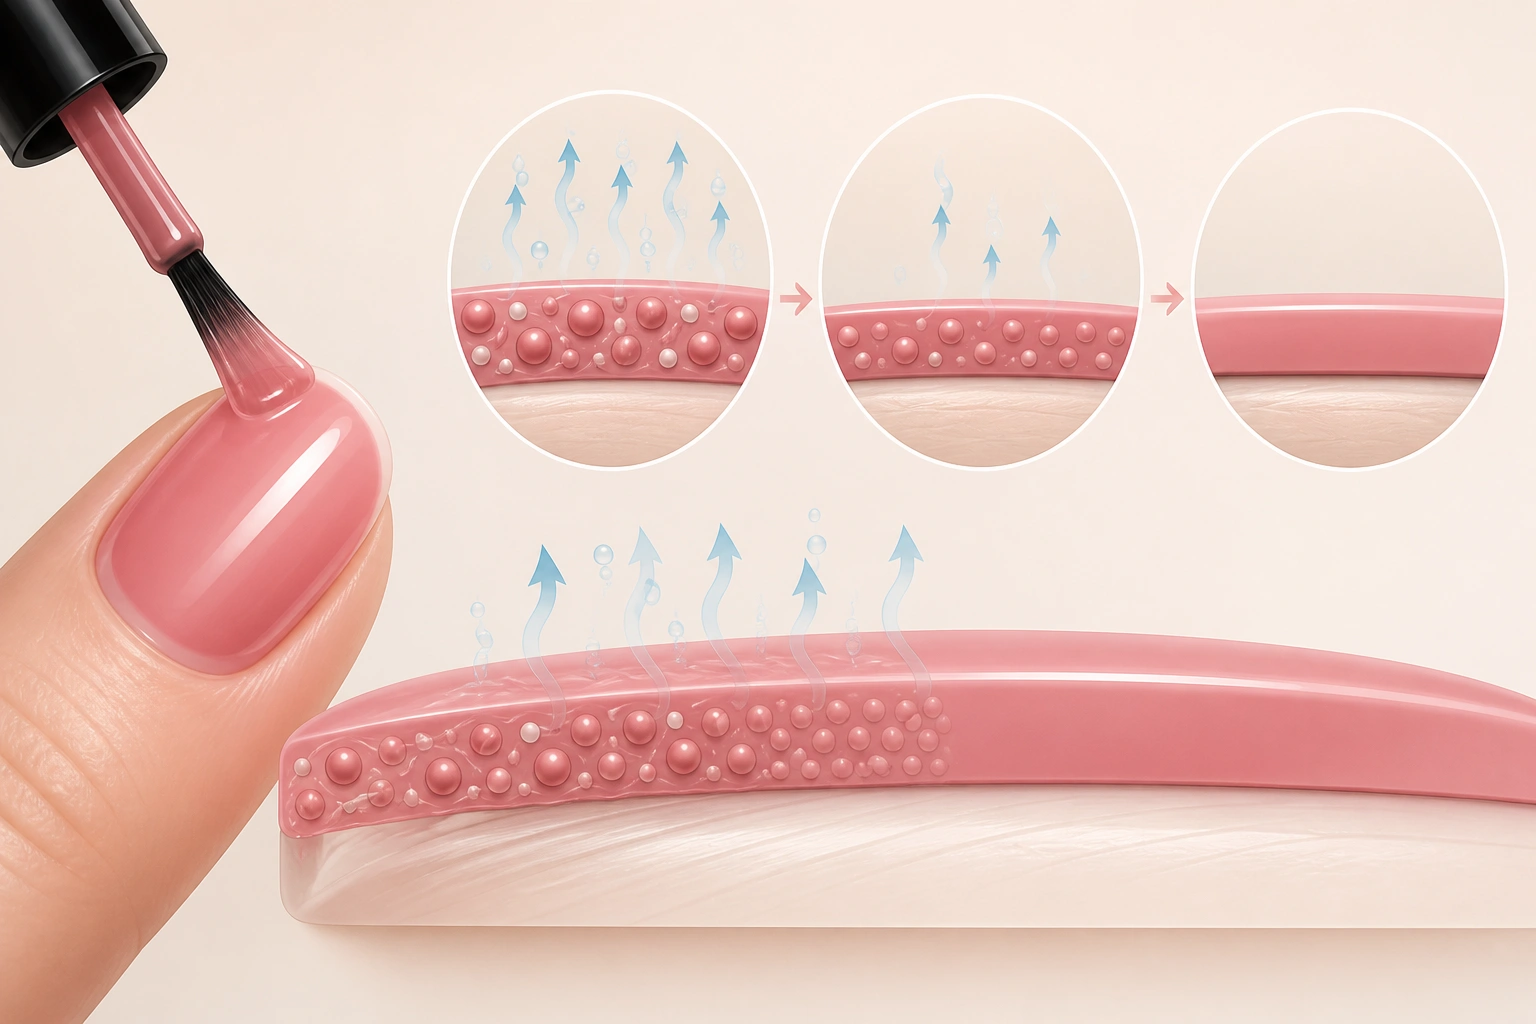
The short answer to how does nail polish dry is this: regular nail polish dries when its solvents evaporate and leave behind a solid film on the nail. That film forms from the top down, which is why a manicure can feel dry on the surface while still staying soft underneath. Gel polish works differently; it doesn’t simply air-dry. It has to be cured under a UV or LED lamp.
That difference matters because the best drying method depends on the product in the bottle. Use the wrong approach, and you can waste time or damage the finish. Use the right one, and your manicure becomes touch-safe much sooner, with less risk of smudging.
How Nail Polish Dries: The Short Answer
Regular polish dries in open air as the liquid solvents leave the formula. As those solvents evaporate, the remaining ingredients form a solid coating on the nail. Nailknowledge describes this as evaporation first, then film formation, which is the basic reason polish gradually turns from wet lacquer into a hard finish.
That process is not all-or-nothing. The top layer usually sets first, while the layers underneath keep hardening for longer. So if you press a thumbnail into a fresh manicure, it may look fine for a moment and then leave a dent later.
Gel polish is different. Manucurist notes that gel polish needs to be cured under a UV lamp, while regular polish air-dries. If you’re using gel, airflow alone will not replace the lamp. If you’re using regular polish, a lamp will not magically turn it into gel.
Drying vs. Curing: Regular Polish, Quick-Dry Products, and Gel Polish
Here’s the simplest way to think about it:
- Regular polish: dries as solvents evaporate into the air.
- Quick-dry regular polish: still air-dries, but the formula is designed to set faster.
- Gel polish: cures under a UV/LED lamp and is built for that system.
That distinction helps you avoid a common mistake: trying to “dry” regular polish the way you’d cure gel. A lamp may warm the nail slightly, but it does not turn regular polish into a gel system.
If you want the fastest route and you like using a lamp, gel can be the more time-efficient system for wear and set time. But it also requires the right lamp, the right formula, and a different removal process. If you want to stay with classic polish, the speed gains come from better application and drying aids, not from switching it into a gel-like process.
For a deeper timing breakdown, you may also want to compare this guide with how long nail polish takes to dry and how long nail polish takes to dry completely.
What You Need Before You Start
You do not need a drawer full of products to get better drying results. You do need the right basics:
- Base coat
- Color polish
- Top coat
- Quick-dry top coat or drops, if you want less waiting
- A fan or cool-air source, if you like airflow
- Nail polish remover for cleanup before you begin
The biggest payoff usually comes from two things: thinner coats and a top coat that matches your goal. If you want shine and durability, a standard top coat is fine, but it usually asks for more patience. If you want speed, a quick-dry top coat or drops can help the surface set faster.
Step-by-Step: How to Let Nail Polish Dry Properly
1) Apply a thin base coat
A thin base coat gives the color something smooth to grip without creating a thick wet layer. Thick base coats are one of the easiest ways to slow the whole manicure down before you even start the color.
2) Paint color in thin, even coats
This is the biggest drying decision you make. Thin coats let solvents escape faster because there’s less polish depth for them to travel through. Thick coats create the classic “dry on top, wet underneath” problem.
If your brush is overloaded, wipe off the excess before painting. A coat that looks slightly sheer is usually better than one that looks opaque but stays soft for ages.
3) Give each coat a little breathing room
You do not need to wait forever between coats, but you do need enough time for the previous layer to stop moving. If the polish still drags when you lightly touch the edge with another nail, it is too soon.
As a practical rule, if you’re doing a full DIY manicure, paint one hand, then the other. By the time you finish the second hand, the first usually has had a better chance to set.
4) Finish with the right top coat
A top coat seals the color and helps protect it from dents and smudges. If speed matters, choose a quick-dry top coat rather than a standard one. Essie says its expressie polish dries in about a minute, which shows how much formula design can matter when you want faster results. That kind of speed is formula-dependent, though, not something every polish can match.
5) Keep your hands out of trouble
Even when polish seems dry, avoid pressure tasks: zipping tight boots, digging through a bag, opening cans, or pressing keys aggressively. Those are the kinds of movements that flatten soft polish before it has fully hardened.
How Long Nail Polish Usually Takes to Dry
Exact drying time depends on the formula, coat thickness, and environment, so there is no single number that fits every manicure. Still, a few realistic expectations help.
For regular polish, think in stages rather than one finish line:
- Surface-dry: often within a few minutes, when the top feels less tacky
- Touch-safe: often after a bit longer, when very light contact is less likely to leave a mark
- Fully hardened: can take much longer, sometimes well beyond the first few minutes, depending on formula and coat thickness
That’s why a manicure can feel dry to the touch before it is truly ready for normal use. A polish that seems fine after a few minutes can still dent if you put on socks, lean on a countertop, or tuck your hands under a pillow.
For gel polish, the timing is different because it does not air-dry in the same way. It cures under a UV/LED lamp, and the exact cure time depends on the product and lamp system. In other words, gel is about curing under light, while regular polish is about solvent evaporation in air.
A better way to think about drying is in stages:
- Surface-dry: the top feels less tacky
- Touch-safe: light contact is less likely to leave a mark
- Fully hardened: the manicure can handle normal friction more reliably
If you need the numbers and expectations in one place, how-to-dry-nails-faster is a useful example of how formula choice changes the timeline.
What Makes Nail Polish Dry Faster or Slower
Coat thickness
Thin coats dry faster because the solvents have less polish to move through. Thick coats trap solvent underneath the surface, which slows the whole process. This is the single biggest reason a manicure looks “mysteriously” slow at home.
Formula
Some formulas are simply built to dry faster than others. Quick-dry formulas use ingredients and balance designed to set more quickly, but they still have limits. They are faster, not magical.
Humidity
A humid room can make drying feel slower because the air is already holding more moisture. Manucurist notes that polish can have a hard time drying in a very humid room, such as a steam-filled bathroom. That’s why a bathroom right after a shower is one of the worst places to let nails set.
Airflow
Air movement helps solvent escape from the surface. LondonTown says cool air is generally more effective than warm air for drying nail polish. Warm air can make the top layer set too quickly and may leave the lower layer soft or tacky.
Temperature

Very warm air can be a mixed bag. It may speed up evaporation a little, but if it heats the surface too much, it can make the finish uneven or uncomfortable. Cool air is the safer choice.
Best Ways to Speed Up Drying at Home
From most reliable to least reliable, the best at-home options are usually:
1) Use thin coats from the beginning
If you only change one habit, make it this one. Thin coats are the most reliable way to reduce drying time without buying anything. They are the best option for both speed and safety.
2) Choose a quick-dry top coat
This is the easiest product-based upgrade. A quick-dry top coat can help the surface set faster and reduce the time you spend worrying about smudges. The trade-off is that it may not feel identical to a standard glossy top coat, so if you care most about a certain finish, test one first. Quick-dry top coats are one of the best choices if your main goal is speed.
3) Add quick-dry drops or spray
These are useful when you want a faster “set” without changing your whole manicure routine. They are best used exactly as directed, because too much product can leave the finish uneven or greasy-looking. They can help with speed, but results vary by formula.
4) Use cool airflow
A fan or a blow dryer on a cool setting can help, as long as the air is not strong enough to disturb the polish. Cote Beauty recommends a cool setting held a few inches away. That spacing matters because strong air can push wet polish around instead of helping it settle. This is usually a good safety-first option, especially if you want to avoid touching the nails.
5) Try an ice-cold water dip carefully
Cote Beauty also mentions gently dipping nails in ice-cold water as a time-efficient method. This can help the surface feel set sooner, but it is not a substitute for proper drying time underneath. Use it only after the polish has had a moment to settle, or you risk disturbing the finish. It may feel fast, but it is not the most reliable method.
If you want a broader comparison of options, how to dry nail polish faster and the quickest way to dry nail polish may help you choose based on your routine.
What Not to Do While Polish Is Setting
Do not stack on thick coat after thick coat and hope a top coat will fix it. It won’t. The polish underneath still has to dry.
Do not assume the manicure is ready just because the shine looks even. Shine is not the same as hardness.
Do not rush into socks, gloves, or tight shoes. Pressure plus soft polish is a recipe for dents.
Do not use a UV/LED lamp on regular polish and expect gel-style curing. The products work differently, and the lamp is not a universal shortcut.
How to Tell When Your Nails Are Really Dry
A manicure is closer to ready when:
- the surface no longer feels tacky
- a light tap does not leave a mark
- the polish no longer shifts when you gently test the edge
- you can move normally without worrying about brushing the nail against everything
Even then, treat the first hour as vulnerable time. The polish may be usable, but it is still hardening. That is why a manicure can survive a light touch and still dent under a heavy press.
A simple test: if you can lightly touch the very edge of the nail without dragging the color, that’s a better sign than staring at the shine. Just keep the test gentle; repeated checking can create the very smudge you’re trying to avoid.
Troubleshooting: Why Your Polish Is Still Soft or Smudging
The room is too humid
Move to a drier room if you can. A steamy bathroom slows things down more than most people expect.
Your coats are too thick
This is the most common fixable problem. If you keep getting dents, use less polish per coat and allow a bit more time between layers.
The formula and the drying method do not match
Regular polish needs air-drying support. Gel needs a lamp. If you mix those systems, results get messy fast.
You are doing too much too soon
Even if the polish feels dry, avoid tasks that press on the nail. Smudges often happen during ordinary movement, not dramatic accidents.
Your top coat is adding tackiness
Some top coats take longer to settle than others. If a standard top coat keeps you waiting, switch to a quick-dry version and compare the feel.
Practical Example: Fast-Drying a Basic DIY Manicure
Here’s a realistic at-home approach for regular polish:
- Apply one thin base coat.
- Paint the first color coat thinly.
- Wait until it stops dragging before the second coat.
- Apply the second coat in the same thin way.
- Finish with a quick-dry top coat.
- Let your hands rest in a cool, low-humidity space.
That routine usually beats a rushed manicure with one thick coat, even if the thick coat looks more opaque at first. You may spend a little more time painting carefully, but you usually save time later because you are not fixing dents or redoing smudges.
When to Ask a Nail Technician
If your polish never seems to set properly, even with thin coats and a better drying routine, a nail technician can help you troubleshoot the product system itself. That is especially useful if you are using gel, want a longer-wear finish, or suspect the issue is product compatibility rather than technique.
FAQs
Why does my nail polish feel dry but still dent?
Because the top layer can set before the polish underneath hardens. It can look finished while still being soft deeper in the film.
Can a fan really help nail polish dry faster?
Yes, cool airflow can help. LondonTown notes that cool air is generally more effective than warm air, but the fan should be gentle enough not to disturb the polish.
Does cold water help?
It can help the surface feel set sooner, but it is not a guarantee that the polish is fully hardened underneath.
Will a UV lamp dry regular nail polish?
No. UV/LED lamps are for gel systems, not regular air-dry polish.
Are quick-dry top coats worth it?
If you want to reduce waiting time, yes, they are often the simplest upgrade. Just remember they speed up the set time; they do not make polish instantly indestructible.