
How to Dry Nail Polish Quickly Without Smudging Your Manicure

If you want your nails to dry faster, the best place to focus is not a magic trick — it’s the polish itself. Thin coats, a sensible top coat, and a little airflow usually help more than any single shortcut.

Here’s the simple beginner rule: apply polish in thin layers and give each layer a little time to settle. That one habit does more to prevent dents and smears than rushing through thick coats.
If you want a deeper breakdown of drying methods, you may also find these related guides helpful: the fastest ways to dry polish at home, how to make nail polish dry more quickly, and whether quick-dry polish really works.
Quick Answer: The Fastest Safe Ways to Dry Nail Polish
If you need your manicure to set as fast as possible, choose based on what you have:
- If you have a quick-dry top coat: use thin coats of polish, then finish with the top coat. This is the best all-around choice for most beginners because it speeds drying and adds shine and protection.
- If you have drying drops: use them after the color coat or over the finished manicure if that is how the product directions work. They are a good lightweight speed-up, especially if you do not want another thick layer.
- If you only have a fan: use thin coats and gentle airflow. This helps the surface set a bit faster, but it is not as effective as a quick-dry top coat.
- If you have nothing extra: focus on thin coats, give each layer a short pause, and avoid touching or testing the polish too soon.
For most beginners, the best first purchase is a quick-dry top coat. It usually gives the biggest practical improvement because it helps the manicure dry faster and also improves the finish. Drying drops are useful too, but they are usually the second buy if you already have a good top coat.
A fan can help move air around your nails, but keep it gentle. You want airflow, not a blast that pushes dust, hair, or lint onto wet polish. Cold water is a common tip, but it is not a substitute for letting the polish set properly. It may help the surface firm up, yet the layers underneath can still stay soft.
If you only remember one thing, make it this: thick coats dry slowly and smudge easily.
Why Nail Polish Takes Time to Dry
Nail polish dries as its solvents evaporate. That means the polish changes from wet to set as the liquid parts leave the film on your nail. The tricky part is that the top may feel dry before the layers below are ready.
That is why a manicure can seem fine for a few minutes, then dent when you press on it or grab your bag. The surface has started to set, but the polish is not fully stable yet.
This is also why beginners often think a manicure is dry too early. If the polish only feels dry on top, it can still wrinkle, smear, or leave marks from clothes, hair, or bedding.
For a basic consumer-friendly explanation of cosmetic product handling and safety, the FDA’s cosmetics page is a useful place to start. It won’t teach manicure technique, but it does offer general guidance on cosmetic products and ingredients.
The Fastest Ways to Dry Nails at Home
1) Quick-dry top coat
A quick-dry top coat is one of the easiest ways to speed up a manicure. It adds shine, helps protect the color, and is made to help the surface set faster than a regular top coat.
Use it after your color coat has had a short moment to settle. Apply one smooth layer and avoid going back over the same spot again and again. Reworking the surface can drag the color underneath.
In practice, a quick-dry top coat often lets the manicure feel safer to the touch sooner, but it still needs time to harden fully. Think of it as a helpful speed boost, not an instant cure.
This is a strong choice if you want:
– a polished finish
– less smudging
– one product that does more than one job
The trade-off is simple: you have to buy the product, and some formulas work better for some people than others. But for most beginners, it is the most practical all-around option.
2) Drying drops
Drying drops are designed to help polish set more quickly without adding much thickness. They are especially useful if you want a lighter touch than a full top coat or if you already like your top coat but want a little extra help.
They can be a good choice when:
– you are in a hurry
– you want a low-fuss option
– you do not want to add a thick extra layer
The main trade-off is that drying drops usually do not give the same protective finish as a top coat. They help with drying, but they are not a full replacement if you want extra shine and wear.
3) Fan drying
A fan can help by moving air over the nails, which supports evaporation. This is a simple option if you already have a desk fan or small handheld fan.
Keep the airflow gentle and steady. You are trying to help the polish set, not blow the liquid around. If the fan is too strong or too close, it can make the surface uneven or bring dust onto the manicure.
Fan drying is useful when:
– you do not have special nail products
– you want a low-cost method
– you need a little help after each coat
4) Cold water
Cold water is often mentioned as a drying trick, but it should be treated as a surface-setting helper, not a full drying method. It may help the top layer firm up, yet it does not make the polish fully dry all the way through.
If you use it, be gentle. Rough handling, water pressure, or bumping your nails can still cause dents. Think of it as a finishing step after the polish has had a little time to settle, not as an instant fix.
Quick-Dry Top Coat vs. Drying Drops
Both products can help, but they solve slightly different problems.
| Option | Best for | Main benefit | Trade-off |
|---|---|---|---|
| Quick-dry top coat | People who want speed plus shine | Adds protection and a smoother finish | Adds another layer, so application matters |
| Drying drops | People who want a lighter, simpler step | Helps polish set without much bulk | Usually less protective than a top coat |
If you want one product that improves both drying and the final look, a quick-dry top coat is often the better first buy. If you already like your top coat and just want a small speed boost, drying drops can be convenient.
If you want a more detailed product-focused comparison, see how to choose a nail polish drying method.
Air Drying vs. Fan Drying vs. Cold Water
These three methods are often grouped together, but they do different things.
- Air drying: safest and simplest, but also the slowest. It works best when you are patient and use thin coats.
- Fan drying: usually more effective than plain air drying because it increases airflow. It is still gentle and low-risk if you keep the fan on a soft setting.
- Cold water: can help the surface feel firmer, but it is the least reliable for fully drying polish and can be awkward if the manicure is still very wet.
For most beginners, fan drying is the best balance of safety and usefulness if you do not have a quick-dry top coat. Cold water is better thought of as a backup trick, not the main method.
How Long to Wait Between Base Coat, Color, and Top Coat
You do not need to wait forever between layers, but you also should not rush each step.
A practical beginner guide is:
- Base coat: wait about 1 to 3 minutes, or until it no longer looks wet and slippery.
- Between color coats: wait about 2 to 5 minutes between thin coats.
- Before top coat: wait about 2 to 5 minutes after the last color coat, or until the surface has started to set and does not look freshly wet.
- After the top coat: give it at least 10 to 15 minutes before careful handling, and longer if the layers were thicker than intended.
These are only rough ranges, because formula, humidity, and coat thickness all matter. The goal is not a perfect stopwatch. The goal is to avoid trapping wet polish under the next layer.
A simple test: if the surface still moves when you lightly float the brush over it, wait a little longer.
Thin Coats Dry Faster Than Thick Coats
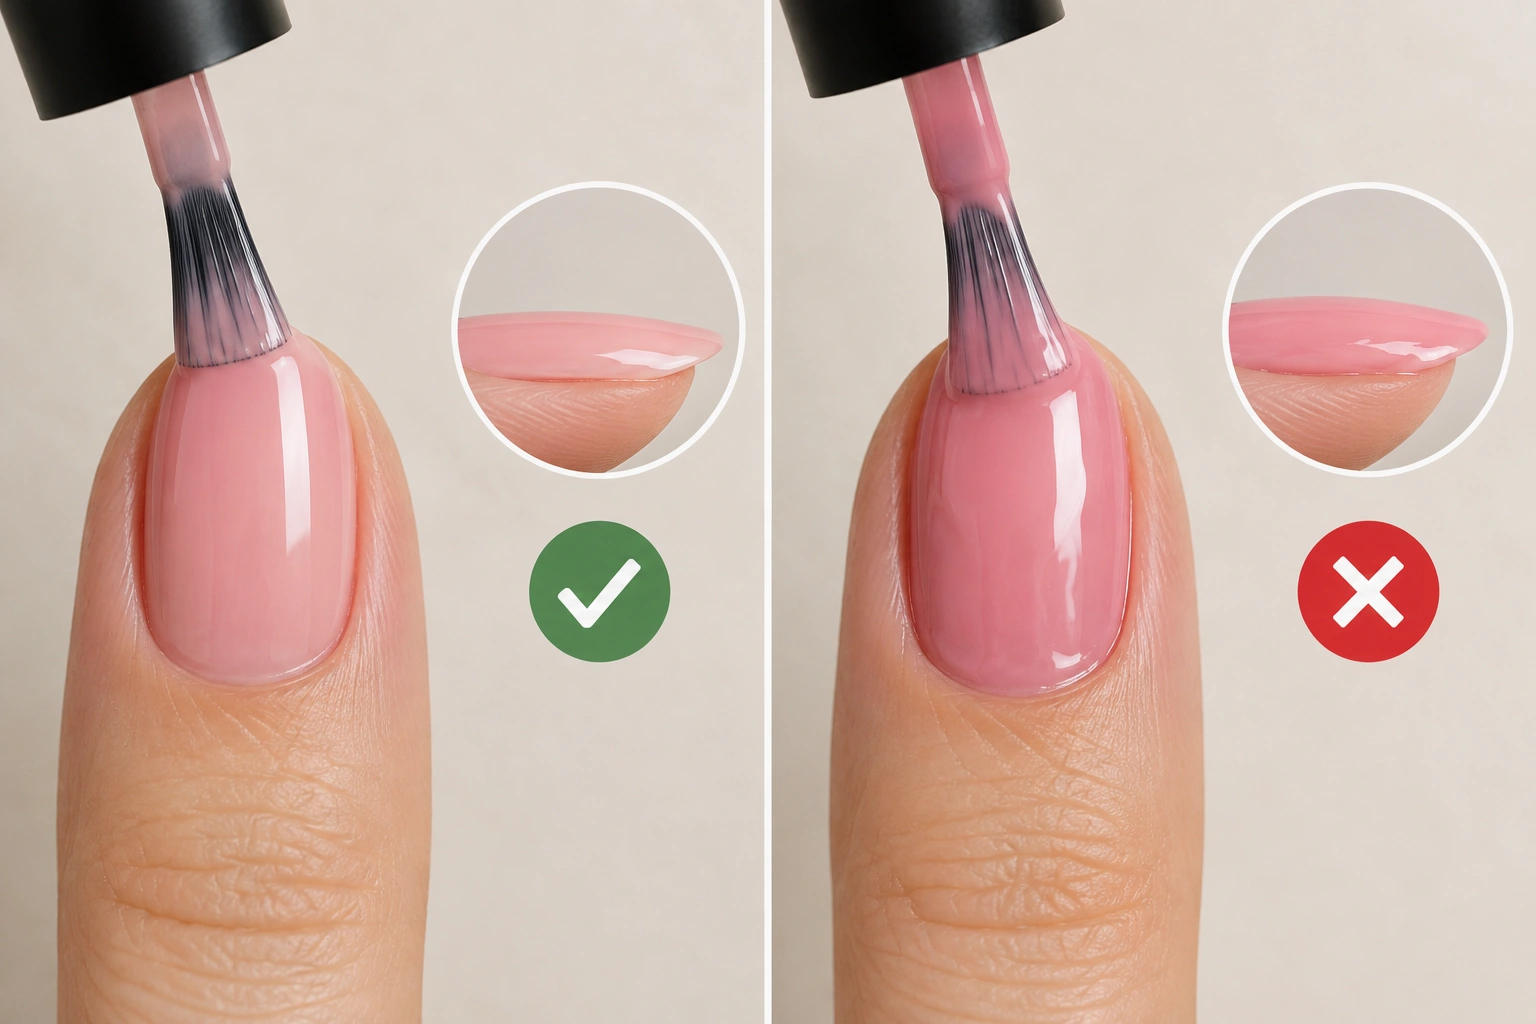
This is the biggest drying rule for beginners.
A thick coat holds more liquid, so it takes longer to set. It is also easier to dent because the top can start to dry while the inside is still soft. Thin coats dry more evenly and are less likely to wrinkle.
For typical coverage, two thin color coats are usually enough, with a third only if the polish is especially sheer. That is usually better than trying to force full coverage in one heavy coat.
Here is a simple way to paint faster:
– wipe excess polish off the brush before applying
– use two or three light strokes instead of one heavy pass
– keep each coat smooth and even
– accept that you may need one extra coat for full coverage
If your polish looks streaky after one thin coat, that is normal. A second thin coat is usually better than one thick coat. You get a cleaner finish and less waiting time overall.
For a broader look at fast-dry formulas and how they compare with regular polish, this guide on fast-dry nail polish basics can help.
What Not to Do While Polish Is Setting
A lot of smudges happen because the polish is treated like it is dry when it is not.
Avoid these common mistakes:
– Pressing on the nail to test it
– Typing, opening cans, or digging in a bag too soon
– Using one thick coat instead of thin layers
– Blowing hard on the nails
– Submerging fresh polish in water too early
– Adding coat after coat without a pause
Blowing on nails is a classic beginner habit, but it can do more harm than good. Strong breath can leave uneven drying, and it can also create tiny bubbles in the polish. Gentle airflow is better.
Also, do not assume the manicure is safe just because the surface no longer feels tacky. Fresh polish can still dent long after it seems dry to the touch.
Does Polish Formula Affect Drying Speed?
Yes. The formula matters.
A fast-dry polish is usually designed to set more quickly than a traditional formula. For beginners, that often means less waiting between coats and fewer chances to smudge. The trade-off is that fast-dry formulas can sometimes feel less forgiving during application, so thin, careful coats matter even more.
Regular polish can still look beautiful and wear well, but it may need more patience. It is a good choice if you want more color options or already have a favorite formula that works for you.
Here is the simple decision rule:
– Choose fast-dry polish if you usually rush your manicure or hate waiting
– Choose regular polish if you want more color choices and do not mind a slower routine
Formula also affects how forgiving the polish feels during application. Some formulas level out more easily, while others need a steadier hand and thinner coats to look smooth.
If you are curious about whether a quick-dry product is worth it for your routine, the essie nail care and polish information page is a useful brand-side resource to browse.
Simple Best-Practice Routine for a Faster Manicure
If you want the quickest beginner-friendly routine, use this:
- Prep clean, dry nails.
- Apply a thin base coat.
- Paint one thin color coat.
- Wait a short moment for it to settle.
- Apply a second thin color coat only if needed.
- Finish with a quick-dry top coat.
- Keep your hands still and use gentle airflow if you have it.
That routine works because it reduces the two biggest drying problems: too much polish and too much handling too soon. It is simple, repeatable, and realistic for home use.
If you are choosing between methods, this is the easiest way to decide:
– Need the fastest all-around result? Use thin coats + quick-dry top coat.
– Already have polish and want a small boost? Try drying drops.
– No special products? Use thin coats and a fan.
– Tempted to use cold water only? Treat it as a helper, not the whole solution.
Final Takeaway
The fastest safe way to dry nail polish is usually not a single trick. It is a better routine: thin coats, a helpful top coat, and less handling while the polish sets. Once you learn that, drying becomes much easier to manage at home.

