
Why Nail Polish Gets Lumpy and How to Fix It Without Ruining the Formula

If your polish is coming out lumpy, thick, or full of tiny bits, the bottle is usually telling you one of three things: air has gotten in, the formula has aged, or dried residue has contaminated the neck and cap. In plain English, the polish has started to lose the smooth flow that makes it level on the nail.
That does not always mean the bottle is trash. Sometimes the polish is only thickened and can be rescued with the right thinner. Other times it has hard chunks, a strange smell, or a texture that keeps getting worse no matter what you do. The trick is figuring out which problem you have before you make it worse.
What “lumpy” polish actually means
People use “lumpy” to describe a few different problems, and the fix depends on which one is happening.
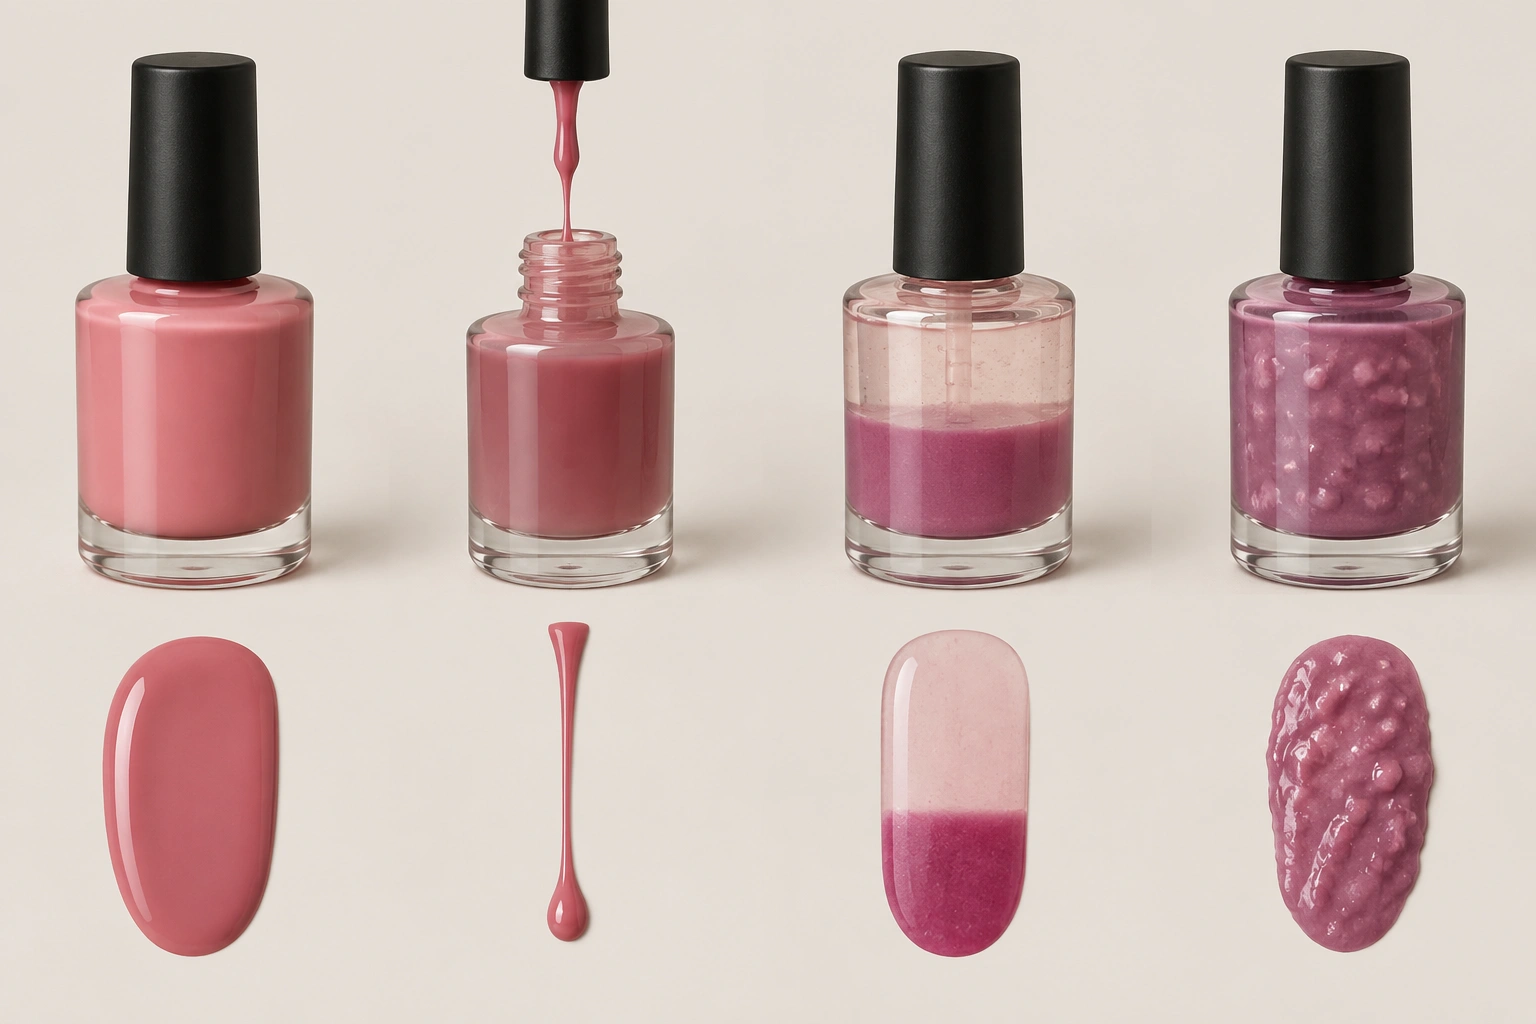
Quick diagnosis: thick vs. stringy vs. separated vs. truly lumpy
| What you see | What it usually means | Best next move |
|---|---|---|
| Thick but smooth, like syrup | Solvent evaporation or age | Add nail polish thinner in small amounts |
| Stringy or gloopy when you pull the brush out | Formula has thickened and lost flow | Try thinner; check storage and age |
| Separated layers with pigment sitting at the bottom | Pigment separation | Roll gently, then thin if needed |
| Hard bits or little chunks | Dried polish contamination or advanced breakdown | Clean the neck; if chunks remain, replace |
| Bumpy finish after application even though bottle looks okay | Application issue, fast drying, or trapped air | Adjust coat thickness and dry time |
A polish can be thick without being truly lumpy. Thick polish still looks smooth in the bottle. Stringy polish stretches when you lift the brush. Separated polish looks uneven, with pigment settled at the bottom or the base looking thinner than the color. Truly lumpy polish has visible particles, hard bits, or chunks that do not blend back in with gentle mixing.
That distinction matters because a thick formula is often fixable. Hard chunks are a different story.
The most likely reasons your polish turned lumpy
1) Solvent evaporation is the usual culprit
Nail polish is built from solvents that keep the formula fluid. Every time you open the bottle, a little air gets in and the solvents can slowly evaporate. Over time, the polish becomes thicker and less self-leveling. That’s why an old favorite shade may suddenly start applying like paste.
This is the most common reason a bottle goes from usable to frustrating. It also explains why a polish can seem fine one month and stubbornly clumpy the next.
2) The bottle has aged past its best stage
Even if the cap has always seemed tight, polish does not stay perfect forever. Older formulas are more likely to thicken, separate, or lose the smooth glide that helps them level on the nail. If a bottle has sat untouched for months or years, age alone may be enough to change the texture.
A good rule: if the polish was already borderline thick before you opened it today, age is probably part of the problem.
3) Dried residue around the neck or cap is contaminating the bottle
This is one of the easiest problems to miss. If polish dries around the bottle neck, the cap may not seal properly. Dried bits can also flake back into the liquid when you close or reopen it. That’s how a bottle develops little hard lumps even when the rest of the formula still looks okay.
If you see crust around the rim, clean it before judging the polish. Sometimes the formula is not ruined; it just has debris in it.
4) Storage conditions can speed up thickening
Heat, sunlight, and frequent temperature swings all work against polish. A bottle stored near a sunny window or in a hot bathroom tends to age faster than one kept in a cool drawer. Temperature changes can also make the formula behave inconsistently from one use to the next.
If your polish keeps getting lumpy again after you fix it, storage is worth looking at before you blame the brand.
5) Shaking can make the problem look worse
Shaking a bottle aggressively does not smooth out thick polish. It can add air bubbles, which may show up as bumps or tiny pits when you apply the color. Traditional polish dries by air evaporation, so extra air in the formula is usually not helping.
A gentle roll between your hands is safer than a hard shake when you’re trying to re-blend a formula.
Can you rescue it, or should you replace it?
Use this quick decision rule:
- Try to rescue it if the polish is thick, slightly stringy, or separated but still smooth enough to pour and mix.
- Replace it if it has hard chunks that do not dissolve, stays gritty after thinning, or shows contamination that keeps you from getting a smooth finish.
- Be cautious with sentimental bottles: if the shade matters more than the cost, it may be worth one careful rescue attempt before you give up.
A bottle can be worth saving even if it looks ugly at first. But if the polish has visible contamination and refuses to smooth out, you can waste time and still end up with a streaky manicure.
For a broader look at drying behavior, our guide on whether quick-dry nail polish really dries faster explains why faster-setting formulas can be less forgiving when the texture is already off.
How to fix lumpy nail polish safely
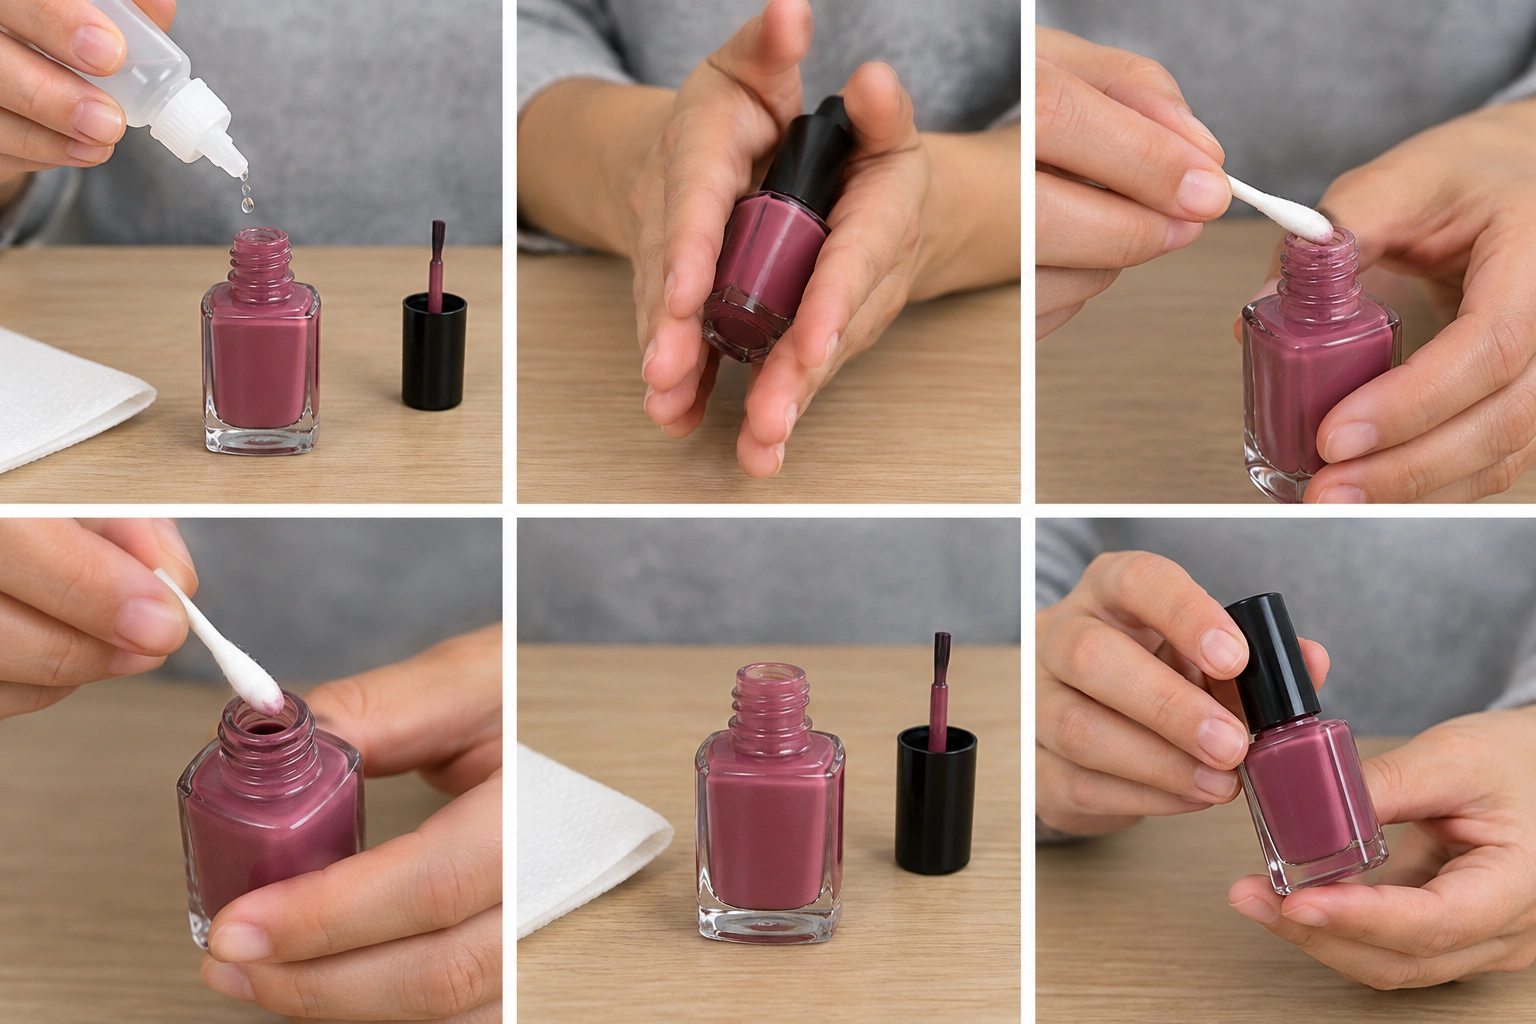
Step 1: Clean the bottle neck and cap
Wipe away dried polish around the rim and inside the cap threads. Use a lint-free cloth or a small piece of paper towel. If the cap has crusted buildup, remove it carefully so the bottle can seal properly again.
This step matters more than people think.
Step 2: Check the texture before adding anything
Open the bottle and look for three things:
- Does it pour slowly but smoothly?
- Are there hard lumps?
- Does the pigment look separated from the base?
If it is just thick, you have a much better chance of fixing it. If it has hard pieces, rescue is less certain.
Step 3: Add nail polish thinner, not remover
Use a proper nail polish thinner. Start with 1–2 drops at a time, then roll the bottle gently between your palms. Let it sit a minute, reopen it, and test the flow before adding more.
The goal is to restore movement, not turn the polish watery. Too much thinner can make the color sheer and harder to control. Small additions are safer because you can always add more.
This is one of the clearest places where chemistry matters. Brand formulas vary, but a dedicated thinner is designed for this job. Nail polish remover is not.
If you want a quick-reference comparison, the article do nail polish drying drops work is useful for understanding which add-ins affect drying versus formula consistency.
Step 4: Let the bottle rest, then test again
After mixing, give the polish a few minutes to settle. Then brush a little onto a nail wheel, paper swatch, or one nail you can redo if needed. If it still drags, strings, or leaves visible lumps, add only a little more thinner.
If the formula improves but still looks slightly uneven, that may be enough. You are aiming for usable, not perfect.
Step 5: Stop if the polish stays gritty
If the polish still feels sandy, has hard bits, or looks curdled after thinning, the bottle is telling you it is beyond a simple rescue. At that point, further thinning usually just creates a weaker version of a bad formula.
What not to add to nail polish
Don’t use nail polish remover as a substitute thinner
This is the mistake that ruins a lot of bottles. Remover and thinner are not the same thing. Remover is made to break down polish so it can be taken off nails. Thinner is made to restore flow in the bottle.
Using remover can change the formula too aggressively, especially if it contains acetone or other fast-evaporating solvents. The polish may become stringy, sticky, or unstable.
Don’t pour in random liquids
Water, oil, hand lotion, alcohol, and “just a little acetone” are all bad guesses unless a product specifically says otherwise. These can break the formula, separate the pigments, or make application worse.
If you are unsure what a product is designed to do, leave it out of the bottle.
For a general safety baseline on solvents and cosmetic use, the FDA’s cosmetics information is a useful reference point.
Why lumpy polish causes streaks and bubbles
A thick or clumpy formula does not spread evenly. Instead of leveling into a smooth film, it can drag across the nail and trap tiny pockets of air. That is why old or gloopy polish often dries with streaks, uneven texture, or a bumpy finish.
Traditional polish relies on air drying, so the drying stage is where a lot of these issues show up.
How to apply fixed polish more smoothly
Once the formula is usable again, the application technique matters.
- Load the brush lightly. A big glob is more likely to streak.
- Use thin coats instead of trying to cover everything in one pass.
- Let each coat settle briefly before the next one.
- Finish with a top coat once the color layer is even.
If the polish still feels a little thick, thinner coats are your friend. They level better and dry more evenly than a heavy coat that tries to do everything at once.
For readers comparing drying methods, our guide on whether UV light dries regular nail polish can help separate air-drying behavior from gel-style curing.
How to prevent polish from getting lumpy again
Keep the cap sealed tightly
A loose cap can speed up solvent loss. After each use, close the bottle firmly. If the threads are messy, wipe them before storing the polish.
Store polish in a cool, stable place
A drawer or cabinet is usually better than a sunny windowsill or a steamy bathroom. The fewer temperature swings the bottle experiences, the longer the formula tends to stay usable.
Wipe the neck after each manicure
This is the small habit that prevents a lot of future frustration. Dried residue around the rim can stop the cap from sealing and can also fall back into the bottle later.
Don’t leave bottles open while you paint
Even a few extra minutes of exposure can dry the surface of the polish in the bottle neck. Keep the cap nearby and close the bottle when you are not actively using it.
If you are trying to make polish last longer between uses, should you use cold air to dry nail polish is a helpful companion read because it explains why some drying tricks help the nail surface but do not fix a bad bottle.
Regular polish vs. gel polish vs. acrylic products
Regular nail polish is the most likely to thicken from air exposure because it air-dries in the bottle and on the nail. Gel polish behaves differently because it is designed to cure under a lamp, not dry in open air. Acrylic products have their own chemistry and should not be treated like standard polish.
That means the fix is not always interchangeable. A bottle of regular polish that seems lumpy may respond well to thinner. A gel product that looks off may be dealing with a different kind of texture problem and should be handled according to its own instructions.
For more on how gel behaves differently, see does gel nail polish air dry.
When to see a nail technician or dermatologist
For the polish bottle itself, a nail technician can sometimes tell you quickly whether the formula is salvageable or not, especially if it is a professional product or a shade you really want to keep.
See a dermatologist if you are dealing with nail changes on your actual nails, such as discoloration, lifting, pain, or persistent irritation. A bad polish formula can make a manicure look rough, but it should not be used to explain away nail symptoms that need medical attention.
Quick takeaway
If your polish is lumpy, the most likely cause is evaporation or age, especially if the bottle has been opened many times or stored poorly. Clean the bottle neck, try a small amount of proper thinner, and test the result before you decide the bottle is ruined. If hard chunks remain, persistent grit stays after thinning, or contamination keeps you from getting a smooth finish, replacing it is usually the better call.

