
Simple Nail Designs for Teens: Easy Ideas That Are Cute, School-Safe, and Kind to Short Nails

If you’re a teen—or a parent helping one—you probably want nails that look pulled together without a salon appointment, a drawer full of tools, or designs that peel off before third period. The good news: the easiest aesthetic nail designs are also the ones most likely to survive a school week when you focus on short nails, thin polish layers, and a good top coat. A practical goal is to master one clean accent nail rather than struggle with a full set of hand-painted daisies at midnight.
This guide walks through shapes, a minimal kit, safe polish choices, four beginner techniques, no-tool shortcuts, press-ons, occasion ideas, time-based plans, and DIY-at-home vs. salon trade-offs. Throughout, the priority is simple: keep the nail plate healthy, avoid school-dress-code surprises, and make the process realistic for a 13- or 16-year-old with homework, sports, and limited patience.
What “Simple” Nail Designs Mean for Teens
For this article, “simple” means designs that use regular polish on short natural nails, require at most one or two techniques, and can be done with items you probably already own. That rules out acrylics, dip powder, UV-gel extensions, and 3D art. Why those boundaries? Regular polish is generally easier to remove than gel or dip systems and doesn’t require soaking off layers or filing the natural nail. Short nails are also more practical for writing, typing, sports, and band practice; a broken long nail in the middle of gym class is nobody’s idea of a good time. Some nail sources specifically suggest short square and short almond as comfortable everyday shapes for teens because they don’t snag or break as easily during daily activities.[1]
Keeping designs age-appropriate matters too. A playful, personality-driven look—dots, a tiny heart, a pastel French tip—works for school and family events, while long, sharp, or highly embellished nails can interfere with daily activities and may be against school rules. One parenting source recommends choosing fun, playful patterns that reflect a child’s age and interests, like simple florals or animals, and avoiding overly mature themes or very long nails.[2] If you’re ever unsure, go with sheer, short, and minimal.
Short Nail Shapes That Work for School, Sports, and Everyday Life
You don’t need long nails for a design to look intentional. The most teen-friendly shapes are:
- Short round or squoval: soft edges, low maintenance, and hard to snag. Great if nails are bitten or uneven.
- Short almond: slightly tapered, still practical for typing and sports, and gives a more polished look without extreme length.
- Oval: a natural finish with a subtle elongated look, good for teens who want a bit more shape.

For special occasions like a birthday or school dance, some teens might choose medium almond or coffin shapes for more nail-art detail, but for daily life, shorter shapes are usually the smartest call. Decision rule: if you’ll be playing an instrument, swimming, or typing a lot, pick round or squoval. If you want a slightly dressier shape but still need function, short almond works.
The Minimal Starter Kit: Base Coat, Top Coat, Polish Colors, and Household Tools
You don’t need a professional nail-art kit to make cute designs. The essentials:
- Base coat and top coat: a base coat helps polish grip and protects nails from staining; a quick-dry top coat seals the design and adds shine.
- Polish colors: 2–4 shades—one neutral or sheer base, one favorite color, one contrast color, maybe one shimmer.
- Household tools: a bobby pin, toothpick, small piece of tape, or rubber band can substitute for dotting tools and striping tape.
- Optional but useful: a dotting tool if dots become a favorite, plus acetone-free nail polish remover.
Trade-off: a bobby pin dotter works, but a metal dotting tool gives cleaner, more consistent dots because the rounded tips come in different sizes. Start with household items; buy a dotting tool only if your teen wants to do dots regularly.
Safe Polish and Remover Choices: Non-Toxic Labels and Parent-Friendly Options
When shopping for teen nails, look for polishes labeled 5-free or 7-free, which means they’re formulated without certain ingredients commonly avoided in cleaner formulas—like formaldehyde, toluene, and dibutyl phthalate. Water-based polishes are another option, especially for younger tweens or anyone sensitive to strong odors. These labels are not a guarantee of zero risk—everyone is different—but they’re a practical way to reduce exposure to harsher solvents.
For removal, choose an acetone-free remover rather than pure acetone. Acetone is strong and effective, but it’s also drying and can strip the nail plate if used often. Acetone-free removers still remove regular polish but do so more gently. That matters for teens who change colors weekly.
Regular nail polish is also generally a lower-risk choice than gel or dip systems for younger wearers because it doesn’t require UV/LED lamps, heavy filing, or acetone soaking to remove. That doesn’t mean gels are “bad,” but for most teens, regular polish or UV-free gel strips are the path of least resistance—and the least potential for nail damage.
Nail Prep in 5 Minutes: The Step That Prevents Chips and Smudges
Even the prettiest design will chip by day two if nails aren’t prepped. Here’s a simple prep routine that works well for teens:
- Wash and dry hands, then wipe each nail with a little remover to remove any oils or old polish residue.
- Shape nails with a file, going in one direction to avoid peeling. Keep them short to medium-short.
- Gently push back cuticles—never cut them. Cuticles are a protective seal; cutting invites irritation and infection.
- Apply a thin base coat and let it dry for about a minute.
- Apply two thin color coats, waiting 2–3 minutes between coats. Thin coats dry faster and are less likely to smudge or bubble.
- Seal with top coat, wiping a little over the free edge of each nail. That edge wrap is a small step that makes a meaningful difference in chip prevention.
This base-coat, edge-sealed top-coat routine is the main thing that helps prevent early chips.[3]
Beginner Nail Art Techniques: Accent Nails, Dots, Stripes, and French Tips
Once nails are prepped, four techniques cover most simple designs.
Accent Nail
Paint every nail one color, then paint your ring finger—or ring and middle fingers—a different or glitter shade. That’s it. An accent nail adds visual interest without requiring any art skill, and it works beautifully on short nails.
Dots
Use a bobby pin or toothpick dipped in polish to place dots on dry polish. Try a single dot at the base, a row of three, or a five-dot flower shape on an accent nail. Dots are forgiving; uneven dots look handmade, not wrong.
Stripes
Place a piece of tape or striping tape over a dry base color, leaving a strip of nail exposed, and paint the exposed area. Or paint thin vertical stripes with a toothpick. A single stripe on an accent nail is an easy way to add a little length illusion to short nails.
French Tips (with a Twist)
For a classic French tip, use a guide sticker or a small rubber band placed just below the tip. Paint the tip, then peel the guide while polish is still wet. For a teen twist, use pastel or bright tips instead of white—like lavender tips on a sheer nude base. On short nails, keep the tip line thin so the nail doesn’t look cut in half.
No-Tool Designs Using Things You Already Have at Home
If you don’t own a single nail-art tool, these still work:
- Polka dots: dip the round end of a bobby pin into polish and dot onto a dry base coat. One accent nail with five dots makes a mini flower.
- Tape color blocks: paint nails one color, let dry completely, then press a small piece of household tape diagonally across the nail and paint the exposed section a second color. Remove tape right away. This gives a crisp diagonal line.
- Rubber-band French tips: wrap a small rubber band around the finger just below the nail tip, paint the tip, and slide the band off. The line won’t be lab-perfect, but it’s neat enough for school.
- Toothpick stripes: after a base color dries, drag a toothpick dampened with polish in a straight line. One or two thin stripes per nail keeps it subtle.
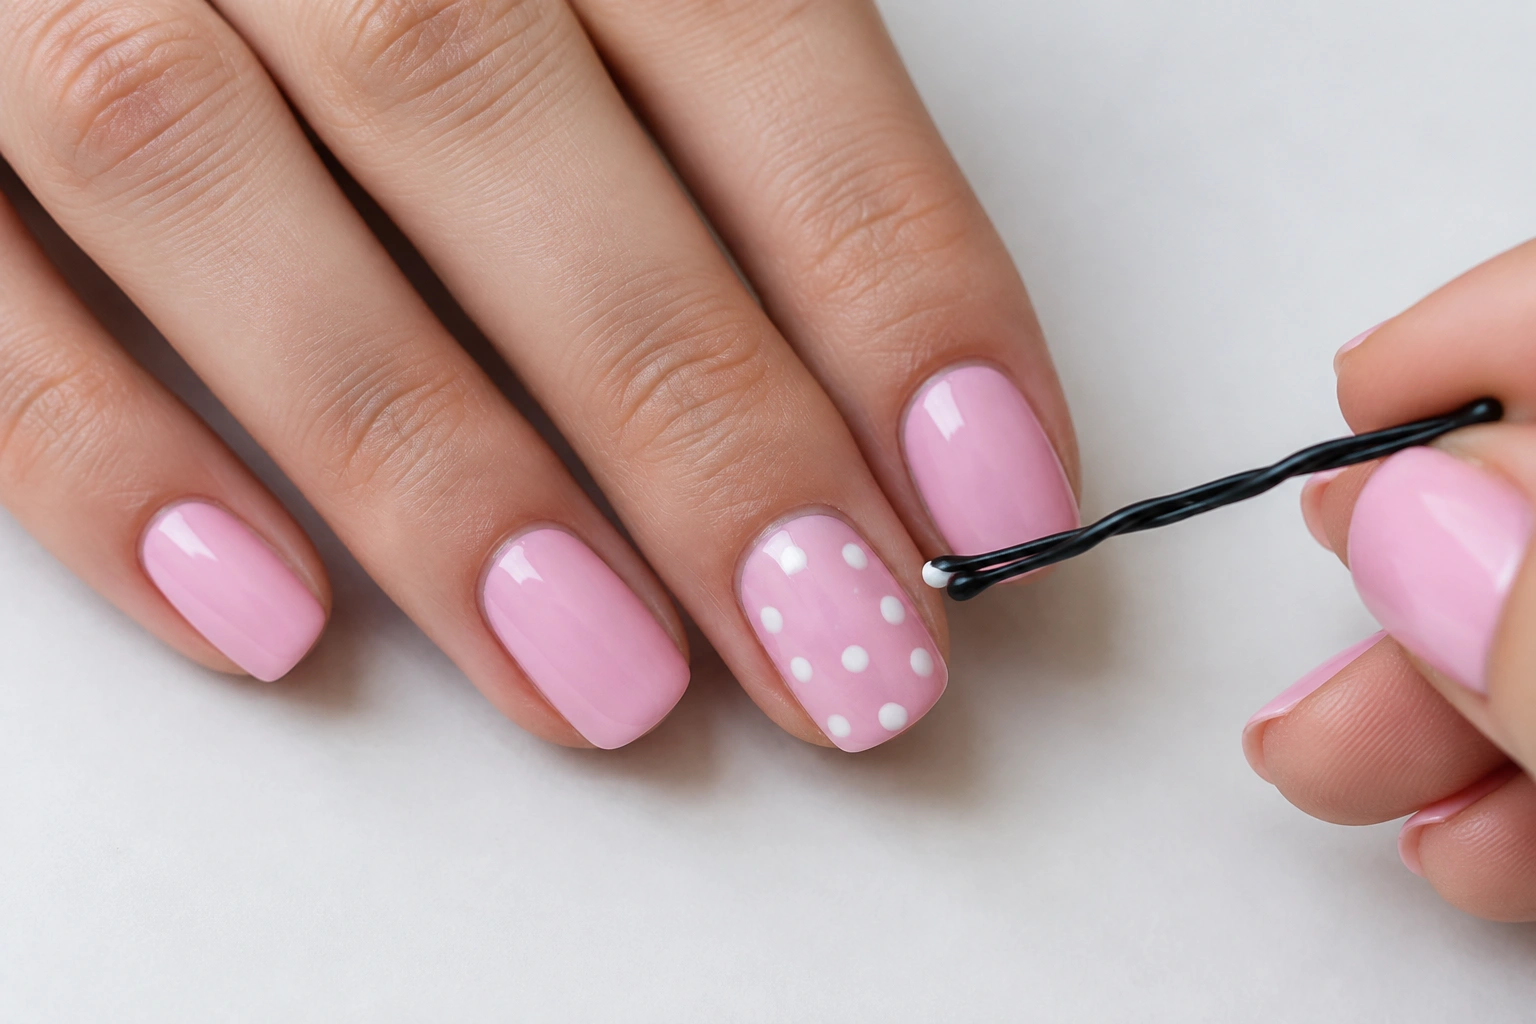
Budget trade-off: tape and bobby pins cost nothing and work in a pinch, but they can be less precise than proper nail-art tape or dotting tools. For a one-off design before a school event, household tools are enough; for a hobby, a small tool purchase may be worth it.
Stickers, Strips, and Press-Ons: When They Beat Hand-Painting
Hand-painted designs are fun, but they take time and require a steady hand. Nail stickers, nail polish strips, and press-on nails offer three advantages:
- Speed: stickers and strips apply in minutes; press-ons can be done in under 15 minutes with practice.
- Consistency: a printed strip or sticker gives an even pattern every time, which is hard to achieve with a shaky hand.
- Low commitment: press-ons come off with warm water or gentle soaking without harming the natural nail if you remove them properly.
UV-free gel strips are a particularly good option for younger wearers and teens because they need no lamp, are quick to apply, and are easy to remove with cuticle oil rather than harsh soaking.[4] Press-ons are another low-commitment choice for a school dance or birthday when a teen wants a longer or more detailed look for one night without the long-term commitment of extensions.
The trade-off is durability: stickers and some press-ons may not last as long as a well-prepped regular polish manicure, and press-ons can pop off during rough activity. For daily school life, regular polish or strips often feel safer; for a special event, press-ons can be the right temporary glam.
At a Glance: Hand-Painted vs. Stickers and Strips vs. Press-Ons
| Factor | Hand-Painted Polish | Stickers & Strips | Press-On Nails |
|---|---|---|---|
| Skill level | Beginner-friendly with simple designs | Very beginner-friendly | Beginner-friendly, but sizing matters |
| Time | 15–30 minutes depending on design | 5–15 minutes | 10–20 minutes once sized |
| Cost | Low if using existing polish | Low to moderate | Low to moderate per set |
| Wear time | A few days to a week with top coat | Up to a week, varies by brand | One night to a few days, activity-dependent |
| Removal | Acetone-free remover | Usually peel-off or gentle remover | Soak in warm soapy water, then ease off |
| Best when | You want a custom DIY look and have time | You want a quick, consistent pattern | You need temporary length or detail for an event |
This table isn’t a ranking; it’s a decision shortcut. If your teen has 10 minutes before school and shaky hands, stickers win. If they want to practice a new skill on a Sunday afternoon, hand-painting is perfect. If it’s a school dance, press-ons give the most glam for the least long-term impact.
DIY at Home vs. Salon: Cost, Time, and Removal Trade-Offs
If you’re deciding between a DIY design and a salon visit, the main trade-offs are time, cost, and removal. At-home regular polish is usually the lowest-cost route because it uses polish you already own and removes with acetone-free remover. A DIY session may take 15–30 minutes, depending on design and drying time. A salon gel or dip service can last longer, but it typically costs more per visit and requires a longer appointment; removal may involve acetone soaking and some filing, which can be harsher on natural nails over time.
For school weeks, a simple at-home manicure is usually enough. For a one-night event like a dance, press-ons or a polished DIY look can work well without the removal hassle of gel or dip. If a teen specifically wants the extended wear of gel or dip, plan for the extra removal time and consider giving nails a break afterward.
School-Approved and Occasion-Ready Design Combinations
School dress codes vary, but many schools have rules about distracting nails. A good rule: if your school has an explicit nail policy, avoid chrome, bold glitter, or 3D effects, and when in doubt, go more sheer.[5] These combinations tend to be safe for most classrooms and still look intentional—you can find more school-safe nail ideas in our simple nails for school guide.
- Everyday school: sheer pink or nude base with one tiny white dot on each ring finger.
- Back-to-school: muted pastel base—like dusty blue or sage—with one thin white accent stripe or a subtle French tip in soft white. This looks crisp and polished without relying on bold glitter or chrome.
- Quietly fun: pastel blue base with a single thin white stripe on an accent nail.
- Subtle shimmer: solid pale lavender with a sheer shimmer top coat.
- Summer: bright coral or turquoise with a white daisy dot accent—floral details add flair without going over the top, and blue daisy art is a classic warm-weather choice on natural nails.[6]
- Birthday or school dance: short press-ons in a blush tone with subtle glitter tips, or a soft French tip in pastel.
Trending looks like aura or glazed nails can be adapted to short natural nails with regular polish, too. For a glazed effect, layer a sheer iridescent or pearl-finish top coat over a nude or pale pink base. For a soft aura effect, dab a little pale pink or lavender polish onto a makeup sponge, lightly blur it in the center of the nail, and seal with top coat. These versions skip gels and acrylics while still giving the vibe.
The key is contrast and busyness: one accent nail or one small detail reads “cute” without reading “loud.” Save neon flames full of 3D gems for a party where the school handbook isn’t involved.
5-, 15-, and 30-Minute Design Plans
Time constraints are real. Here’s a framework:
- 5 minutes: one coat of sheer iridescent polish on clean nails, plus a small nail sticker on each ring finger. If you use UV-free gel strips instead, budget 10–15 minutes for application and smoothing.
- 15 minutes: paint a pastel base, add one dot accent with a bobby pin, and finish with top coat. This fits nicely after school before sports practice.
- 30 minutes: do a two-color tape color block or a rubber-band French tip, plus proper prep and dry time. Save this for a weekend when there’s no homework pile waiting.
These time windows are estimates, not promises—fresh polish needs time to dry even with a quick-dry top coat. Encourage teens to wait a full minute after the final top coat before using their hands, and avoid texting for at least five minutes.
Fix Smudges, Stop Chips, and Remove Polish Without Damage
Even careful nails smudge. Here’s what to do:
- Small smudge: dip a finger in a tiny bit of non-acetone remover and gently smooth the surface, then reapply a thin top coat. For a deeper dent, wait for the polish to set for a minute and redo that nail.
- Chip on day two: if the chip is small, clean the edge and apply a thin top coat to seal it. If it’s large, remove polish on that nail and repaint just that nail.
- Complete removal: soak a cotton pad with acetone-free remover, press it onto the nail for about 30 seconds, then wipe gently in one direction. Rubbing back and forth roughs up the nail plate.
- Peeling or lifting polish: don’t peel. Peeling takes layers of the natural nail with it. Soak it off instead.
- Press-on removal: soak nails in warm soapy water for a few minutes, then ease the press-on off gently. Never rip them off, and don’t use force if they resist.
After any removal, give nails a rest day or two with a little cuticle oil. Nails and cuticles benefit from a break between color changes.
Common Mistakes That Ruin Simple Teen Nails
If a simple design keeps failing, one of these is usually the culprit:
- Skipping base coat or top coat. The base coat prevents staining; the top coat locks everything in. Skipping either shortens wear dramatically.
- Applying polish too thick. Thick layers take longer to dry and smudge more easily. Two thin coats beat one thick coat.
- Peeling off polish or press-ons. This damages the nail plate and can lead to weak, peeling nails later.
- Cutting cuticles. Cuticles protect the nail matrix. Cutting them increases the chance of redness, discomfort, and infection.
- Not wrapping the free edge. The tip of the nail takes the most hits. Wrapping top coat over the edge helps prevent chips.
- Using blunt or dirty household tools. Clean bobby pins and toothpicks before each use with rubbing alcohol to avoid transferring grime.
- Attempting advanced art too soon. 3D designs or fine-line hand painting require practice. Master dots and stripes first.
These aren’t failures—they’re normal parts of learning. The fix is usually less product, more patience, and a little edge-sealing.
When to See a Pediatrician or Dermatologist
Most simple nail designs won’t cause problems, but see a doctor if you notice persistent nail discoloration, thickening, pain, swelling around the nail, or signs of an allergic reaction like redness or itching after using a new polish. Also pay attention if a nail becomes painful after press-on removal or if the nail plate feels unusually thin after repeated manicures. A healthcare provider can tell you whether it’s simply overuse or something that needs treatment.
Frequently Asked Questions About Simple Teen Nail Designs
What are the easiest nail designs for beginners?
Accent nails are the easiest: paint all nails one color and one nail a different shade. Dots with a bobby pin and a single stripe with tape are close seconds.
What basic tools and colors do I need to start?
A base coat, a top coat, two or three polish colors, a bobby pin or toothpick, and acetone-free remover. That’s enough for accent nails, dots, stripes, and simple French tips.
Can I do these designs on short nails?
Yes, absolutely. In fact, many simple designs—like small dots, thin tips, and single stripes—look better on short nails because they stay in proportion.
How do I make a simple design last without chipping?
Start with clean, dry nails, follow the prep steps above, and seal the free edge with top coat. Thin coats and a little patience between layers matter more than extra thick polish.
What designs are appropriate for school?
Sheer or pale base colors with a single accent dot, a thin stripe, or a subtle French tip are generally safe bets. For a back-to-school look, try a muted pastel base with one thin white accent stripe. Avoid chrome, heavy glitter, and 3D elements if your school has a strict dress code.
Are there safe, non-toxic nail polish options for teens?
Look for polishes labeled 5-free or 7-free, or choose water-based polish. Use acetone-free remover. No polish is risk-free for everyone, so test in a ventilated area.
How do I remove polish without damaging my nails?
Soak a cotton pad in acetone-free remover, hold it on the nail for about 30 seconds, and wipe in one direction. Never peel polish off, and give nails a rest day with cuticle oil after removal.
How long do press-on nails last and how do I remove them safely?
Wear time varies, but for a one-night event they usually hold up fine. Soak in warm soapy water for a few minutes and ease them off; don’t force them.
What are some 5-, 15-, and 30-minute design ideas?
5 minutes: sheer polish and a sticker. 15 minutes: pastel base with a dot accent. 30 minutes: two-tone tape color block or rubber-band French tip.
What nail shapes are most practical for teens?
Short round, squoval, and short almond shapes are practical for writing, typing, and sports, and they’re less likely to snag or break.
Citations:
[1] https://btartboxnails.com/blogs/btartbox-official-guides/teen-nail-designs
[2] https://www.todaysparent.com/kids/bigger-kids/nails-for-kids
[3] https://greenweddingshoes.com/simple-nail-designs-ideas
[4] https://la-bek.com.au/blogs/news/perfect-subtle-nail-designs-for-teens-tweens-and-professionals
[5] https://la-bek.com.au/blogs/news/perfect-subtle-nail-designs-for-teens-tweens-and-professionals
[6] https://yourteenmag.com/stuff-we-love/teenager-summer/summer-nails-for-teen-girls
