
Why Your Gel Polish Won’t Cure Properly: A Beginner’s Troubleshooting Guide

Gel polish should feel simple: apply, cure, and go. So when it stays sticky, soft, or wrinkled after the lamp, it can be confusing fast. The good news is that most curing problems come from a few predictable causes, and you can usually narrow them down without guessing.
The first thing to know is that not every sticky finish means something went wrong. Some gel products leave a tacky top layer after curing. That layer is called an inhibition layer, and it is normal for many formulas. The real problem is when the gel underneath is still soft, dentable, or wrinkled.

If you are just getting comfortable with gel basics, it also helps to understand where curing fits into the bigger manicure process. A clean prep, the right lamp, and thin coats all work together. If one part is off, the polish may look finished on top but never fully set underneath. For a broader refresher on the basics, see this beginner nail polish guide and common nail polish mistakes.
Why Gel Polish Sometimes Feels Sticky After Curing
A sticky surface is not always a failure. Many gel top coats and color layers are supposed to leave a slightly tacky finish so the next layer can bond properly. That tacky surface is different from uncured gel.
Here is the simple distinction:
- Normal tackiness: only the top feels sticky, but the layer beneath is firm.
- Uncured gel: the product feels soft, wrinkled, gummy, or dentable below the surface.
A useful test is to press very gently with a clean fingertip or orangewood stick after curing. If the surface is only tacky, the polish should still feel solid underneath. If it leaves a dent or moves around, the gel is not fully cured.
Some brands also make no-wipe top coats, which are designed to cure without a sticky layer. If your product is labeled that way, a sticky finish is a clue that something is off. If it is not labeled no-wipe, a tacky surface may be completely normal.
First Check: Is the Top Layer Normal or Is the Gel Still Soft?
Before changing your lamp or throwing out the polish, check the texture carefully. This saves time and helps you avoid fixing the wrong thing.
Use this quick order:
- Touch the surface lightly. Sticky only on top? That may be normal.
- Press a little more firmly. If the polish dents, it is under-cured.
- Look at the shape. Wrinkles, ripples, or a cloudy center usually mean the layer cured unevenly.
- Check one nail against another. If only one nail is soft, the issue may be application or lamp position rather than the whole product line.
If the polish is just tacky, wipe it only if the product instructions say to do so. If it is soft underneath, do not keep wearing it as-is. Uncured gel can cause lifting and can increase skin contact with product that was never fully set.
Most Common Reasons Gel Polish Won’t Cure
Most curing problems come down to one of these issues:
- the lamp is not the right type for the product
- the lamp is weak, old, or used incorrectly
- the coats are too thick
- the curing time is too short for that formula
- the products do not work well together
- the polish itself is old, contaminated, or poor quality
A helpful way to think about it: if the polish works on some nails but not others, the problem is often technique or lamp placement. If nothing cures properly, the lamp or product compatibility is more likely.
Young Nails notes that curing too briefly, using thick layers, or setting the wrong timer can stop gel from curing properly, and they recommend following the manufacturer’s cure instructions rather than guessing. You can read that guidance here: Young Nails on gel polish not curing.
UV Lamp vs LED Lamp: Matching the Lamp to the Polish
Not every gel polish cures the same way. Some formulas are made for UV lamps, some for LED lamps, and some work in both. The polish has to match the lamp’s curing system, or the gel may stay soft even if the lamp seems strong enough.
For beginners, the safest rule is: check the bottle and the lamp instructions first. Look for words like UV, LED, or UV/LED on the polish bottle, box, or product page. Then check your lamp label or manual to see what it is designed to cure. If the brand says the polish needs a specific lamp type or wavelength, follow that exactly.
A simple comparison:
| Situation | What it usually means |
|---|---|
| Cures well in one lamp, not another | Lamp compatibility or output difference |
| Never cures in any lamp | Product issue, thick coats, or major prep/application problem |
| Base cures but color stays soft | Color layer may be too thick or too pigmented |
| Top coat stays tacky but the manicure is firm | Normal inhibition layer may be present |
If a brand does not clearly state compatibility, do not assume the lamp will work just because it is “for gel.” Gel systems can depend on the curing wavelengths the lamp emits, so a mismatch can leave the polish under-cured. In that case, the safest choice is to use a lamp the polish maker specifically recommends or to contact the brand for confirmation before troubleshooting further.
How Lamp Power, Bulb Age, and Hand Position Affect Curing
A lamp can look fine and still underperform. That happens when the bulbs are aging, the lamp is not delivering consistent light, or your hand is sitting too far from the source.
Three practical things matter here:
1. Lamp output
If the lamp is too weak for the product, the light may not reach the lower part of the gel layer. That can leave the top looking set while the inside stays soft. If multiple nails stay soft even with thin coats and the correct cure time, weak output is more likely than a simple application mistake.
2. Bulb age or wear
Older bulbs or worn-out lamp components may not cure as strongly as they once did. If a lamp used to work and now struggles, that is worth considering.
3. Hand placement
If your fingers are angled too far back, off-center, or too close to the edge, the light can hit unevenly. That is one reason one nail may cure fine while another stays soft. If only the thumb or only the side nails fail, uneven placement is often the better clue than a bad product.
A simple fix is to keep your hand flat and centered in the lamp. If your lamp has a reflective base or finger guides, use them. Uneven positioning is easy to overlook, but it often explains patchy results.
How Long Gel Polish Should Cure
There is no single cure time that fits every brand, formula, and lamp. The safest rule is to follow the product instructions for that exact gel system.
That matters because cure time can change based on:
- the lamp type
- the lamp output
- the color formula
- how opaque the polish is
- whether you are curing base, color, or top coat
The temptation is to give every layer the same guess-based cure time. That is where beginners run into trouble. A sheer base layer may cure faster than a dense color, while a heavily pigmented shade may need the full time the brand recommends.
If your manicure is coming out soft, do not assume “a little more time” will solve everything. Longer curing can help when the issue is simply not enough exposure, but it will not fix a wrong lamp or a bad product match.
Luxa Polish notes that over-curing can make gel more brittle, discolored, or dull, although under-curing is the more common problem. Their guide is here: The Ultimate Guide to Curing Gel Polish.
Why Thick Coats Cause Under-Cured Gel
Thick coats are one of the easiest mistakes to make at home. They look efficient because they cover in fewer passes, but gel cures best when light can reach the whole layer.
When the coat is too thick, the top may harden while the bottom stays soft. This is especially common with:
- highly pigmented colors
- white or pastel shades
- glitter-heavy formulas
- rushed second coats
The beginner-friendly rule is simple: apply thin, even layers and build coverage gradually. If a coat still looks streaky, that is a sign to add a thinner second layer rather than one heavy one.
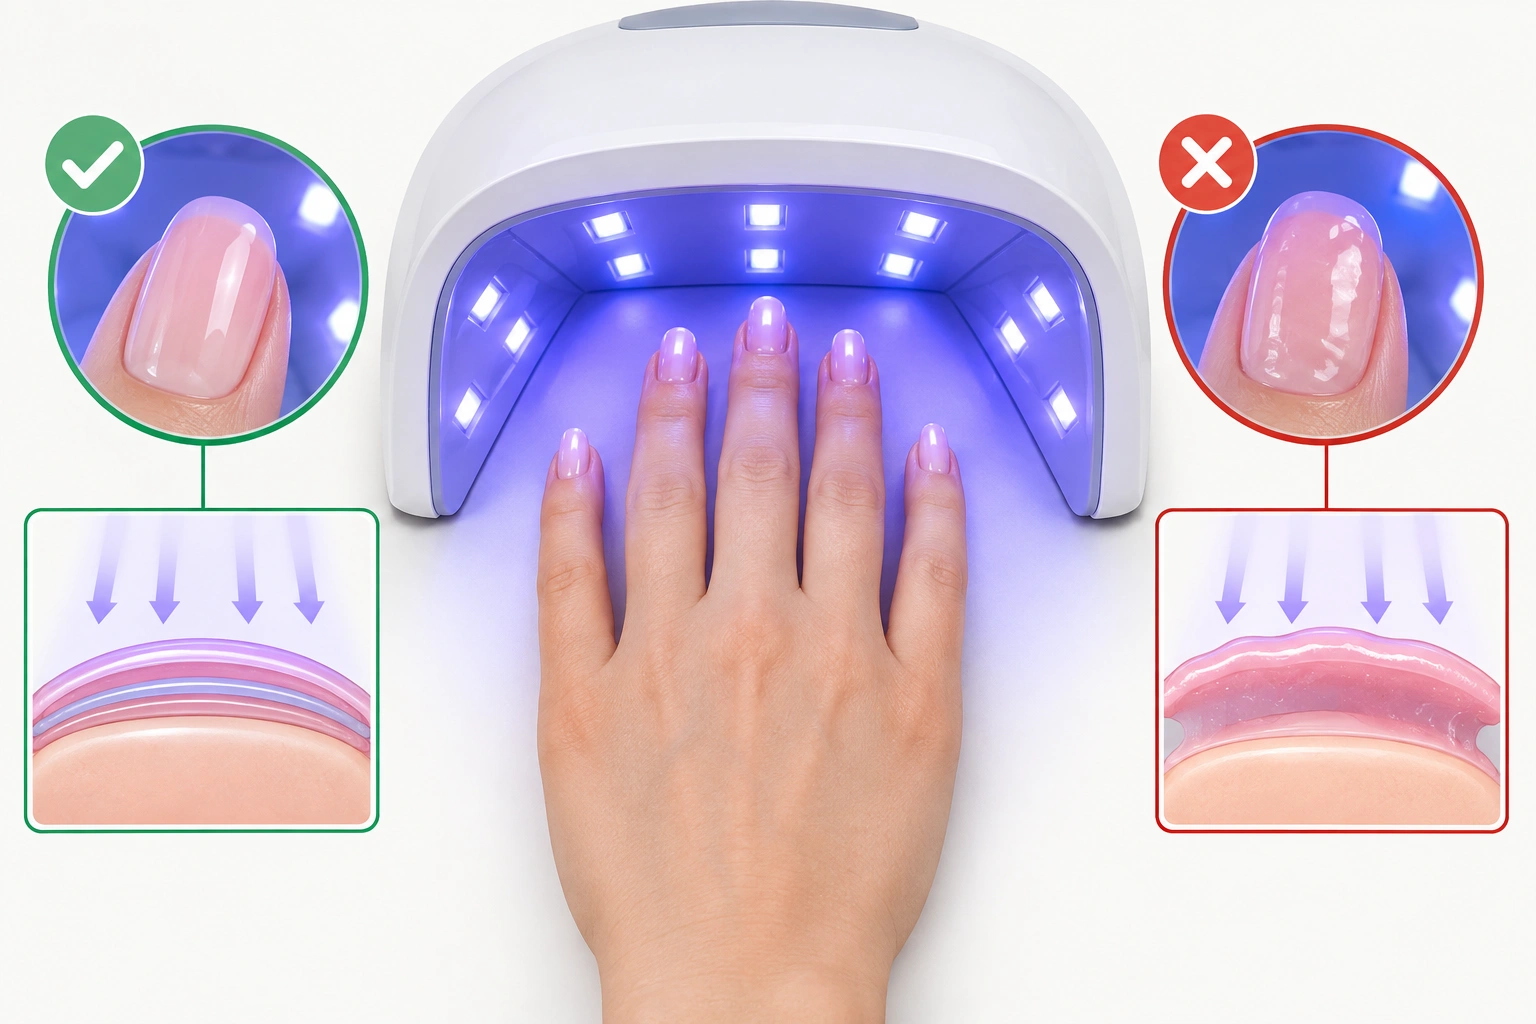
A good example is a milky pink color that looks patchy after one coat. Many beginners try to “fix” it with a thicker second coat. That often creates a smooth-looking surface that never fully cures in the center. Two thin coats are usually safer than one heavy coat.
Product Compatibility: Base Coat, Color, and Top Coat
Gel systems are not always interchangeable. A base coat from one brand, a color from another, and a top coat from a third may work fine sometimes, but they can also create curing problems.
Why this happens: each formula is designed to work within a certain system. When you mix brands, you may end up with layers that do not bond or cure at the same rate.
This does not mean mixed-brand manicures never work. It means they are harder to troubleshoot. If your gel keeps failing and you are using products from several different lines, a matched system is a smart test.
Use this decision rule:
- If you want the easiest troubleshooting, stick to one brand or a clearly compatible system.
- If you mix brands, test one change at a time.
That way, if the manicure fails, you can tell whether the issue came from the lamp, the base, the color, or the top coat.
Nail Prep Problems That Can Make Gel Feel Like It Won’t Cure
Poor prep does not always stop curing directly, but it can make the manicure seem uncured because the polish lifts, wrinkles, or separates.
The usual prep problems are:
- leftover oils on the nail plate
- dust trapped before application
- uneven shaping that causes thick spots
- product touching the skin or cuticle area
If the nail is oily, the gel may slide around instead of leveling smoothly. If dust is trapped, the layer can cure unevenly. If polish floods the sidewalls or cuticle, the edge may lift first and make the rest of the manicure look faulty.
A clean, dry nail surface matters more than most beginners expect. If you want a deeper look at the prep step, using a dehydrator before gel polish is a useful next read.
How to Troubleshoot the Problem in the Right Order
When gel will not cure, the fastest fix is to test in a sensible order instead of changing everything at once.
Beginner checklist: find the failing step
- Lamp check: Does the same polish cure properly in the recommended lamp type?
- Bottle check: Does the bottle say UV, LED, or UV/LED?
- Layer check: Is the base coat, color coat, or top coat the layer that stays soft?
- Application check: Were the coats thin, or was one layer applied too heavily?
- Placement check: Were the fingers centered and flat in the lamp?
Step 1: Check the finish
Is it only tacky, or is it soft underneath? If it is only tacky, the finish may be normal.
Step 2: Check the lamp and product match
Confirm that the polish is meant to cure in that lamp type.
Step 3: Check the coat thickness
If the layer is visibly thick or opaque in one heavy pass, redo it thinner.
Step 4: Check the cure time
Use the brand’s instructions for that exact coat.
Step 5: Check hand placement
Make sure the fingers are centered and flat in the lamp.
Step 6: Check the product itself
If everything else looks right but the polish still fails, the bottle may be old, contaminated, or low quality.
This order matters because it helps you isolate the cause. If you replace the lamp, the polish, and the technique all at once, you will not know what actually fixed the problem.
What to Do If the Gel Is Still Soft After Curing
If the manicure is still soft, wrinkled, or gummy underneath after the recommended cure time, do not try to salvage it with top coat or keep wearing it as-is. That usually traps the problem instead of fixing it.
Here is the practical next move:
- If the issue is just a slightly tacky surface and the product says that is normal, leave it alone or wipe it only as directed.
- If the gel is soft underneath after the full recommended cure time, remove it and redo the manicure.
- If the brand allows a longer cure time for that exact product, you can try that once, but do not keep extending cure time indefinitely.
- If it still does not cure properly after the recommended cure, the safer choice is to start over with a thinner application, the correct lamp, or a compatible system.
A manicure that looks finished but stays soft is not one to “save” with top coat. If the gel remains soft after the recommended cure time, it is usually a redo, not a repair.
Signs the Product May Be Expired or Poor Quality
Sometimes the polish is the real problem. That is especially likely if one bottle behaves badly while others from the same lamp and routine cure normally.
Warning signs include:
- the formula separates and does not remix well
- the texture is unusually thick, stringy, or grainy
- the polish cures inconsistently from one use to the next
- the color changes, yellows, or looks off before curing
- the bottle has been open a long time and the product feels different
If a new bottle never cures properly while another shade from the same brand does, the product itself may be the issue. For more on shelf life and product condition, see whether expired nail polish can still be used and what happens if you use expired nail polish.
How to Prevent Gel Polish Curing Problems Next Time
Once you fix the current manicure, a few habits make the next one much easier:
- use the lamp recommended for the product
- keep coats thin
- keep the nail plate clean and dry
- center your hand in the lamp
- follow the brand’s cure instructions
- avoid mixing random products without checking compatibility
- replace polish that has clearly changed texture or performance
The biggest habit shift for beginners is this: do not try to make gel behave like regular polish. Gel rewards patience and thin layers. The moment you rush it with thick coats or guesswork cure times, problems show up quickly.
When to See a Nail Technician or Dermatologist
If the gel repeatedly stays uncured no matter what you change, it is worth seeing a nail technician. A professional can check whether the lamp, product system, or application method is the real issue.
See a dermatologist if you develop redness, itching, swelling, or a rash after using uncured gel or after repeated exposure to the product. Stop using the gel until you get proper advice.
Quick Takeaway
If your gel polish will not cure, the most likely causes are a wrong lamp match, too-thick coats, a cure time that does not fit the product, or poor product compatibility. First confirm whether the finish is only tacky or truly soft. Then test the lamp, the layer thickness, and the product system in that order.
With gel, small changes matter. Thin coats, the right lamp, and the brand’s instructions solve most beginner curing problems.

